Arrange and group objects
Now, you will arrange the symbols in the model.
Procedure
1. Select the adjacent objects CRM system, Find addresses of potential customers and Distribution. To do so, position the mouse pointer to the left of/above the CRM system object, press and hold the left mouse button, and drag the mouse pointer to the right of/below the Distribution object. This completely encloses the adjacent objects CRM system, Find addresses of potential customers and Distribution within the displayed frame. Now release the mouse button. The objects are selected.
2. Click Align >  Align middle in the Start tab bar.
 3. Click Align >  Distribute horizontally.
 4. Activate the Format tab bar and click  Group. You can now move or edit the three grouped objects together only.
 5. Right-click in the model background and select Select > All.
6. Hold down the Ctrl key and successively click the two new occurrences of the Distribution organizational unit. The symbols are now removed from the selection. Release the Ctrl key.
7. Activate the Start tab bar and click Align >  Centered.
 8. Click Align >  Distribute vertically.
 9. Click in the model background to deselect all symbols.
10. Increase the distance between the CRM system application type and the Find addresses of potential customers function. To move the grouped objects separately, you must first ungroup them. Activate the Format tab bar and click Group >  Ungroup.
 11. Right-click in the model background and select Select > All.
12. Hold down the Ctrl key and click CRM system. The object is removed from the selection.
13. Now you can move the selected objects to the right by increments of two gridlines. To do this, hold down the Shift key and press the right arrow key twice. The selected objects are moved in line with the grid steps.
14. Click in the model background to deselect all symbols.
15. Arrange the Distribution object occurrences. Right-click one of the object occurrences and enable Select > Select all of this type. The symbols are selected.
16. Click Align >  Align right.
 17. Click in the model background to deselect all symbols.
18. Hold down the Ctrl key and successively click Find contact person and the Distribution organizational unit placed to the right. The symbols are selected.
19. Click Align >  Align bottom.
 20. Click in the model background to deselect all symbols.
21. Now align the Schedule product presentation objects and the organizational unit Distribution to the right of it along a bottom line.
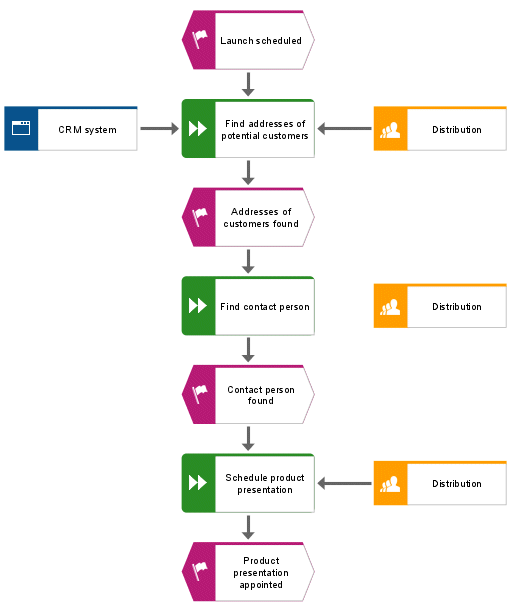
The objects of the model are now arranged as follows:
Tip: |  If your model is no longer fully visible in the model window, reduce the size of the model's appearance. To do this, select the current value in the Size of appearance field of the toolbar and overwrite it with 80, for example. Press the Enter key. To move the model in the model window, right-click in the model background and select Select > Select all. Click anywhere in the selection, hold down the mouse button, and drag the model to the relevant position in the model window. |