Working with the Demo Applications
The Instant Demo
Note:
When using a replay file, it is possible to navigate from one screen
to the next by pressing ENTER in each web screen. Clicking on buttons which
execute paths will work only if the replay file contains the relevant path
navigation recorded and the session screen is in the relevant starting point to
execute the path. If this is not the case, the path will fail and the user will
receive an error from the web application.
When using transformations it is important to notice the order in which the transformations appear in the screen editor (Transformations tab). Transformations can change the way ApplinX perceives a host screen. If, for example, the first transformation hides a certain text on the screen and the second transformation searches for that text pattern in order to replace it with a link then the second transformation will never find a match for that pattern since it has been removed by the first transformation. So always keep in mind, the order of the transformations in the screen editor will be the order in which they will be executed.
template.jsp/template.master
Refer to Customizing the Default Template in the Web Application Development documentation for a detailed explanation on how to change the default template.
-
The host keys relevant for this screen are displayed on the left of the screen. This is defined in the template.jsp/template.master (.NET web apps) file in the host key control. The host key control displays all the host keys for the current host screen. It is possible to define whether they should appear horizontally or vertically , in the form of buttons, links or a pre-defined template (see "gx:GXHostKeysControl" in .NET web apps or "gx:hostKeys" tag in JSP applications). The default host key style is defined in the css/styles_instant.css style sheet in the "gx_hky" class.
-
The Page footer section contains links that perform various actions such as logging off, refreshing the page, submitting a terminal key and so on. These links can be defined in the template.jsp/template.master file (look for "pgfooter" control in the instant demo app).
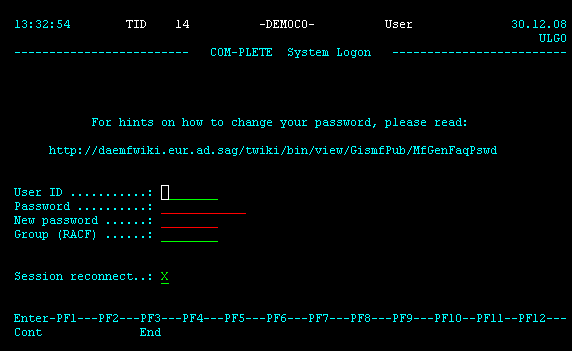
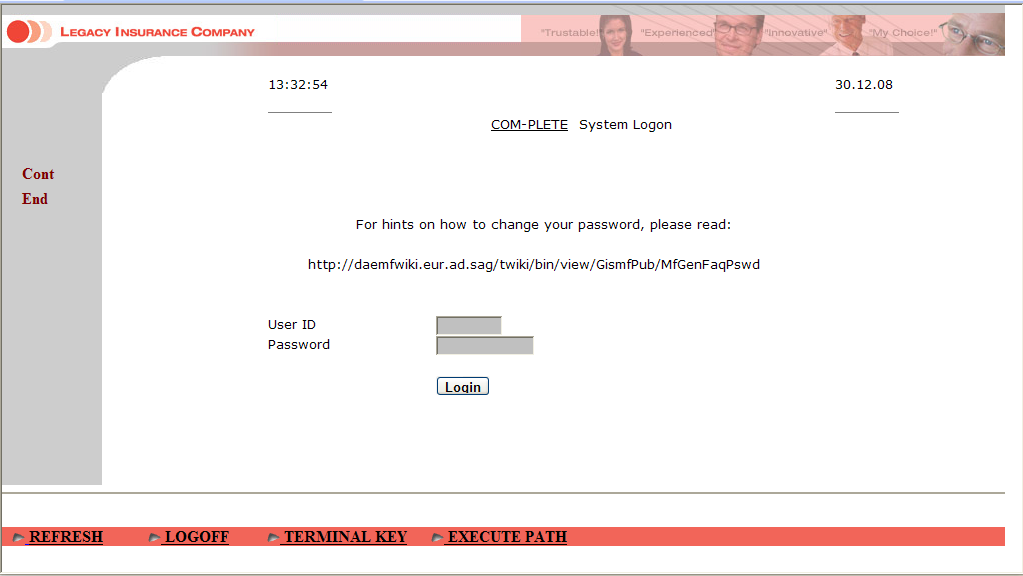
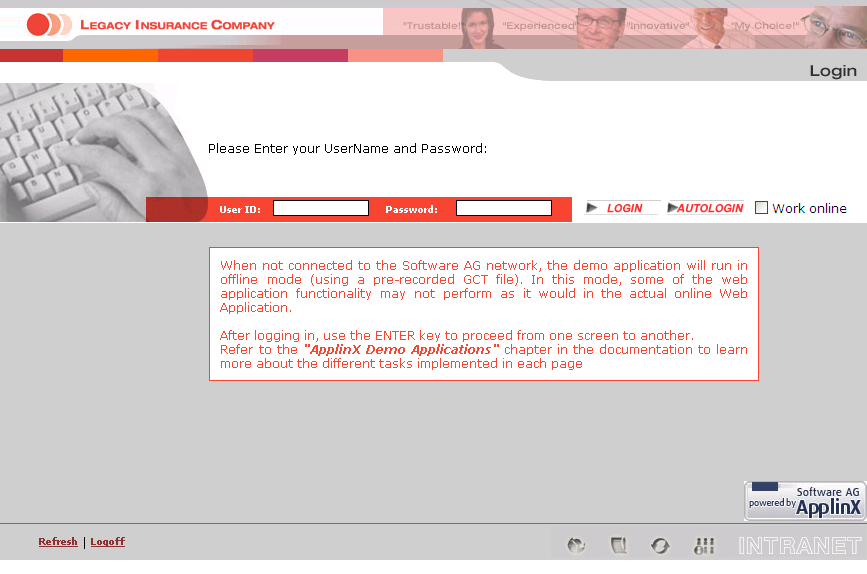
Screen Name: Login
Host Screen
Screen in Web Application
Note:
The sections that are referred to below can be found in the Designing and Developing an Application documentation.
-
Identify the screen using the "-DEMOCO-" and "COM-PLETE System Logon" texts. Refer to Define Identifiers.
-
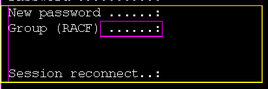
Map the Message, UserID, Password and Reconnect fields. Refer to Map Fields.
-
The "HideTextTODel" transformation hides text in a defined area. Refer to Transforming a Text Pattern to Text and select the "Hide" option.
-
The "RemoveDots" transformation removes dots followed by a colon ("...:"). Refer to Transforming a Text Pattern to Text.
-
The "HideInputField" transformation hides input fields in a defined area. Refer to Transforming an Input Field to a Text Field and select the "Hide" option.
-
The "HideText" transformation hides text in different areas in the screen. Refer to Transforming a Text Pattern to Text and select the "Hide" option.
-
The "DashesToLine" transformation changes all the dashes in the screen to lines. Refer to Transforming a Repeating Characters Pattern to a Line.
-
The "AddLoginButton" transformation adds a button used to login. Clicking on this button executes the "login" path procedure. Refer to Transforming a Text Pattern to a Button.
The "login" path procedure receives the user ID and password as inputs.
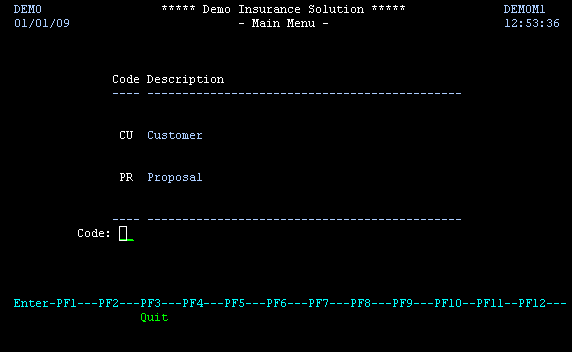
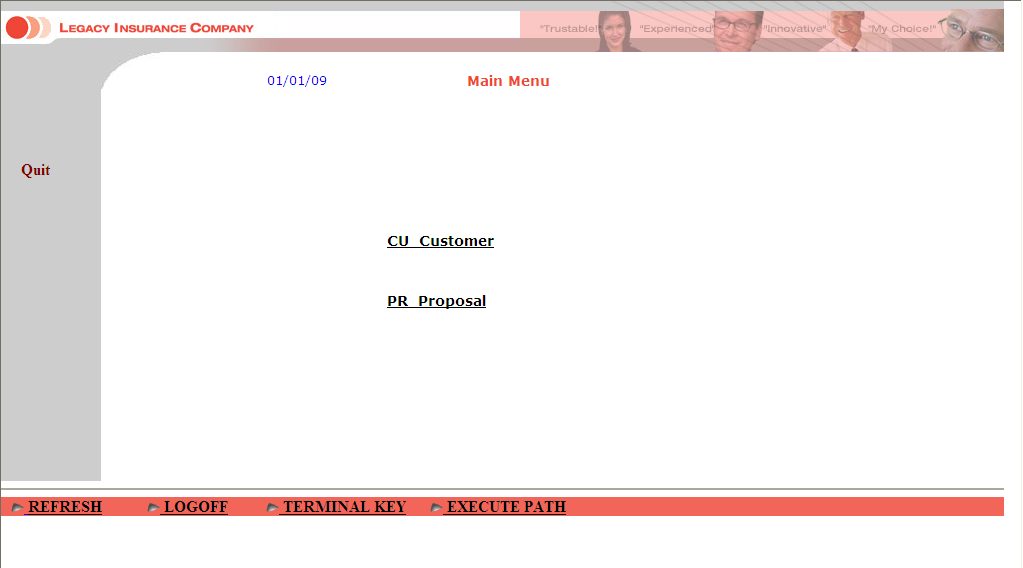
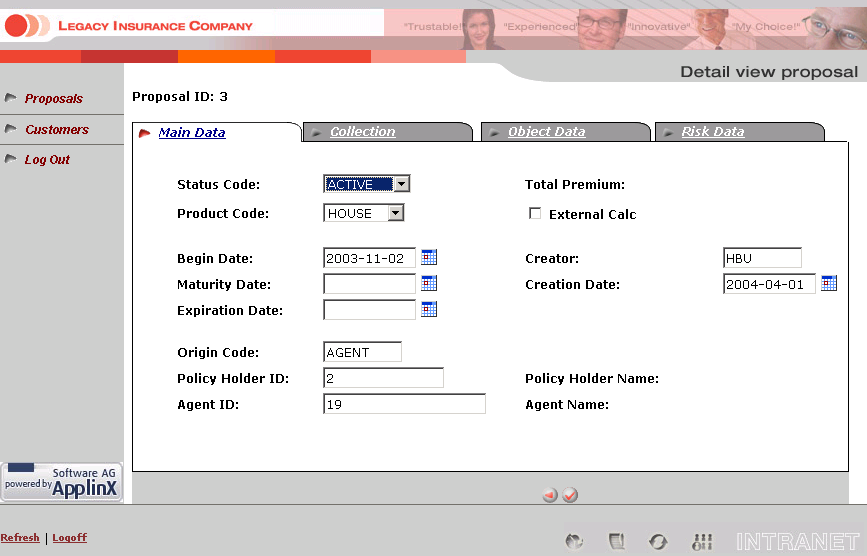
Screen Name: InsuranceMenu
Host Screen
Screen in Web Application
Note:
The sections that are referred to below can be found in the Designing and Developing an Application documentation.
-
Identify the screen using the "DEMO" and "DEMOM" texts. Refer to Define Identifiers.
-
Map the Code, Time and Message fields. Refer to Map Fields.
-
The "CleanMenuScreen" transformation hides text in a number of defined areas in the screen. Refer to Transforming a Text Pattern to Text and select the "Hide" option.
-
The "AllGroup" screen group includes all the screens that include in row 1, column 23 the content "*****Demo Insurance Solution*****". The "AllGroup" screen group includes various transformations:
-
Removing the first line in the screen (the "RemoveFirstLine" transformation). Refer to Transforming a Text Pattern to Text and select the "Hide" option.
-
Formatting the screen name (the "FormatScreenNameHeader" transformation).
-
Removing dots that are followed by a colon "...:" (the "RemoveDots" transformation). Refer to Transforming a Text Pattern to Text.
-
Hiding the time that appears in the top right corner (the "HideText" transformation). Refer to Transforming a Text Pattern to Text and select the "Hide" option.
-
-
The "MenusGroup" screen group includes all screens that include text: "code", and text "menu". This screen group includes a transformation which transforms menus to links (the "MenuToLinks" transformation). Refer to Transforming a Menu to Hyperlinks.
-
Associate the "AllGroup" and "MenusGroup" screen groups to this screen.
-
Refer to the template section above to see how to implement placing the host keys on the left of the screen, and placing buttons in the footer.
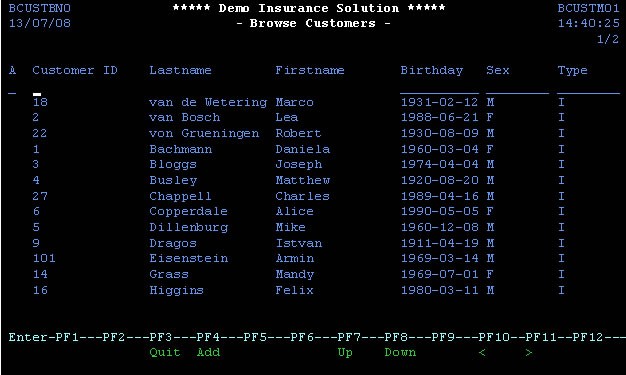
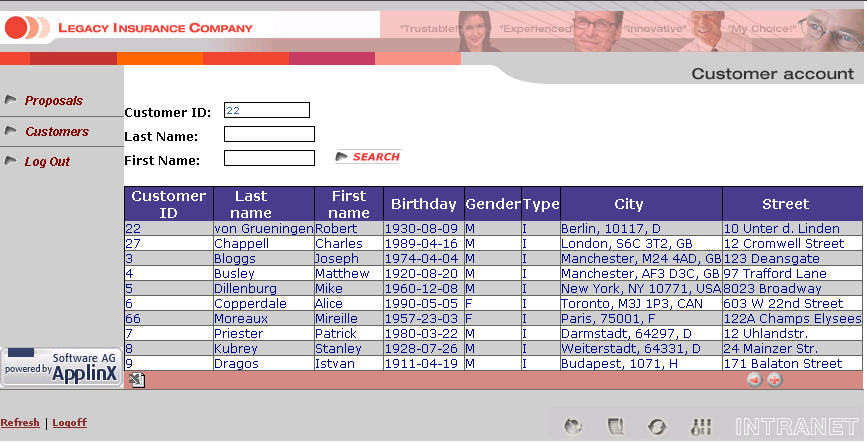
Screen Name: BrowseCustomers
Host Screen
Screen in Web Application

-
Identify the screen using the "BCUSTBN0" and "BCUSTBN1" texts. Refer to Define Identifiers in the Designing and Developing an Application documentation.
-
Refer to the Fields tab to see the mapped fields.
-
Refer to the template section above to see how to implement placing the host keys on the left of the screen, and placing buttons in the footer.
The Composite Demo
Note:
When using a replay file, it is possible to navigate from one screen
to the next by pressing ENTER in each web screen. Clicking on buttons which
execute paths will work only if the replay file contains the relevant path
navigation recorded and the session screen is in the relevant starting point to
execute the path. If this is not the case, the path will fail and the user will
receive an error from the web application.
template.jsp/template.master
Refer to Customizing the Default Template in the Web Application Development documentation for a detailed explanation on how to change the default template.
JSP
In this template we use these panels (that can be overridden by specific pages):
-
CssPanel: holds the css links (has a default in the template).
-
JSPanel: holds the JavaScript code and JavaScript file references.
-
HeaderImagePanel: by design, an image in the top-right corner changes according to the data.
-
MenuPanel: holds the menu that is included in the pages. In some specific pages it is empty, therefore the menu is not displayed.
-
GXPagePlaceHolder: holds the data for the page.
.NET
In this template we use these panels (that can be overridden by specific pages):
-
CssPanel: holds the css links (has a default in the template).
-
JSPanel: holds the JavaScript code and JavaScript file references.
-
HeaderImagePanel: by design, an image in the top-right corner changes according to the data.
-
MenuPanel: holds the menu that is included in the pages. In some specific pages it is empty, therefore the menu is not displayed.
-
GXPagePlaceHolder: holds the data for the page.
Screen Name: Login
Tasks
Refer to the following sections in the Web Application Development documentation:
Screen Name: Browse Proposals
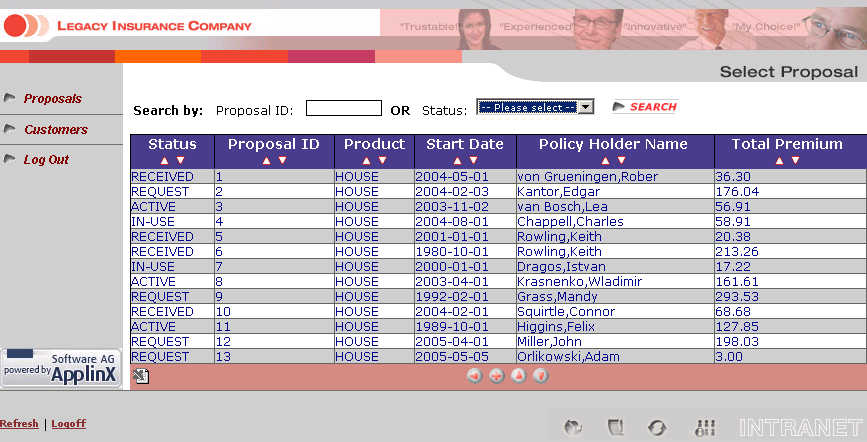
Tasks
Refer to the following sections in the Web Application Development documentation:
Screen Name: ModifyProposal1
Tasks
Refer to the following sections in the Web Application Development documentation:
-
Creating a Button / Hyperlink for Executing a Path Procedure
-
Map Fields (identify dynamic fields by their leading label)
Screen Name: BrowseCustomers1
Tasks
Refer to the following sections in the Web Application Development documentation:
The SOA Demo
.NET and JSP implementation can be done in many ways. This demo includes examples of one way to implement the tasks. For example, in one of the tasks below, we demonstrate how to display data collected by the procedure client. To do this we use the framework. In .NET, this can also be implemented using .NET datagrid.
The following lists the different typical tasks that we have demonstrated in the SOA application included with the ApplinX installation. Next to each task, the entities involved with this task are detailed. This enables you to further explore the configuration of each of these entities.
-
Identify and define host screens in the ApplinX repository. Refer to Screens in the Designing and Developing an Application documentation.
-
INS_Browse_Customers
-
INS_Customer_Details_1
-
INS_Customer_Details_2
-
INS_Customer_Details_3
-
DEMOCO_Login
-
DEMOCO_Menu
-
DEMOCO_Splash
-
E_Environment
-
INS_Menu
-
-
Create a connection pool with a connection information set (for offline use). Refer to Connection Pools and Connection Information Sets in the Designing and Developing an Application documentation.
-
Set the pool size as required.
-
Set a connection information set when required (SOADemo includes connection information sets that allow the application to run in offline mode).
-
Set navigation rules:
-
Create an initialization path for the pool that initializes each new connection in the pool. This path should finish in the "Initial screen", otherwise the initialization will fail.
-
Set the initial screen a connection should wait on.
-
Create and set a recycle path to recycle connections in the pool.
-
Create and set a termination path for properly terminating a connection in the pool. For more information see Defining a Termination Path in the Designing and Developing an Application documentation.
-
As you may have noticed, the SOADemo repository contains three connection pools. This is for the sole reason of enabling the application to retrieve results in offline environments (that do not have connectivity to Software AG's network). All three pools share the same setting (pool size and navigation settings), but differ in their connection information sets. To enable offline execution of the application, each procedure has been executed with its own replay file (set in its connection information set), whereas, online execution requires no replay file at all.
-
-
Collect data from multiple screens. Refer to Collecting Data from Multiple Host Screens in the Web Application Development documentation.
-
Create a path procedure which collects table data (refer to the Browse_All_Customers path procedure). Refer to Creating a Path Procedure in the Designing and Developing an Application documentation.
-
Assign a connection pool to start from the relevant screen.
-
Create a While loop that checks if an "End of data" message appears on the screen, marking the table's end.
-
For every table instance: Collect the tabular host screen data and page down for the next instance.
-
-
Create a path procedure which collect data from multiple screens (refer to the GetCustomerByID path procedure). Refer to Creating a Path Procedure in the Designing and Developing an Application documentation.
-
Assign a connection pool to start from the relevant screen.
-
Add an input to allow the user to specify which customer details they wish to retrieve.
-
Navigate to the Details screens and map host fields to the procedures' output.
-
-
Assign procedures to procedure groups. Refer to Assigning a Procedure to a Procedure Group in the Designing and Developing an Application documentation.
-
Generate a procedure client from the procedure group (refer to DemoINS procedure group in the demo repository). Refer to Procedure Clients in the Designing and Developing an Application documentation.
-
-
Bind web controls to procedure response (output). Refer to Binding Procedure Outputs to an ApplinX Framework Based Web Page in the Designing and Developing an Application documentation.
-
For each procedure, create a JSP/ASPX page with controls which match the procedure output.
-
Fill the form (using gx_fillForm).
-