Business Activity Entity
Business Activity entities are used in the Screen Process Extraction when analyzing trace files. This entity enables defining rules and conditions that are later searched for when analyzing trace files. Once these rules and conditions are met, the relevant information regarding the activity is detailed in an XML file and summarized in a CSV file (located in <application root>\AnalysisSummary directory). The XML file is then used by ARIS PPM to analyze business processes and the CSV file can be reviewed. Debugging information can be found in ApplinX server log.
Note:
The Screen Process Extractor license is required.
This section describes how to define a business activity. A business activity can be defined either in the entity editor or via the session view.
Define a Business Activity Entity using the Session View
![]() To define a business activity entity using the session view:
To define a business activity entity using the session view:
-
Within the relevant ApplinX application, ensure that you are connected to an ApplinX session.
-
Navigate to the first screen where the business activity is to begin.
-
In the Session View, click on the toolbar icon. The toolbar is displayed.
-
Navigate to the screen where you would like to begin and click the Capture Business Activity icon.
-
Click the , and select a Rule. The relevant wizard is displayed. There are four types of rules:
-
Start Rules: The Start rule determines when the activity starts. ApplinX checks the Start rule conditions after every screen related event occurs to determine whether an activity has started. A Start Rule may include:
 Conditions
-
The Current screen and related conditions based on the screen content
-
The Previous screen and related conditions based on the screen content
-
-
Participating Screen Rules: The Participating rule is optional and can be used in the following cases:
-
The user passes through screens (as part of the activity), and you would like to collect data from them.
-
These screens may or may not participate in the activity, but if they do then you may want to collect data from within these screens
-
-
Abort Rules: The Abort rule consists of one or more conditions, which are checked on started activities, after each screen-related event occurs. Once one of the conditions is met, the activity is aborted.
Conditions-
The Current screen and related conditions based on the screen content
-
The Previous screen and related conditions based on the screen content
-
-
Complete Rules: The Complete rule determines when the activity ends. The Complete rule consists of a number of conditions, which are checked on running activities, after each screen-related event occurs. Once the conditions are met, the activity ends.
Conditions-
The Current screen and related conditions based on the screen content
-
The Previous screen and related conditions based on the screen content
-
-
-
Click the icon and select the fields whose value you would like to check.
-
Click the icon and select the relevant fields that you would like to map as outputs.
-
Click the icon. The Start Rule wizard is displayed. The fields you marked to be checked appear in the Screen section.
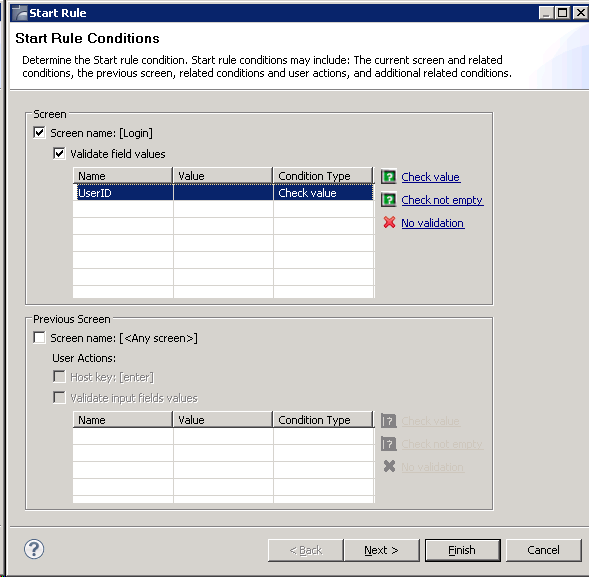
By default the " Check value" condition is selected and when analyzing the file, the field will be checked to see if the value you entered is the value in this field. You can click the link to change the condition type to "Check not empty" or "No validation".
-
In the Previous Screen section, it is possible to define user action conditions for the previous screen, such as the host key used, or input field values.
-
Click . The Output screen is displayed.
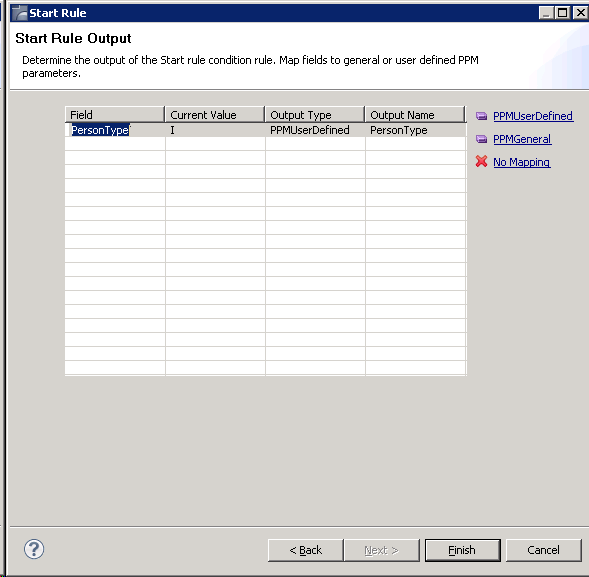
Determine whether the output is to be mapped to a basic PPM output or to a user defined output.
-
Click
-
Click on the icon in the Activity toolbar.
-
-
Enter a name for the entity.
-
Select or enter a process type. The process type must be the same as the process type used in PPM.
Note:
If necessary, the process type can later be changed in the Activity Root node, in the Output tab. -
Click .
-
-
The created entity appears in the tree in the ApplinX Explorer.
Define a Business Activity Entity in the Entity Editor
![]() To define a business activity entity in the entity editor:
To define a business activity entity in the entity editor:
-
Select the relevant application.
-
In the menu select . The New Business Activity wizard is displayed:
-
Enter a name for the entity.
-
Select or enter a process type. The process type must be the same as the process type used in PPM.
Note:
If necessary, the process type can later be changed in the Activity Root node, in the Output tab. -
Click .
-
-
The created entity appears in the tree in the ApplinX Explorer.
-
The work flow structure of the entity may include a Start rule, a Participating rule, an Abort rule and a Complete rule.
-
Start rule
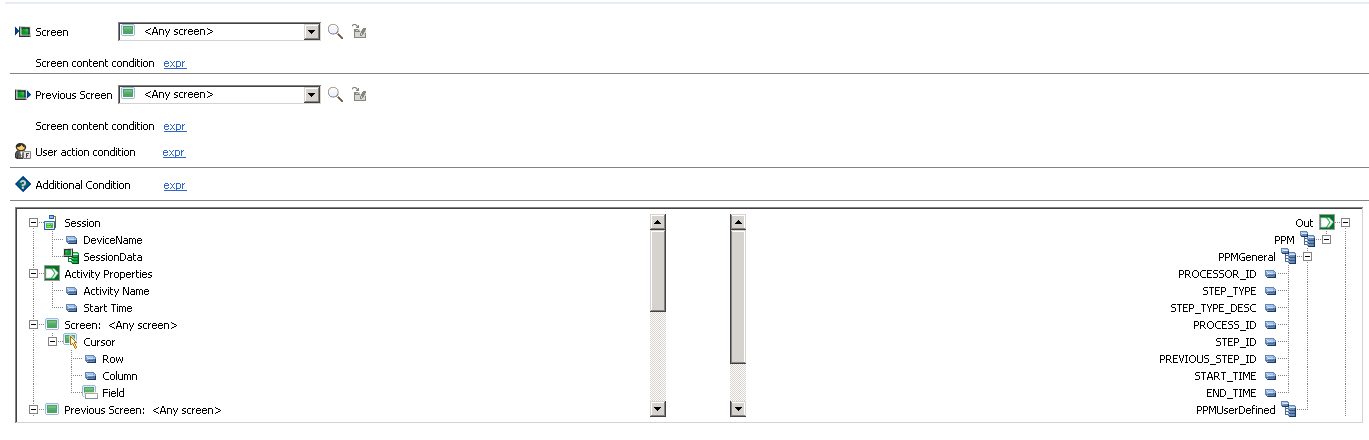
The Start rule determines when the activity starts. ApplinX checks the Start rule conditions after every screen related event occurs to determine whether an activity has started. To create a new Start Rule, drag the Activity Rule node from the "drawers" on the right to the Start Rule container on the left.
A Start rule may include:
Conditions-
The Current screen and related conditions based on the screen content
-
The Previous screen and related conditions based on the screen content
-
User actions - the user inputs' in the previous screen and the host key which performed the action
-
Additional - for any information related to all of the above conditions (Current, Previous screen and User Action)
Note:
A Business activity which does not specify Start Rules, each Complete Rule will be searched from the first screen in the trace file.Note:
Each Start rule must specify at least one condition in the Current or Previous screens. -
-
Participating Screens
The Participating rule is optional and can be used in the following cases:
-
The user passes through screens (as part of the activity), and you would like to collect data from them.
-
These screens may or may not participate in the activity, but if they do then you may want to collect data from within these screens.
To create a new Participating Screen: drag the "Activity Rule" node from the drawers in the right side to the Participating Screen container in the left tree.
-
-
Abort rule
The Abort rule consists of one or more conditions, which are checked on started activities, after each screen-related event occurs. Once one of the conditions is met, the activity is aborted.
To create a new Abort Rule: drag the "Activity Rule" node from the drawers in the right side to the Abort Rule container in the left tree.
Conditions-
The Current screen and related conditions based on the screen content
-
The Previous screen and related conditions based on the screen content
-
User actions - the user inputs' in the previous screen and the host key which performed the action
-
Additional - for any information related to all of the above conditions (Current, Previous screen and User Action)
Note:
Each Abort rule must specify at least one condition in the Current or Previous screens. -
-
Complete rule
The Complete rule determines when the activity ends. The Complete rule consists of a number of conditions, which are checked on running activities, after each screen-related event occurs. Once the conditions are met, the activity ends. A Complete rule may include:
Conditions-
The Current screen and related conditions based on the screen content
-
The Previous screen and related conditions based on the screen content
-
User actions - the user inputs' in the previous screen and the host key which performed the action
-
Additional - for any information related to all of the above conditions (Current, Previous screen and User Action)
Note:
Each Complete rule must specify at least one condition in the Current or Previous screens. -
-
-
Outputs: For each Rule, you can map the condition's outputs to the output of the activity. Define outputs and determine whether each output should be mapped to a PPM basic attribute or to a PPM user defined attribute.
Note:
An image of the Activity tree can be saved as a PNG file for later
reference, by right-clicking on the Activity root node, and selecting
.
Examples for Creating a Business Activity from the Session View and from the Business Activity Editor
Example
The following example is demonstrated in the Insurance Demo (using CompositeDemo repository). The object of the activity is to enable the Insurance company track new customers added in the host application.
![]() The Host Application Workflow (Original Workflow)
The Host Application Workflow (Original Workflow)
-
From within the BrowseCustomers1 screen, the user presses PF4 to initiate the process of creating a new customer.
-
The CreateCustomer1 screen is displayed and the messages "Enter new record" appears at the bottom of the screen.
-
The user enters information in the relevant input fields in the screen and presses PF9 to confirm the entries.
-
The BrowseCustomers1 screen is then displayed and the message "Customer added successfully" appears at the bottom of the screen.
Guidelines for creating a suitable activity:
Looking at the host application workflow, we can assess that when creating a new customer, the user will inevitability pass through the CreateCustomer1 screen, and the message "Enter new record" will appear at the bottom of this screen. These conditions are to be defined as the Start Rule of the activity.
The activity that we are trying to identify will be defined as completed when we reach the BrowseCustomers1 screen and the message "Customer added successfully" appears at the bottom of the screen. Therefore this is what should be defined in the Complete rule.
An activity can be created either in the entity editor or via the Session View. Follow the steps below to demonstrate how to implement the activity in each of these options.
![]() Creating the Activity using the Session view Activity Toolbar
Creating the Activity using the Session view Activity Toolbar
-
Ensure that you are connected to an ApplinX session.
-
From within BrowseCustomers1, navigate to CreateCustomer1 by pressing on .
-
In the Session View, click on the toolbar icon. The toolbar is displayed.
-
Click the icon.
-
Define the Start Rule:
-
Click the , and select .
-
Click the icon.
-
Click the field named "Message" (towards the bottom of the screen). The "Enter new record" string is currently displayed in this field.
-
Click the icon. The Start Rule wizard is displayed. The condition appears in the Screen section.
-
Click
-
-
Define the Complete Rule
-
Click the , and select .
-
Click the icon.
-
Click the field named "Message" (towards the bottom of the screen). The "Customer added successfully" string is currently displayed in this field.
-
Click the icon to define relevant outputs.
-
Click the CustomerID field to highlight it.
-
Click the icon. The Complete Rule wizard is displayed. The condition appears in the Screen section.
-
Click . The Complete Rule Output screen is displayed.
-
Click on the relevant link to determine whether CustomerID is to be a user defined output or one of the PPM predefined outputs.
-
Click
-
Click the icon. A screen is displayed where you are required to enter a name for the activity. Click
-
![]() Creating the Activity using the Editor
Creating the Activity using the Editor
-
Ensure that you are connected to an ApplinX session.
-
From within BrowseCustomers1, navigate to CreateCustomer11 by pressing on .
-
Right click the repository and select .
-
Enter a name for the entity and select/type the process type name. Click
-
Define a Start Rule:
-
Drag an Activity condition and drop it on the Start node. A Start rule is added to the Start node.
-
In the Start Rule details area at the bottom of the screen, select CreateCustomers1 as the screen.
-
Click the Condition link and select .
-
Set the Test screen content expression condition to check if the Message field contains the text "Enter new record".
-
-
Define the Complete rule.
-
Navigate to the last screen in the session view (the BrowseCustomers1 screen with the message "Customer added successfully" at the bottom of the screen).
-
Drag an Activity condition and drop it on the Complete node. A Complete rule is added to the Complete node.
-
Select CreateCustomers1 as the Previous screen.
-
Depending on whether you want the CustomerID field to be defined as one of the PPM general outputs or a PPM user-defined output, either drag the CustomerID field to one of the PPM general outputs OR create a new PPM user-defined output and drag CustomerID to it. Select BrowseCustomers1 as the screen.
-
Click the Condition link and select .
-
Set the Test screen content expression condition to check if the Message field contains the text "Customer added successfully".
-
-
Save the Activity.