Block category | Icons | Description | ||
Applications | Displays the Applications available in Integration Cloud. | |||
Services | Use the Service blocks (date, math, string, and so on) to specify the service that will be invoked at run time. Related services are grouped in blocks. You can sequence services and manage the flow of data among them.
| |||
Integrations | Displays the list of Integrations created in Integration Cloud. You can invoke an Integration from another Integration. When copying integrations from one stage to another, all the referred Integrations and their dependents will also be copied. Click the | |||
Control Flow | Conditional expressions, looping structures, and transform pipeline. Conditional expressions perform different computations or actions depending on whether a specified boolean condition evaluates to true or false.The if-then block is used to evaluate a boolean condition and if the condition is true, the statements following the “then” are executed. Otherwise, the execution continues in “else” if you have selected the if-then-else block. You can implement error handling by using the try-catch block. Loops execute a set of steps multiple times based on the block you have chosen. It repeats a sequence of child steps once for each element in an array that you specify. For example, if your pipeline contains an array of purchase-order line items, you could use a Loop to process each line item in the array. Loop requires you to specify an input array that contains the individual elements that will be used as input to one or more steps in the Loop. At run time, the Loop executes one pass of the loop for each member in the specified array. For example, if you want to execute a Loop for each line item stored in a purchase order, you would use the document list in which the order’s line items are stored as the Loop’s input array. while-do loops repeat their bodies while the conditional expression you have provided evaluates to true. do-until loops are similar except that they repeat their bodies until some condition is true. The for-each-do block traverses items in a collection. Unlike other for loop constructs, for-each loops usually maintain no explicit counter: they essentially say “do this to everything in this set”, rather than “do this x times”. | |||
A Loop takes as input an array field that is in the pipeline. It loops over the members of an input array, executing its child steps each time through the loop. For example, if you have a Integration that takes a string as input and a string list in the pipeline, use Loops to invoke the Integration one time for each string in the string list. You identify a single array field to use as input when you set the properties for the Loop. You can also designate a single field for the output. Loop collects an output value each time it runs through the loop and creates an output array that contains the collected output values. Use the Transform Pipeline block to make pipeline modifications. See Pipeline and Signatures for more information. | ||||
Expressions | Logical operations, comparisons, and values. The six comparison operators are: equal to, not equal to, less than, less than or equal to, greater than, greater than or equal to. Each takes two inputs and returns true or false depending on how the inputs compare with each other. The and block will return true only if both of its two inputs are also true. The or block will return true if either of its two inputs are true. The not block converts its Boolean input into its opposite. You can also type a text value, select a field on which to build an expression, or select a block with no inputs.
|
Note: | You can select a block, other than the root block, and click Duplicate to repeat a block, click Collapse to flatten a block, click Delete to remove a block from the workspace, or click Disable to disable a block and all blocks within that block. If you disable blocks, those blocks will not be considered for execution, test, or debug operations. You can also click Test to test the Integration execution in real time and view the execution results in the Test Results pane. |
Icons | Applicable for... | Action/Description |
All blocks. | Add or edit the description of a block. Comments for all blocks. | |
Application. | Map the input of the operation from the Pipeline and also map the output of the operation into the pipeline. | |
Transform Pipeline. | Make pipeline modifications. Edit data mapping, Set Transformer, Set a value, Remove a field, Restore a field, Add a field, Clear all mappings, and so on. | |
Application. | Select an Account and an Operation for the Application. | |
Orchestrated Integrations. | Click to view or modify an Orchestrated Integration after it is moved to the workspace. The Orchestrated Integration will open up for editing in a new tab. | |
Application/Service. | The block is not configured. Select an Account and an Operation for the Application or select a Service. | |
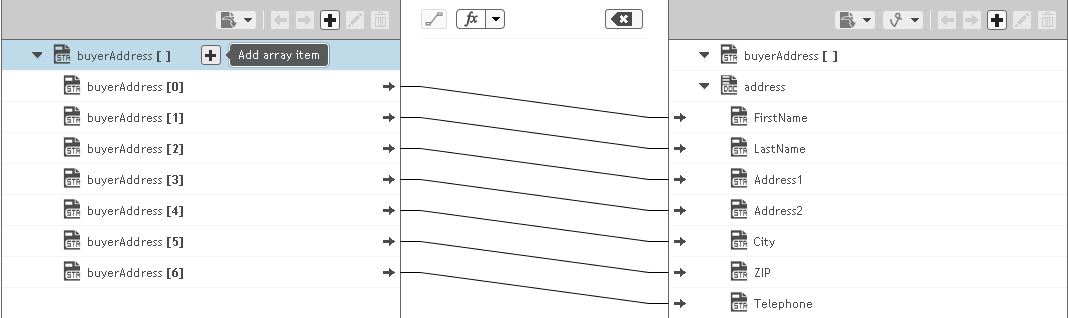
Start/End Integration block | Click to define the input/output signature of an Integration. You can declare the input and output parameters for an Integration using the Input and Output tabs. Input and output parameters are the names and types of fields that the Integration requires as input and generates as output. These parameters are also collectively referred to as a signature. For example, an Integration can take two string values, an account number (AcctNum ) and a dollar amount (OrderTotal ) as inputs and produces an authorization code (AuthCode ) as the output. On the Output tab, specify the fields that you want the Integration to return. You can use a Document Type to define the input or output parameters for an Integration. If you have multiple Integrations with identical input parameters but different output parameters, you can use a Document Type to define the input parameters rather than manually specifying individual input fields for each Integration. When you assign a Document Type to the Input or Output side, you cannot add, modify, or delete the fields on that part of the tab. | |
You can select a Document Type from the Document Reference drop down list. To create a Document Type, from the Integration Cloud navigation bar, select Develop > Document Types > Add New Document Type. You can create pipeline variables as document references, create document types comprising of document references, and also define the signature of Integrations comprising of document references. See Document Types for more information. | ||
Orchestrated Integrations. | An Orchestrated Integration has been modified but not saved. |
If you link… | To… | Then… |
A scalar variable | An array variable that is empty (the variable does not have a defined length) | The link defines the length of the array variable; that is, it contains one element and has length of one. The first (and only) element in the array is assigned the value of the scalar variable. |
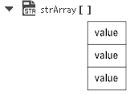
If you link… | To… | Then… |
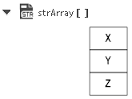
A scalar variable | An array variable with a defined length | The length of the array is preserved and each element of the array is assigned the value of the scalar variable. |
 |  | |
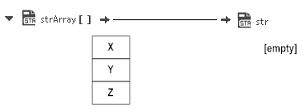
If you link… | To… | Then… |
An array variable | A scalar variable | The scalar variable is assigned the first element in the array. |
 | ||
If you link… | To… | Then… |
An array variable | An array variable that does not have a defined length | The link defines the length of the target array variable; that is, it will be the same length as the source array variable. The elements in the target array variable are assigned the values of the corresponding elements in the source array variable. |
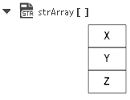 | ||
If you link… | To… | Then… |
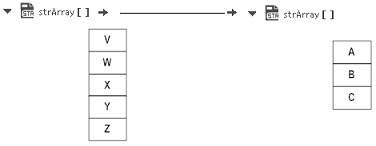
An array variable | An array variable that has a defined length | The length of the source array variable must equal the length of the target array variable. If the lengths do not match, the link will not occur. If the lengths are equal, the elements in the target array variable are assigned the values of the corresponding elements in the source array variable. |
 | ||
 | No link occurs. | |
If you link… | To… |
Where the value of DocumentList1 is... | Then the value of StringList1 is… |
 |
