
A new host may be defined either in the process of creating a new application (refer to Creating a New Application) or simply as an addition host in the host node.
![]() To create a new host
To create a new host
In the ApplinX Explorer, right-click on the Host node and choose . The New Host wizard is displayed.
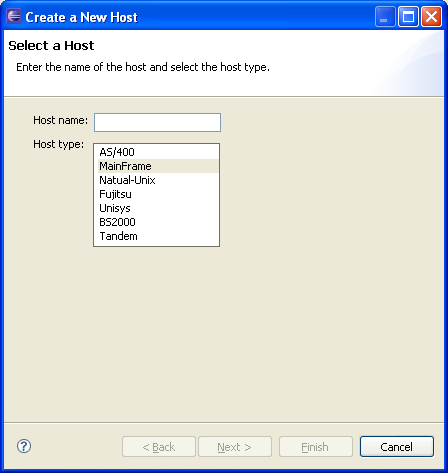
Enter a name for the host and select a host type. Click .
Set the connection and conversion parameters, which may differ according to the host type. Click . Refer to Host Configuration Parameters for further details.
To delete a host, in the ApplinX Explorer, right-click on the relevant host and choose . Confirm this action.
To edit the current host configuration, in the ApplinX Explorer, right-click on the relevant host and choose . The Host Properties' are displayed.
After defining an AS/400 host, open the host's properties (right-click on the host in the ApplinX Explorer and choose ), and in the RPC tab configure the parameters.
Standard UNIX protocols lack information required for extensive integration into modern environments. Natural-UNIX, a proprietary protocol of Software AG, provides you with this additional information, and it is therefore recommended to be used with all Natural applications that run on UNIX machines.
Refer to Natural-UNIX Installation for installation details.
![]() To configure a Natural-UNIX host
To configure a Natural-UNIX host
Create and access the Host dialog box as detailed in Adding a Host Definition.
Configure the new host: enter a name, IP address (IPv4 and IPv6 address formats are supported), port and service (optional - limited to 24 characters). In the Device type field, choose "Natural-Unix". Select "Natural-APX" (or "Natural-NSW" for Natural versions prior to Natural version 6.2.5 and 6.3.2 ). Configure the relevant parameters.
There are applications which require entering a user name and password. Click on the Security tab. Enter the default User name and Password (both fields are limited to 24 characters). You can override these settings, either when connecting to a session (in the Connection Properties dialog box, Host user name and Host password fields), or using the Framework/Base Object code or enabling users to dynamically provide a user name and password in the framework login page (refer to the Framework Developer's Guide, General Application Customization, Using a Login Page).
Note:
The Application Properties>Windows tab will be disabled, as
window's definitions are included in the Natural-UNIX protocol and do not
require being defined via ApplinX.
Secure Shell (SSH), sometimes known as Secure Socket Shell, is a command interface and protocol for securely getting access to a remote computer. It is widely used by network administrators to control Web and other kinds of servers remotely. SSH commands are encrypted and secure in several ways: both ends of the client/server connection are authenticated using a digital certificate, and passwords are protected by being encrypted. SSH uses RSA public key cryptography for both connection and authentication.
ApplinX supports the SSH Password authentication method. This means the user needs to enter his/her SSH user ID and SSH password in order to establish an SSH connection. This should be done when connecting through the display session configuration, connection pool, Base Object or ApplinX Web Application.
Note:
This is applicable only when using a Unisys host.
It is possible to configure a host to use SSH connection. In the Host Properties dialog box, Security tab, check the option "Connect using SSH". Change the host port to the host port used for SSH connectivity (the default host port used for SSH connectivity is normally 22).
There are fields or screens that their input, whether uppercase or lowercase, is automatically uppercased by the host after receiving it from the user. Therefore, these screens should be configured in ApplinX to have their input fields contents uppercased before being sent to the host, otherwise ApplinX Server will not handle them correctly.
There are three options for doing this:
You can add some code for uppercasing the relevant fields before sending them to ApplinX Server.
For specific screens, use the following application parameter in the Base Object: GX_APPLICATION_PARM_UPPERCASE_INPUT, "true" (or "false") (For information regarding the usage of application parameters, refer to the Base Object documentation).
In the Host Configuration dialog box, check the check box Uppercase input. This will convert to uppercase all fields sent to the host. This configuration may be overridden for specific screens using the application parameter described in the previous section.
SSL connection is used to ensure a secure connection between the ApplinX server and the remote host. Connecting using SSL V3 enables encrypting all the traffic between the server and the host and requires the server to present proof of identity (server authentication).
Note:
This can be used in any block mode host, however this has only been
tested on a 3270 Mainframe host.
![]() To define the SSL connection
To define the SSL connection
In ApplinX, enable the SSL Connection option for the specific host (access the Host Properties dialog box of the relevant host, and in the Security tab check the Use SSL connection to host check box).
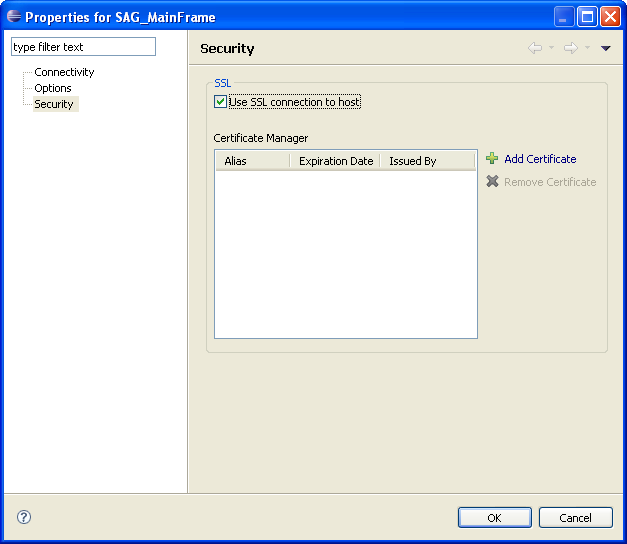
Add a valid X509 certificate to connect to the SSL enabled host.
Refer to SSL Cipher Suites Supported by ApplinX.
In the Host Properties dialog box, set the RPC parameters. Refer to RPC Parameters for details.
This feature is available in SOA applications only.