A Hello World Pluggable View Class
The library for each pluggable view must contain a class that implements or uses theMashZone NextGenViews API for:

Optionally, a method to update the view.
A method to render a configuration input fields used in one step in the
MashZone NextGen View Maker wizard. These inputs collects configuration information when users add or edit views for mashables or mashups based on this pluggable view. See
Support Configuration for a Pluggable View for an example.
A method to collect user entries for view configuration.
An optional method to validate user configuration entries.
For the complete hello world sample, see
A Hello World Pluggable View Class.
Pluggable View Constructor
In this example, we start the class for this pluggable view as a self-invoking function to implement the view in a closure and associate the $ method with jQuery for this view. (This is not a requirement for pluggable views, just one possible design choice.)
(function($){
//set id and namespace
//constructor
//register view
}(jQuery));
The class has three parts: setting basic properties (the ID and namespace), defining the constructor and view implementation, and registering the view.
Initial setup defines the ID for this view library which generally should match the root folder name for the library. It also creates a namespace for this pluggable view using the Presto.namespace method.
Tip: | Defining pluggable view classes in your own namespace prevents potential conflicts with other JavaScript libraries. |
(function($){
var id="hello-world";
Presto.namespace("Sample.view");
//constructor
//register view
}(jQuery));
Next we add the constructor as a method defined in the namespace for this class. The constructor’s signature is view-class-name(selector, dataTable, [config]):
(function($){
var id="hello-world";
Presto.namespace("Sample.view");
Sample.view.HelloWorld = function(selector, dataTable, config) {
};
//register view
}(jQuery));
The selector parameter identifies the view container - the node in the containing app or page where this view will be rendered. This can be a CSS selector pointing to the node or it can be a DOM node.
The actual data and data model that the view will use is passed in the dataTable parameter. This is a MashZone NextGen DataTable object. See theMashZone NextGenDataTable API for more information.
The last parameter, config, is an optional object with configuration properties for this view with this mashable or mashup. This is the configuration that users set when they add views or edit them in MashZone NextGen Hub.
Lastly, we initialize some variables and properties and make sure the selector is a jQuery node for easy access later:
(function($){
var id="hello-world";
Presto.namespace("Sample.view");
Sample.view.HelloWorld = function(selector, dataTable, config) {
config = config || {};
var self = this, el = $(selector);
self.config = config;
//draw method
//update method
//showConfig method
//getConfig method
//validate method
};
//register view
}(jQuery));
In this example constructor, we will also implement methods from the View API to render the view and to allow users to configure the view. See
Render the Pluggable View and
Support Configuration for a Pluggable View.
Render the Pluggable View
To render the view, pluggable view libraries:
Must implement
draw(dataTable, [config]) to render the view initially.
Can optionally implement
update(dataTable, [config]) to render the view when there are updates to the
dataTable (the data or model) or other events.
For this example, the view is a single HTML <div> element with one dynamic value for the name to add to the greeting. The value to render is defined as a property in the config parameter object, from user configuration for the view, rather than from mashable or mashup results that are normally passed in the dataTable parameter.
(function($){
var id="hello-world";
Presto.namespace("Sample.view");
Sample.view.HelloWorld = function(selector, dataTable, config) {
config = config || {};
var self = this, el = $(selector);
self.config = config;
self.draw = function(dataTable, config){
el.html('<div
><p>Hello ' + config.greeting + '</p></div>');
};
self.update = function(dataTable, options){
el.html('<div
><p>Hello ' + config.greeting + '</p></div>');
};
//showConfig method
//getConfig method
//validate method
};
//register view
}(jQuery));
Support Configuration for a Pluggable View
In almost all cases, pluggable views will have configuration information that users must set to enable the view to render results from specific mashables or mashups. Configuration may also include specific visual aspects to optimize the view.
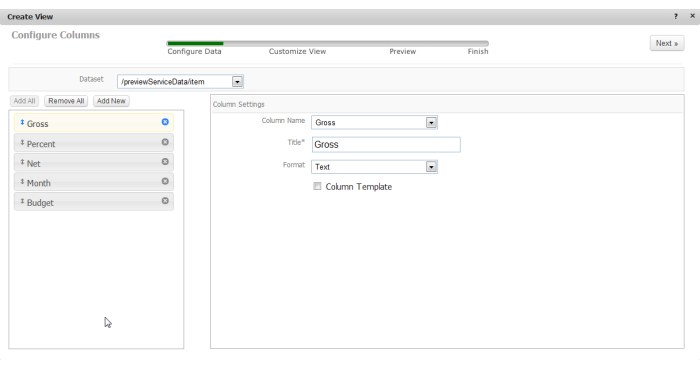
To complete view configuration in the MashZone NextGen View Maker wizard
1. Data configuration is provided automatically by the View Maker wizard to let users determine the dataset to use in the view, delete columns of no interest for this view and handle other common configuration for specific columns.
2. View configuration specific to this pluggable view is provided by the pluggable view implementation class using the showConfig(dataTable, selector, config) to render input fields and getConfig() methods to retrieve user entries. You can also optionally implement the validate() method to validate user configuration.
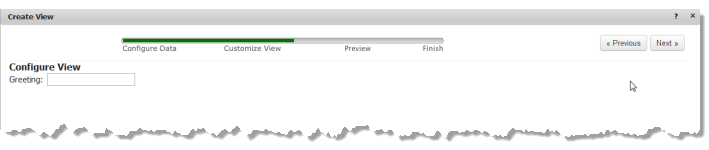
For this Hello World pluggable view, configuration inputs look like this:
3. Preview is provided automatically by the View Maker wizard with a rendering of the view based on the current data and configuration.
4. Finish is provided automatically by the View Maker wizard to allow users to name and save the view.
The showConfig method defines the input fields that users complete in the View Configuration step of the View Maker wizard and also makes sure that any existing configuration for properties fills these fields when users edit existing views.
For Hello World, this is a single input field where users enter a name for the greeting:
...
Sample.view.HelloWorld = function(selector, dataTable, config) {
...
self.showConfig = function(dataTable, selector, config){
self.form = $(selector).html('<div>Greeting: <input type="text" name="greeting" /></div>');
self.form.find('input[name=greeting]').val(config.greeting || self.config.greeting || '');
};
//getConfig method
//validate method
};
//register view
}(jQuery));
The selector parameter is either a CSS selector or the DOM node where this form is rendered in the View Maker wizard. The dataTable parameter is both the data and the data model for the current mashable or mashup.
The final parameter, config, is the configuration object that is updated with user configuration choices for this view.
Important: | Since users can edit existing views with existing configuration as well as users moving back through previous steps in the wizard when they add views, the showConfig method must support the case where values may already exist in the config parameter for each configuration field. |
The View Maker wizard uses the getConfig method to populate the configuration object for the view with user entries from these fields when users click the Next button to move to Preview.
...
Sample.view.HelloWorld = function(selector, dataTable, config) {
...
self.showConfig = function(dataTable, selector, config){
self.form = $(selector).html('<div>Greeting: <input type="text" name="greeting" /></div>');
self.form.find('input[name=greeting]').val(config.greeting || self.config.greeting || '');
};
self.getConfig = function(){
if(self.form){
self.config.greeting = self.form.find('input[name=greeting]').val();
}
return self.config;
};
//validate method
};
//register view
}(jQuery));
If the validate method is also defined, the View Maker wizard validates the user entries before calling getConfig.
...
Sample.view.HelloWorld = function(selector, dataTable, config) {
...
self.showConfig = function(dataTable, selector, config){
self.form = $(selector).html('<div>Greeting: <input type="text" name="greeting" /></div>');
self.form.find('input[name=greeting]').val(config.greeting || self.config.greeting || '');
};
self.getConfig = function(){
if(self.form){
self.config.greeting = self.form.find('input[name=greeting]').val();
}
return self.config;
};
self.validate = function(){
var config = self.getConfig();
return config.greeting ? true : false;
};
};
//register view
}(jQuery));
Register this Pluggable View
Once the constructor and view class implementation is done, the last step is to use the Presto.view.register(viewConfig) method in the MashZone NextGen View API to make the pluggable view visible in the MashZone NextGen View framework:
(function($){
var id="hello-world";
Presto.namespace("Sample.view");
Sample.view.HelloWorld = function(selector, dataTable, options) {
...
};
Presto.view.register({
cls: Sample.view.HelloWorld,
lib: id
});
}(jQuery));
The configuration object for this method contains two properties to identify the view library ID and the name of the implementation class.
Complete Sample.view.HelloWorld Pluggable View Class
(function($){
var id="hello-world";
Presto.namespace("Sample.view");
Sample.view.HelloWorld = function(selector, dataTable, config) {
config = config || {};
var self = this, el = $(selector);
self.config = config;
self.draw = function(dataTable, config){
el.html('<div
><p>Hello ' + config.greeting + '</p></div>');
};
self.update = function(dataTable, options){
el.html('<div
><p>Hello ' + config.greeting + '</p></div>');
};
self.showConfig = function(dataTable, selector, config){
self.form = $(selector).html('<div>Greeting: <input type="text" name="greeting" /></div>');
self.form.find('input[name=greeting]').val(config.greeting || self.config.greeting || '');
};
self.getConfig = function(){
if(self.form){
self.config.greeting = self.form.find('input[name=greeting]').val();
}
return self.config;
};
self.validate = function(){
var config = self.getConfig();
return config.greeting ? true : false;
};
};
Presto.view.register({
cls: Sample.view.HelloWorld,
lib: id
});
}(jQuery));