This document describes the Web Services Stack basic tool for packaging, configuring, and deploying web service archives.
The information is organized under the following headings:
The Packaging and Configuration Eclipse plug-in provides a graphical user interface that you can use to do the following:
Create web service archives
Configure web service archives in various ways (including advanced configurations like addressing, security, transactional behavior, and others)
Deploy web service archives to the Web Services Stack runtime
Register web service archive in CentraSite
The Web Services Stack installation installs the Eclipse plug-in by default with webMethods Designer. If you want to use your own installation of Eclipse 3.4 SP2, you must first install the plug-in with the Installer.
These archives are located under SoftwareAG\webMethods\eclipse\updates.
![]() To install the Eclipse plug-in in your own Eclipse installation
To install the Eclipse plug-in in your own Eclipse installation
Open Eclipse.
Go to Help -> Software Updates -> Available Software
Select Add site….
Select Archive.
Browse to the <eclipse\updates> folder of your Web Services Stack installation and select the com.softwareag.common.zip archive inside.
Select Install… and follow the instructions.
Repeat steps 2 through 6 for eclipse.wss.<verison_number>.UpdatePackage.0000.zip.
The version number of the particular update package is a three-digit number which depends on the version of the current installation. You can construct the version number using the version of the release (omitting any periods in the number) and the SP version (using the number of the SP release). For example, if you want to update a Web Services Stack 8.0 SP4 installation, the version number of the update package is 804, and the file name is: eclipse.wss.804.UpdatePackage.0000.zip.
Important:
CentraSite Eclipse plug-in is a prerequisite for the proper
functioning of the CentraSite registration plug-in is.
Following are guidelines on creating (or removing) web service packages with the Eclipse plug-in.
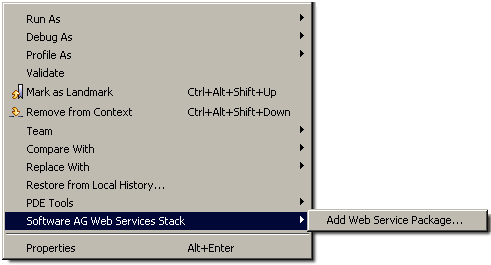
After you have created a new project, Software AG Web Services Stack/ Add Web Service Package appears in the context menu of the Java projects in the Package Explorer view. You use this option to create a new deployment archive and add it to the project.
Note:
One project might have several packages associated with it.
![]() To create a web service package using the Eclipse plug-in wizard
To create a web service package using the Eclipse plug-in wizard
Select Software AG Web Services Stack ->Add Web Service Package...
Specify name and container of the package. By default, the container is the project itself.
Select a service source file. This may be either a WSDL file or Java class.
Important:
The files must be part of the project. External files can not
be added.
Add additional meta-information files. These are files to be included in the package under the meta-inf directory.
Add additional files to be included into the service package. These are files to be included in the package under the root directory.
The archive is created.
![]() To remove a web service package using the wizard
To remove a web service package using the wizard
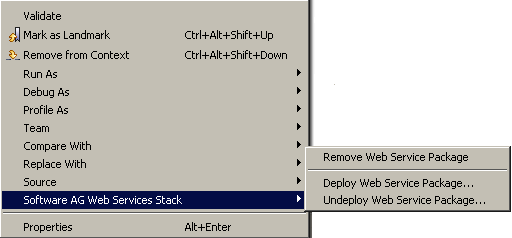
Select Software AG Web Services Stack ->Remove Web Service Package
Note:
This command is valid only for previously added web service
package.
After creating the archive, the editor provides an interface to configure the settings of the package itself, the services, contained in it, and the operations of the services. This imposes three different layouts: archive view, services view, and operation view. The different views appear as different tabs in Web Services Stack. There is one more additional tab that contains a textual view of the services.xml file, but it displays a read-only version of the file that cannot be modified directly.
In the outline view of Eclipse, the package structure is represented in a tree view. The package itself is the root element of the tree; the second level contains the services; the third level contains the operations. Selecting an item changes the view in the editor to the view corresponding to the selected item.
In the archive view, you can add additional files to the root of the package or to the meta-inf directory. You can also add additional Java files (POJOs) that adds additional services to the archive.
In the services view, you can select any of the available services in the archive. After that you can perform various configurations on it:
Add custom description
Add message receivers
Configure the transports on which the service is accessible
Enable and configure the available modules like WS-Addressing, WS-Reliable Messaging, and WS-Security
The available transports are: HTTP, HTTPS, TCP, and JMS transport. If no transport is selected, then all transports that are enabled on the server are available to the service.
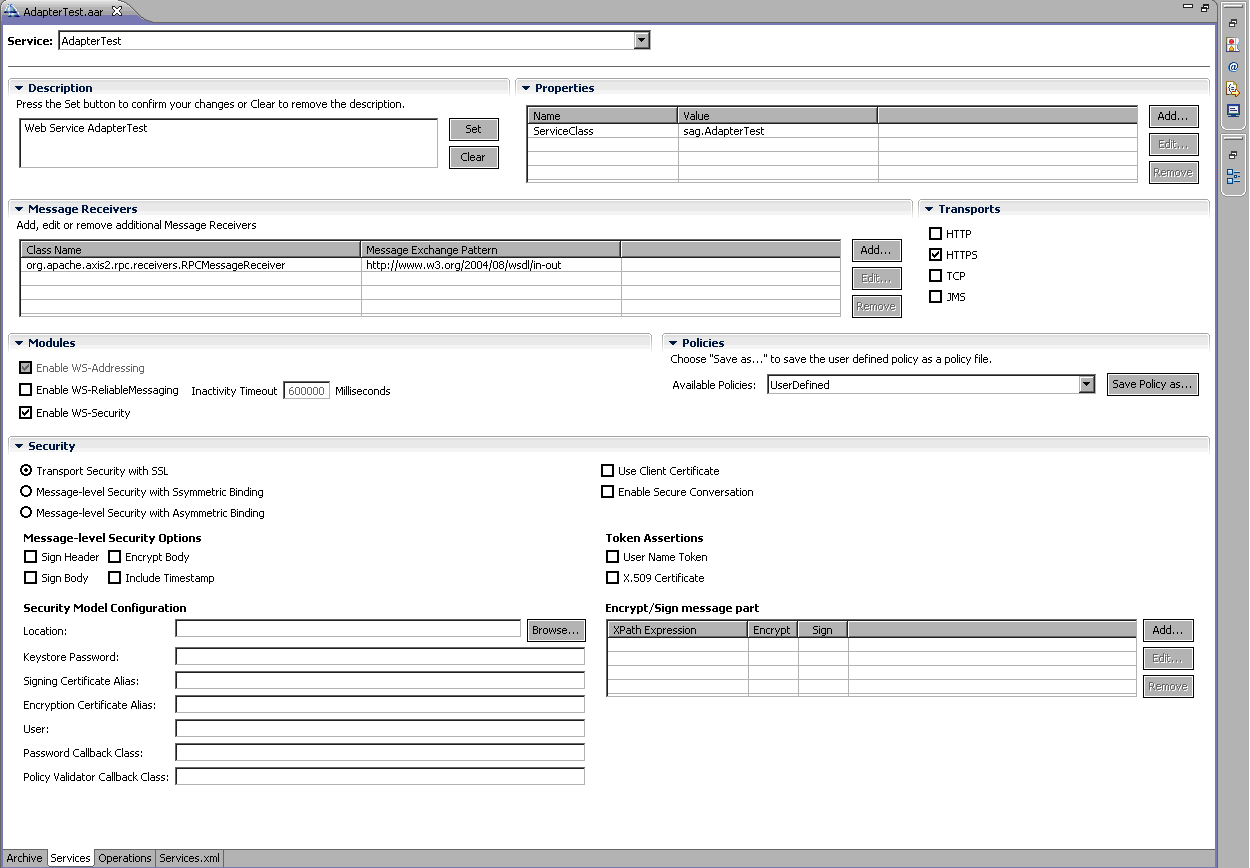
In the operations view, you can select any of the operations in the package by selecting a service from the drop down list and one of its operations. The available configurations on the operation level are:
Setting the message receiver class
Adding parameters
Enabling and configuring service modules
The available policy configurations on a <service> level and on an <operation> level are WS-Addressing, WS-Reliable Messaging, and WS-Security.
By selecting Enable WS-Addressing check box, you enable WS-Addressing module.
When WS-Reliable Messaging is selected, you must provide a value for the inactivity time period that is by default 600 000 milliseconds by default.
By selecting the Enable WS-Security check box, a new
configuration view is opened in the editor. You have three types of security to
choose from: Transport Security (SSL), Message-level Security with symmetric
binding, and Message-level Security with asymmetric binding. When you select
Enable WS-Security check box, Transport Security with SSL and HTTPS transport
are chosen by default. The Addressing module is engaged always when the
Security module is engaged. You must provide a keystore
configuration in the cases of message-level security and a Password
callback class if Authentication with user
name token is selected.
For details on message-level security and transport, see Security.
The keystore configuration includes the location of the server
keystore file, the keystore password,
aliases of the certificates to be used for signing and encryption, user
(default user name for username token and alias of the certificate for signing
if the last is not specified in the corresponding field) and the
password callback class. You can specify a policy
validator callback class to ensure that the security header corresponds to the
policy in the services.xml file. If the class is not
explicitly specified, there is a default policy validator callback class that
is used.
You also have the option to enable standard message security to sign header, sign body, encrypt body, or include timestamp. Else, you can write an XPath expression to encrypt and sign arbitrary parts of the message. For the authentication, you can use either X.509 certificate, or a Username token. You can also choose to engage WS-Secure Conversation.
The other service modules available are WS-Addressing and WS-Reliable Messaging. When WS-Reliable Messaging is selected, you must provide a value for the inactivity time period that is 600 000 milliseconds by default.
With the editor, you can save policy configurations in a file that you can later reuse by choosing the button and load it when needed as saved policy.
When the package is set and configured, it can be deployed to Web Services Stack by choosing in the project context menu.
Important:
The default deploy location of Web Services Stack is "localhost"
(that is, default Web Services Stack running in default Tomcat) at port 49981.
It is recommended that users configure a deploy target with the real hostname
instead of "localhost".
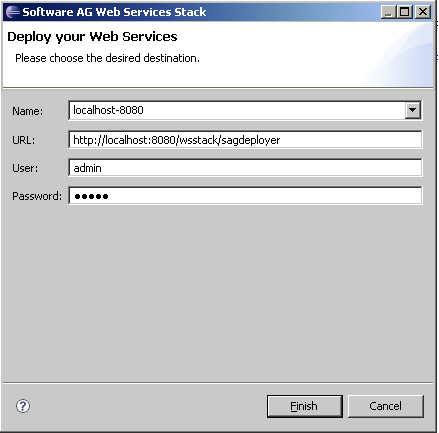
Type in the following information:
The URL of the Web Services Stack deploy servlet
The default servlet is /wsstack/sagdeployer.
The user name and password
These authentication credentials are the same as the credentials for administration that are configured in the axis2.xml file. The default user name is "admin" and the default password is "axis2".
Note:
See Changing Logon
Credentials for details on changing the default user name
and password at first logon.
The default servlet name is /wsstack/sagdeployer.
The context menu of the package has also the Undeploy Web
Services Package command. When it is selected, a window is opened
containing the same required information as for the deploy command.
The Eclipse console provides feedback on the execution of the operations.
Another option from the context menu of the package is to register it in CentraSite. Web Service Stack Eclipse UI provides a context menu on AAR service files to register the service using the JAXR interface to CentraSite. The registration process requires authentication to CentraSite with user name and password credentials. These credentials give access to exactly those Organizations in CentraSite the user is authorized to register service into.
Note:
Create and configure organization with CentraSite tooling. However,
there is always a "Default Organization".
Following is a sample screen capture to illustrate the use of the required parameters for the registration:
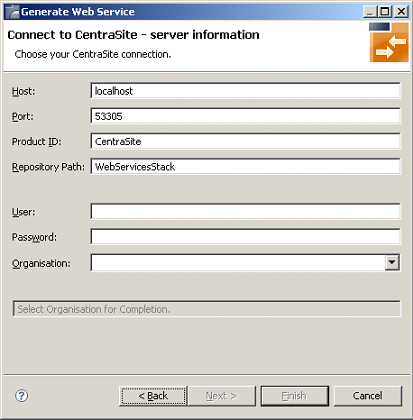
The required parameters are as follows:
Host - the host of the CentraSite instance
Product ID – CentraSite product ID
Port - the port of the CentraSite instance
Repository Path - the path under which the
package is registered
Authentication data like user name, password and organization
Important:
To have the registration functionality available in Eclipse
environment, you must have CentraSite Eclipse plug-ins as a
prerequisite.
Prior to registration, deploy the service in a Web Service Stack runtime. For details, see Deploying and Undeploying a Web Service Package.
The service is registered in the CentraSite Registry via the WSDL.
For details on importing web services, see section User Interface -> Using the Asset Catalog -> Publishing a New Asset into the Catalog -> Adding an Asset to the Catalog Using an Importer -> Importing Web Services in CentraSite documentation at Software AG documentation Web site.
The WSDL and the service archive is stored in the CS Repository.
For details, see User Interface -> Using the Asset Catalog -> Publishing a New Asset into the Catalog -> Adding an Asset to the Catalog Using an Importer -> Importing Web Services in CentraSite documentation at Software AG documentation Web site.
The service object gets an external link to the archive.
For details on storing objects (e.g. service archive, or any other object) in the CentraSite Supporting Document Library, see section User Interface -> Using the Asset Catalog -> Attaching a Supporting Document to an Asset in CentraSite documentation at Software AG documentation Web site.