Data loading is one of the most important features of Tamino. Tamino offers several possibilities to load data: the Tamino Data Loader, the Tamino X-Plorer, and the Tamino Interactive Interface. In the following, you will find a description of use cases for the different tools as well as the prerequisites and advantages, depending on your data loading situation. This section comprises the following topics:
Basically, the Tamino Interactive Interface and the Tamino X-Plorer are best suited for small amounts of data, whereas the Data Loader is used for loading larger amounts of data. Some other criteria for deciding which tool to use for the different data loading situations are listed in the following table:
| Tamino Interactive Interface | Tamino X-Plorer | Tamino Data Loader | |
|---|---|---|---|
| Small amounts of data | + | + | |
| Large amounts of data | + | ||
| Graphical user interface | + | + | + (via Tamino Manager) |
| Performance (for large data volumes) | + | ||
| Wildcard search | + | ||
| Handling of non-XML data | + | + | + |
The Tamino Interactive Interface offers the possibility to load small amounts of data quickly and easily. Use it if your Tamino database is already up and running and you quickly want to add a few small instances of data, or use it for testing or demo purposes. It is not suitable for mass loading data - if you want to load large amounts of data, use the Tamino Data Loader. The reasons why the Interactive Interface is not suitable for mass loading are:
Performance is not the focus of the Interactive Interface, but easy handling of small data sets.
When loading large documents with the Interactive Interface, the timeout limits are quickly reached and the loading process stops.
For detailed information about how to use the Interactive Interface, see the respective documentation.
Another possibility to load small amounts of data is the Tamino X-Plorer. The Tamino X-Plorer offers easy handling of data loading via a navigation tree. You can also load documents that do not have a doctype, as well as non-XML documents (see Use Case 4). For detailed information about how to use the Tamino X-Plorer, see the respective documentation.
Note:
If you load data for demo or test purposes only, it is recommended
not to use too many or too large documents.
The Tamino Data Loader is used to load many documents into Tamino. It does not require a special input format and even offers the possibility of wildcard data selection. You can load several files at the same time, and do not need to convert them to a special format.
The Tamino Data Loader is also used to load large amounts of data into Tamino. Use it if your data has more than just several megabytes. The Tamino Data Loader offers the quickest way to load these data. Also, you have the possibility to start the Data Loader not only via the command line, but with the Tamino Manager and its graphical user interface.
Starting with Tamino Version 4.2, it is possible to load several files without using the special input format, to use wildcards for input file selection, and to use the Data Loader for non-XML files.
If you want to load documents that do not have an XML format into a user collection, for example graphic or word processing files, you can use the Tamino Interactive Interface, the Tamino X-Plorer or the Tamino Data Loader. A special schema is needed in this case. Here is an example of a schema file for non-XML data:
<?xml version="1.0" encoding="UTF-8"?>

<xs:schema
   xmlns:xs  = "http://www.w3.org/2001/XMLSchema"
   xmlns:tsd = "http://namespaces.softwareag.com/tamino/TaminoSchemaDefinition">
   <xs:annotation>
      <xs:appinfo>
         <tsd:schemaInfo name = "abcNonXML">
            <tsd:collection name = "abcNonXML"/>
            <tsd:doctype name = "xyzNonXML">
             	  <tsd:nonXML/>
            </tsd:doctype>
         </tsd:schemaInfo>
      </xs:appinfo>
   </xs:annotation>
</xs:schema>
The decisive element in this schema is
tsd:nonXML. It tells Tamino to load non-XML data
into the collection abcNonXML.
To load the data into Tamino, first define the schema above to Tamino with the help of the Tamino Interactive Interface or the Tamino X-Plorer. The process is described in the respective documentation. The next step is to load the non-XML files into Tamino.
Use the Interactive Interface as follows:
 To load non-XML data into Tamino with the Tamino Interactive
Interface
Start the Tamino Interactive Interface, if you have not already done so.
Choose the Load tab.
Enter the database URL.
Enter the file to be loaded. Use the button to locate the file, if necessary.
Note:
The limitation for document names for non-XML documents is 1004
bytes. The number of possible characters varies, depending on UTF-8 encoding.
If a document name exceeds the limitation, an error message will be displayed
and the document will be rejected.
The entry in the field Into collection is special for non-XML data. Enter the following:
(collection name)/(doctype name)/(document name)
If, for example, you want to load a file named patient.doc with the example schema file above, enter:
abcNonXML/xyzNonXML/patient.doc
The document with ino:docname patient.doc is loaded into Tamino, and you can query for it.
Specifying the document name is optional, but recommended, since it
provides the possibility to query the document via the ino:docname attribute.
Use the function tf:getDocname
to get the document name for the non-XML document element.
The Tamino X-Plorer offers a special dialog box for loading non-XML data. See the X-Plorer documentation, section Working with Instances > Inserting new Instances > From non-XML Files for a detailed description.
If you only have small amounts of data to be loaded and are using the Tamino Interactive Interface or the Tamino X-Plorer, you can ignore this section. If, however, you will be loading large amounts of data into Tamino, some preparations are recommended if you want to further increase data loading performance:
In order to improve the performance for loading large amounts of data into Tamino, you first should check the buffer pool size of your database. If it is lower than 100 MB, increase it to 100 MB. Use the Tamino Manager for this task.
Note:
The value of 100 MB is only a recommendation, gained from
experience. It depends on the data loading situation and is a good starting
point to find the value that best suits your needs.
 To increase the buffer pool size
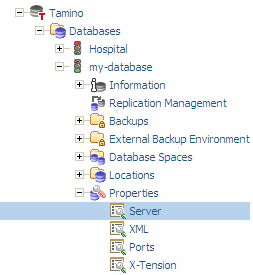
Choose in the Tamino Manager.

The Tamino Server Properties are displayed.
From the context menu, choose the button.
This displays a list of the parameters and their
values. For the property Buffer Pool, the display
could look like this:

Change the value in the Configured Value column for the buffer pool size to 100 MB:
For the changes to take effect, restart the server.
If you are looking for a quick way to load data, take a look at the
corresponding schema and nodes with index properties (tsd:index).
Removing text indexes from the schema reduces data loading time considerably.
If the schema contains several text indexes, delete most of them and only keep
the most important ones:
...
<tsd:index>
...
    <tsd:text>          -> delete!
    </tsd:text>         -> delete!
...
</tsd:index>
...
To do so, you can use the Tamino Schema Editor as follows.
 To remove text indexes from the schema with the Tamino Schema
Editor
Open the Tamino Schema Editor.
Open the schema for your data to be loaded.
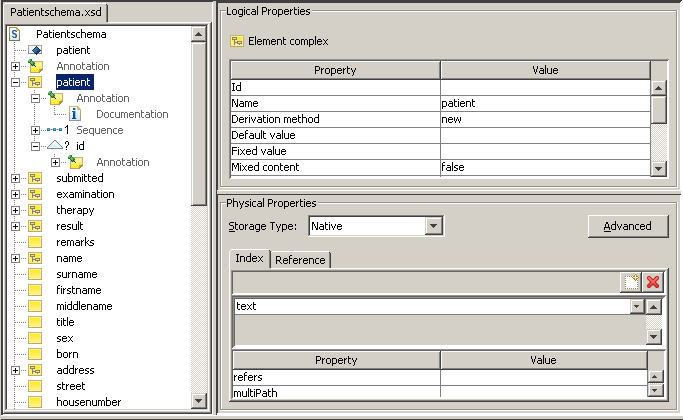
Select a node for which a text index has been defined.
This example shows an element
patient, for which an existing text index shall be
removed:

Remove the text index by choosing the icon.
Repeat these steps for every node that has a text index.
Note that after having deleted text indexes, you should query only those nodes that still have a text index to reduce query time. Alternatively, you can also reactivate the text indexes after the load process by putting them back into your schema. To do so, follow the steps described above, but reverse the process.
If for any reason you do not want to or cannot remove any text indexes,
use the ino:loadlist instead to speed up the data loading process.
Words that are very likely to be used as indexes should be defined in load
lists. This can be done by adding a load list document to your database into
the collection ino:vocabulary. Here is an example:
<?xml version='1.0' encoding='UTF-8'?>

<ino:loadlist ino:loadlistname="myloadlist"
		xmlns:ino="http://namespaces.softwareag.com/tamino/response2">
  <ino:word>jazz</ino:word>
  <ino:word>blues</ino:word>
  <ino:word>swing</ino:word>
  <ino:word>ragtime</ino:word>
</ino:loadlist>
The required schema is already defined in Tamino. It is possible to define several load lists (with different names). When a database is started, Tamino will concatenate all load lists stored in the database and pre-load the words contained in them for the indexing to speed up the loading of documents.
Another possibility to accelerate data loading performance is to prevent the structure index from being built. To do so, enter the following information into your schema:
...
<tsd:structureIndex>none
</tsd:structureIndex>
...
Again, you can use the Tamino Schema Editor as follows.
 To remove the structure index from the schema with the Tamino Schema
Editor
Open the Tamino Schema Editor.
Open the schema for your data to be loaded.
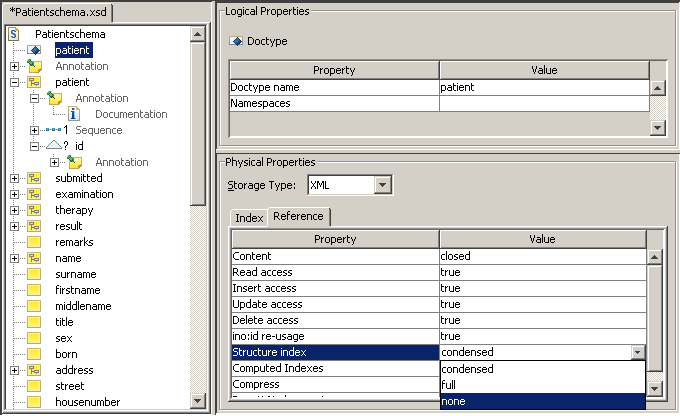
Select the doctype node in the tree view.
This example shows a doctype
patient, for which an existing structure index shall
be removed:

Change the Structure index value under Physical Properties to none.
In this case, the same applies as for the text index: Use queries only for nodes that are part of the schema. Alternatively, you can also reactivate the structure index after the load process by putting it back into your schema. To do so, follow the steps described above, but reverse the process.
When you use the Tamino Data Loader for initial loading, make sure that
you use it without the concurrentwrite option
(which is the default behavior). This will improve performance
considerably.
For subsequent data loading, you may consider switching the
concurrentwrite parameter on, which means that the users
of the database have read and write access while data is being loaded. This
may, however, decrease data loading performance.
For further information about the concurrentwrite
option, see section Prerequisites in the
Tamino Data Loader documentation.
Another way to improve performance is to separate Tamino server and
massload client physically by running them on different machines. If, however,
a multiprocessor machine is used, this is not necessary. If you want to have
several massload clients work in parallel, you must set the parameter
concurrentwrite (see section
With concurrent read/write
access).
In many cases, you need to define a schema before loading your data. To do so, use the Schema Editor as described in the Tamino documentation.