This document explains how you can build server extension packages based on Direct and Java-based infrastructures using the Tamino X-Tension Builder. Server extensions can be written in C++, Java or any language that supports dynamic loading of object libraries.
The following combinations of programming languages and infrastructures are supported by Tamino Tools and/or described in this documentation:
| Infrastructures / Programming Languages | Direct | Java |
|---|---|---|
| Direct/C++ |
X-Tension Builder |
- |
| Java | - | X-Tension Builder |
Server extensions written in C++ or any programming language that supports the dynamic loading of object libraries can be executed using the Direct infrastructure of Tamino X-Tension. The X-Tension Builder supports the development of server extension packages based on this infrastructure.
The Tamino X-Tension Builder supports the development of Java-based server extension packages on Microsoft Windows and UNIX platforms. The infrastructure is established by means of a JVM attached to the Tamino Server process. The usage of Java is restricted to avoid harmful influences on the Tamino Server.
This section tells you how to build a server extension package. The X-Tension Builder supports developing server extensions using the Direct and Java-based infrastructures. For information about what Tamino server extensions are and how they can be developed, see the Introduction and the sections Tamino Server Extension Functions and Developing Tamino Server Extensions. The individual steps related to building a server extension package - which is what you need when you want to install a server extension into a database - are described in the following sections:
Adding a Server Extension Function to an Existing Server Extension Project
Generating Javadoc Comments for a Server Extension Class File
The Tamino X-Tension Builder is used to create a server extension project. The tool automatically generates files containing all of the code required by the infrastructure-specific parts of the program and for communication with the Tamino Server. You are responsible for implementing the functionality. This section explains how to use the tool to set up a new project.
![]() To create a server extension project
To create a server extension project
Create the directory or folder where the source files for your project are to be stored. Use different directories for different projects!
Microsoft Windows:
Start the Tamino X-Tension Builder from the program group under the Windows menu.
UNIX:
Call the script inosxbuilder.sh from the command line.
The Tamino X-Tension Builder appears and displays an empty screen.
Choose from the menu to open a new project.
The first of two dialog boxes appears:
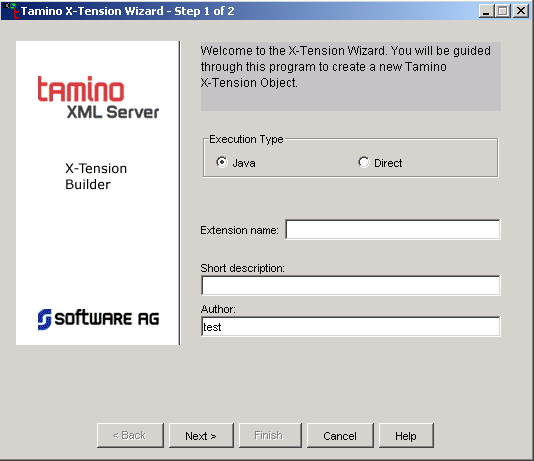
You can create either a Direct/C++ server extension or a Java-based server extension. Select the appropriate radio button. The following description shows the results of choosing the Java-based infrastructure for the server extension; the results of choosing the Direct infrastructure are similar.
Enter a name for the server extension. This name is used to reference the object within Tamino.
The text box for the short description is filled in automatically. You can edit this text, and also the text in the Author box.
Choose .
A second dialog box appears:
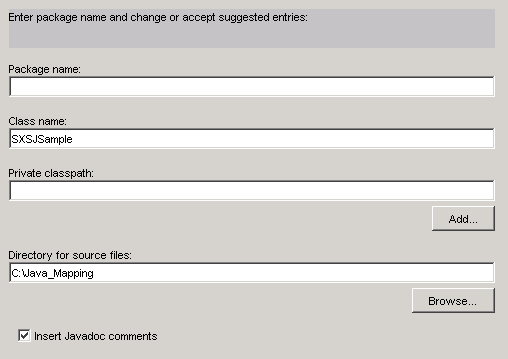
Enter a package name for the Java class. To ensure unique naming, Software AG recommends that you use your domain name in the package name.
The class name is filled in automatically. You can edit this text.
Enter the private classpath (if needed).
Enter the directory where the source files are to be stored, or choose to select a drive and directory.
If you keep the check mark in the Insert Javadoc comments box, you can generate Javadoc comments for your new server extension object and any server extension function that you include in the project after compiling the class file.
When you have made all desired changes, choose to create the new project.
Note:
If the specified directory had already been used for a previous project, the following message is displayed:

If you select in the message box, the Install.xml file will be overwritten. If you choose the button, you are returned to the previous dialog, where you can choose a different directory.
A list of files that will be created is displayed:
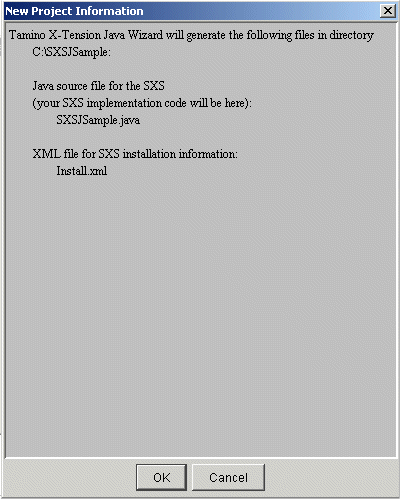
These two skeleton files are of special interest to the server extension developer:
The source file to which the signature of a server extension function is added using the menu item from the menu and into which the developer's function code has to be inserted;
The installation file which is required to install the finished server extension package. The XML server uses this file to put information about the server extension object into the repository.
Choose to create the files.
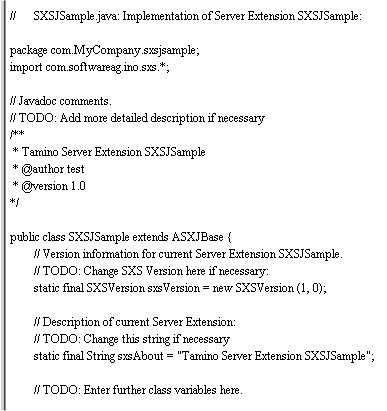
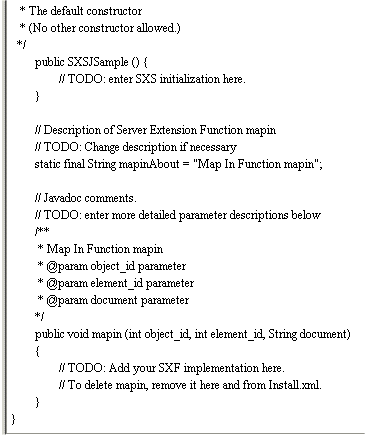
The source file your-project.java is opened in the editing window of the Tamino X-Tension Builder:
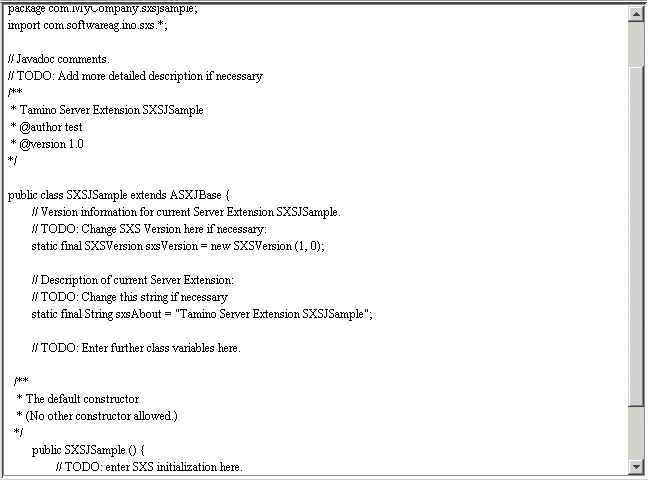
At various points in the generated framework code, you will find comments of the form:
// TODO: ...
Add your code after these comment lines.
Save the file.
This file can be edited as described in the section Adding a Server Extension Function to an Existing Server Extension Project.
You can open a previously-generated server extension project with the Tamino X-Tension Builder at any time to edit and manipulate the source file (add the signature of a server extension function and the function code, compile and pack the server extension object) as long as the server extension has not yet been installed in one or more databases.
![]() To open an existing server extension project
To open an existing server extension project
Microsoft Windows:
Start the Tamino X-Tension Builder from the Windows menu.
UNIX:
Call the script inosxbuilder.sh from the command line.
Choose from the menu of the Tamino X-Tension Builder.
The Select Server Extension Project dialog box appears:
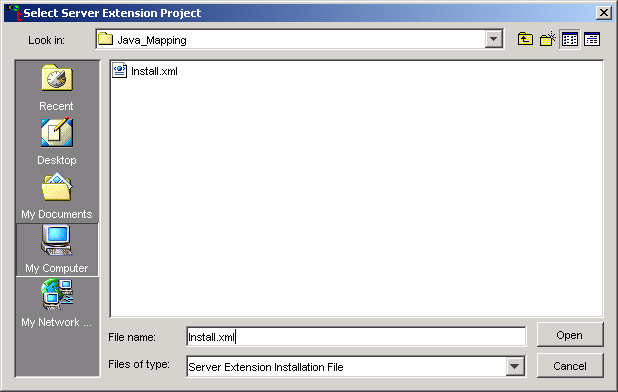
Browse to the drive and directory that contains the Install.xml file for the project.
Select the file and choose .
The your-project.java source file for this server extension project appears in the Tamino X-Tension Builder's editing window.
You can view all source files for the project by selecting the filename in the tree displayed in the left-hand frame of the X-Tension Builder.
Note:
You should not change the Install.xml file.
If you do change it, for example if you change parameter names, you must also
make these changes in the
your-project.java source
file.
Note:
It is not possible to install different versions of a server
extension at the same time. If you want to make changes to the function code of
a server extension that is installed in a database without uninstalling it,
create a new project specifying a
different name for the server extension, add the modified function code, and
compile and pack the project as usual with the Tamino X-Tension Builder.
You can add any number of map-in, map-out, map-delete, trigger, query and shadow functions, but only one init or event function to a server extension object.
We recommend including a complete set of mapping functions (one map-in, one map-out and one delete function) or trigger functions in a server extension object. Implement an init function to perform initializing actions prior to first function execution. Usually you will also need an event function to react to commit or rollback events.
![]() To add a server extension function to an existing server extension
project
To add a server extension function to an existing server extension
project
With the source file (your-project.java) open in the editing window, choose from the menu.
The Add X-Tension Function dialog box appears:
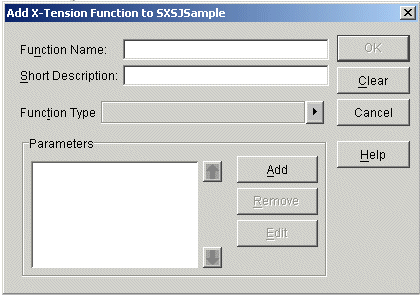
Enter the name of the server extension function in the Function Name text box.
Either:
Select the drop-down list box for the server extension function.
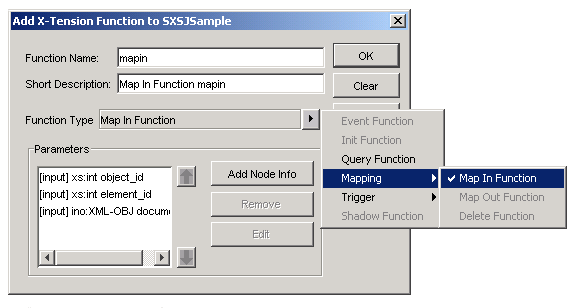
If you choose Map In Function, Map Out function or Delete Function, parameters with default names and types are generated automatically, and the button changes to , which can be used to add the nodeinfo parameter to the function.
Choose to add the map-in function to your server extension.
Or:
Choose .
The Add parameter dialog box appears:
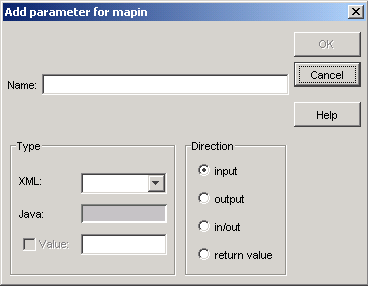
Enter a name for the parameter you want to define and select the XML type and attribute.
Choose .
The Add parameter dialog box appears again, allowing you to add all the parameters that are required for the type of server extension function you want to define.
When you have specified all of your parameters, choose the (only function types with suitable parameter lists are enabled). Missing mandatory parameters are added.
Optional parameters can be reordered. Select the parameter you want to move to another position, and the up and down arrows are enabled if reordering is allowed for that parameter.
If you select one of the displayed parameters, the and buttons are enabled.
If you choose Query Function from the Function Type drop-down list box, the Edit return parameter dialog box appears, where you can define a return value:
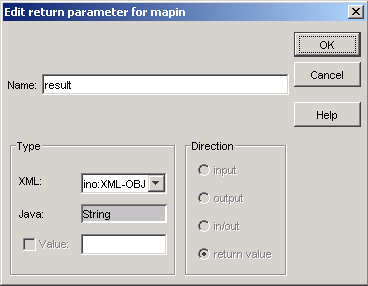
Select the appropriate type (XML document or character string) of
the value to be returned by your query function from the XML drop-down list box. (If you select
"XML-OBJ", the XML document processor parses the
result. If the result is not a well-formed XML document, the parser fails with
the error message INOXPE8702 Invalid document
prolog.)
Choose .
The Add Extension Function dialog box appears again with the button changed to , allowing you to generate an arbitrary number of optional parameters for a query function. All of these parameters must be input parameters.
Optional parameters can be reordered. Select the parameter you want to move to another position, and the up and down arrows are enabled if reordering is allowed for that parameter.
If you select one of the displayed parameters, the and buttons are enabled.
Choose to add the function's signature to the source file (your-project.java) and the Install.xml file.
The following predefined code is displayed:
At various points in the generated framework code, you will find comments of the form:
// TODO: ...
Add your code after these comment lines.
Save the file.
When you have made all entries to the source file, the class file for the server extension must be compiled before the server extension can be packed. The class file is compiled using the packaging information that is specified in the second dialog box for creating a new project.
The server extension class file can only be compiled if you have
installed a Java compiler (by default this is installed as part of the standard
Tamino installation procedure) and set the system environment variable
path to point to it.
![]() To compile the server extension class file
To compile the server extension class file
With the source file (your-project.java) open in the editing window:
Either:
Choose from the menu.
Or:
Choose from the menu.
This copies the compile command to the clipboard. You can now paste it at a command prompt (so-called "DOS box"), where it can be executed.
The source file appears, showing messages about the compilation process in the Result Frame.
If errors occurred, correct your function code and recompile the file.
If the Insert Javadoc comments check box was selected in the second dialog box for creating a new project, you can generate Javadoc comments for the server extension class file and include them in the server extension package.
![]() To generate Javadoc comments
To generate Javadoc comments
With the source file (your-project.java) open in the editing window, choose from the menu.
A list of the created files appears:
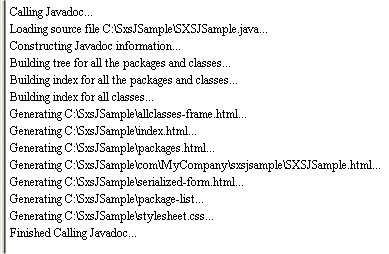
The HTML file that is named after your project and stored in the directory where the class file is located is of special interest to the server extension developer. The other files are stored in the project's main directory.
Close the box.
When the server extension class file has been successfully compiled and, if desired, the Javadoc comments have been generated, the server extension package can be created.
![]() To create a server extension package
To create a server extension package
With the source file (your-project.java) open in the editing window, choose from the menu.
The first Pack Server Extension dialog box appears:
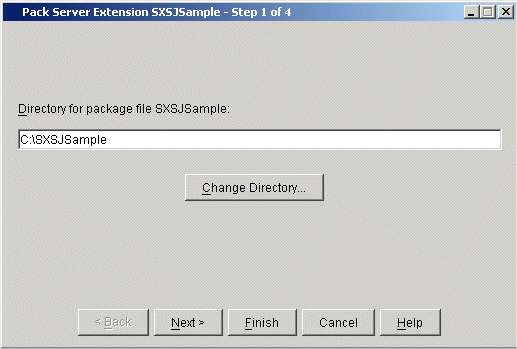
Choose if you want to create the package in a directory other than the default.
Choose to continue, or to complete the wizard using default values.
The second Pack Server Extension dialog box appears, displaying the Java executables available for the specified server extension object:
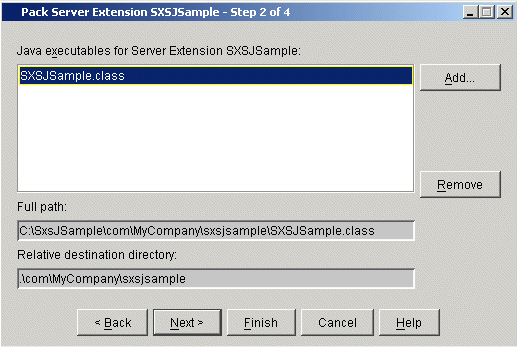
Select one of the displayed executables and choose to include it into the package. If you want to exclude an executable you have specified from the package to be created, select it and choose . Full path and Relative destination directory are displayed automatically. You cannot edit them.
Choose to continue, or to complete the wizard using default values.
The third Pack Server Extension dialog box appears, displaying a help file (HTM, HTML, XML and TXT) for the server extension object.
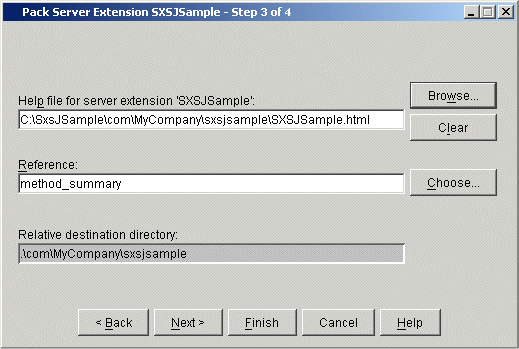
The relative destination directory of the selected help file is displayed.
If you want to exclude a help file you have specified from the package to be created, choose .
The Reference text field can be used to specify a bookmark in the help file. In this case, the help file will start at the position indicated by the bookmark.
Choose the button.
The References available list box appears showing the bookmarks available in the current help file.
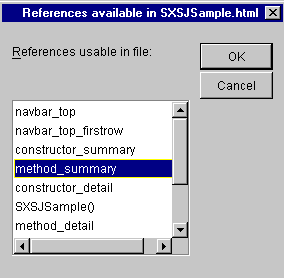
Select a bookmark.
Choose .
The fourth Pack Server Extension dialog box appears:
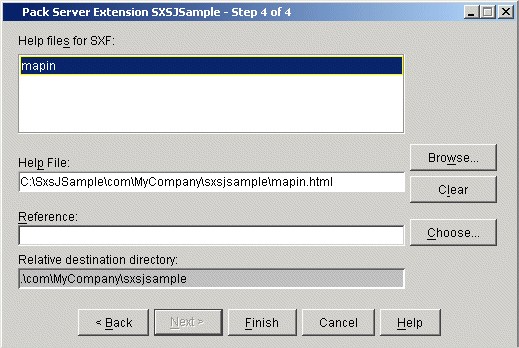
A help file for the individual server extension function is displayed, together with the relative destination directory.
Choose to select a different help file than the one suggested in the dialog box, or choose to remove a help file.
The Reference text field can be used to specify a bookmark in the help file. In this case, the help file will start at the position indicated by the bookmark.
Choose the button.
The References available list box appears, showing the bookmarks available in the current help file:
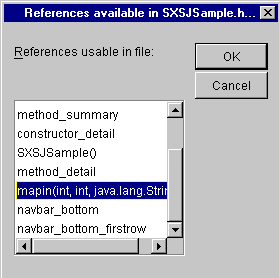
Select a bookmark.
Choose .
Choose to complete the wizard actions.
Note:
The complete help information may be contained in one file. This
file can be specified repeatedly; for example, for the server extension object
(as described in step 3) and for any
server extension function that you select in the current page.
If you want to include all files generated using the item in the menu, select all the files, one after the other, for all functions or one of the functions contained in the selected executable.
A list of the files to be included in the package is displayed:
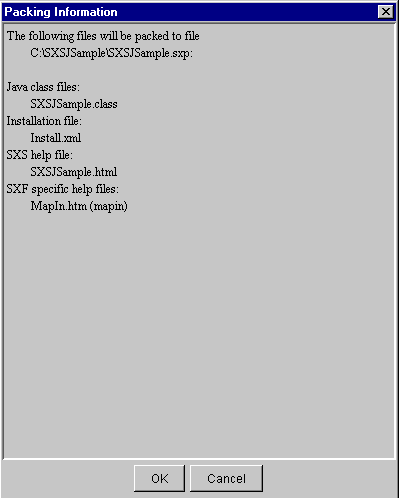
Choose to create the server extension package.
The package file (your-project.sxp) can now be installed as described in the section Installing a Tamino Server Extension.
Server extensions written in C++ or any other programming language that supports dynamic loading of object libraries can be executed using Tamino X-Tension's Direct infrastructure. The X-Tension Builder supports the development of Direct/C++ server extension packages.
![]() To create a server extension project
To create a server extension project
Open a project in the X-Tension Builder. On the first page there is a button . Select this button and you will be guided through the whole building procedure using the Direct infrastructure. The procedure is very similar to that described for the X-Tension Builder.