
When a schema has been loaded into the Tamino Schema Editor, you can modify it. For example, you can select a node in the schema tree and then change the properties of the selected node. Or you can invoke a context menu for the selected node and then choose the desired command.
This document covers the following topics:
You can use the commands from the menu to insert structures for the logical properties of a schema. The commands vary, depending on the current selection in the schema tree. For example, for attribute declarations, only annotations can be inserted.
The menu is not available in code view.
The Tamino Schema Editor displays the Tamino schema in such a way that the nodes of the tree coincide with the elements or attributes of the instance as much as possible. For this reason, there may be nodes which correspond to individual schema constructs as well as nodes that do not. These nodes are either composed of several schema constructs, or are determined by an attribute of a schema construct. Examples:
Types and elements are compound nodes where one property determines the construct that is to be generated. Thus, a simple type can be defined using a restriction, list or union.
The definition of a group results either in a group or group
reference, depending on the setting of the
Reference property.
When you load a schema into the Tamino Schema Editor or when you switch
from code view to tree view, the Tamino Schema Editor determines each type of
node on the basis of the schema constructs. It may happen that the type of an
element cannot be determined and that the type "element
unknown" is therefore used. This occurs when a type is referenced
using the Datatype property and the Tamino Schema
Editor does not recognize the declaration for this type. In this case, the
Tamino Schema Editor cannot determine whether a simple element, an element with
attributes or a complex element is referenced.
 To insert an element in the schema tree
If code view is currently active, switch to one of the tree views.
In the schema tree, select the element below which you want to insert a new element.
From the menu, choose the command which corresponds to the desired schema construct.
For a description of all available commands and corresponding schema constructs, see Schema Tree Items Explained.
Specify all required properties for the element you have just inserted.
For a description of all available properties, see Properties Explained.
When you edit the logical and physical properties of a schema construct, different types of input fields are available in the Value column:
Simple text box in which you enter text.
Drop-down list box from which you select one of the allowed values. The drop-down arrow is only visible after the input field has been selected.
A button for invoking a property editor in which you specify the required information (see below). The button is only visible after the input field has been selected.
Some properties are specified using a property editor (for example, the
logical property Enumeration which can be found in
the Facets group tree).
Note:
Different types of property editor are available. See below.
To invoke the property editor
Select the input field in the Value column.
If provided, choose the following button:

The Property Editor dialog box
appears. For the Enumeration property, it looks as
follows:
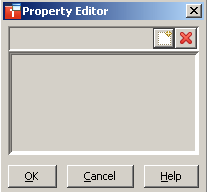
The following buttons are provided:
|
|
Add a new item. |
|
|
Delete the selected item. |
Add/delete all required items.
Choose the button.
The dialog box is closed and the information you have specified is shown in the Value column.
A property editor is provided for the logical property
namespaces. This property is available for
schemas and
doctypes. For information on
how to invoke a property editor and how to add items, see
Using the Property
Editor.
When you add a namespace, you have to specify a prefix and an URI. If a namespace is to be used as the target namespace, make sure that the corresponding option button in the Target column for the namespace is selected. It is only possible to use one or no target namespace.
A property editor is provided for:
the logical properties in the triggers
(see Logical Properties for
XML Elements), and
the physical properties of the storage type Map
XTension (see Properties for SXS
Mapping).
For information on how to invoke a property editor, see Using the Property Editor.
To select a server extension
If this is the first time you are connecting to a server, the list box which usually contains a list of servers is empty. In this case, you have to proceed as described under Connecting to Tamino. This section also provides information on the buttons that are located next to the Look in drop-down list box.
Choose the required server.
The databases on this server are now shown.
Choose the database on which the required server extension has been installed.
The server extensions are now shown.
Select the server extension.
Choose the button.
The name of the server extension is now shown in the Value column.
You can document a schema by inserting annotations at any level within the schema. Within an annotation, the documentation element is used to provide the documentation text. The documentation text is added using a property editor.
To add annotation and documentation elements
In the schema tree, select the node to which you want to add documentation.
From the menu, choose .
This inserts an annotation as a child of the selected node. You can
optionally assign an id value to it.
In the schema tree, select the annotation element.
From the menu, choose .
This inserts a documentation element as a child of the annotation. The documentation element is automatically selected and its logical properties are shown.
In the logical properties, select the
Value column for the property Documentation
text.
Choose the following button.
The Property Editor dialog box appears.
Enter your annotation text.
To start text on a new line, simply press ENTER.
Using the commands from the menu, you can cut, copy, paste, find and replace text. Further information on these features is provided later in this section.
Choose the button.
The dialog box is closed and the information you have specified is shown in the Value column.
You can define occurrence constraints for an element.
Exception: occurrence constraints cannot be defined for top-level elements.
In the schema tree, one of the following characters may appear to the right of an icon. These characters indicate the occurrence constraints.
| Character | Description | Values | |
|---|---|---|---|
| Minimum occurrence | Maximum occurrence | ||
| ? | Optional. Can only occur once. | 0 | 1 |
| 1 |
Must occur exactly once. |
1 | 1 |
| * | Optional. Can be any number. | 0 | unbounded |
| + | Must occur at least once. Can be any number. | 1 | unbounded |
| n | Fixed values for Minimum occurrence and Maximum occurrence. | n | m |
See the XML Schema Part 0: Primer, section 2.2.1 at http://www.w3.org/TR/xmlschema-0/#OccurrenceConstraints for more information on occurrence constraints.
To specify the occurrence constraints
In the schema tree, select the element for which you want to specify the occurrence constraints.
In the pane displaying the logical properties, select
the value for the property Minimum occurrence or
Maximum occurrence and select the required value
from the drop-down list box.
In the schema tree, a character indicating the new constraints is now shown next to the corresponding icon.
Elements can be declared as optional, required or prohibited.
Exception: top-level elements cannot be declared as optional, required or prohibited.
In the schema tree, one of the following characters may appear to the right of an icon:
| Character | Value |
|---|---|
| ? | Optional |
| 1 | Required |
| 0 | Prohibited |
See the XML Schema Part 0: Primer, section 2.2.1 at http://www.w3.org/TR/xmlschema-0/#OccurrenceConstraints for more information.
To declare an element as optional, required or prohibited
In the schema tree, select the desired element.
In the pane displaying the logical properties, select the value for
the property use and select the required value
from the drop-down list box.
In the schema tree, one of the above characters is now shown next to the corresponding icon.
You can immediately jump to the declaration for the selected reference.
Note:
This feature is not available in code view.
To display the declaration for a reference
In the schema tree, select the desired reference.
From the menu, choose .
Or:
Press CTRL+ALT+PAGE-UP.
Or:
Choose the following toolbar button:
![]()
The declaration is now selected in the schema tree.
You can immediately jump to the next reference for the selected declaration, or to the next reference that matches the selected reference.
Note:
This feature is not available in code view.
To display the next reference
In the schema tree, select either a declaration or reference.
From the menu, choose .
Or:
Press CTRL+ALT+PAGE-DOWN.
Or:
Choose the following toolbar button:
![]()
The next reference is now selected in the schema tree.
You can change the sequence of elements in the schema tree. You can move an element up or down, including all of its child nodes, within the allowed hierarchy in the schema.
Note:
This feature is not available in code view.
To move up the selected element
From the menu, choose .
Or:
Press CTRL+ALT+UP-ARROW.
Or:
Choose the following toolbar button:
![]()
To move down the selected element
From the menu, choose .
Or:
Press CTRL+ALT+DOWN-ARROW.
Or:
Choose the following toolbar button:
![]()
You can cut, copy and paste the following:
A node in the schema tree, including all child nodes. A node is treated as a fragmental XML document.
A logical or physical property value where direct text input is possible (for example, a name or ID).
Text in code view or in a property editor.
Caution:
This feature uses the Windows clipboard which may also contain
information from another application. Due to performance reasons, the
information from the clipboard is not parsed. Watch the output panel for
messages concerning your last action. When you cut information and paste it at
a position in the tree where it is not allowed, this information will be lost.
A message will be shown in the output panel. The drag-and-drop feature, which
is described below,
provides more intelligent support for copying and moving information.
It is also possible to copy an entire message line from the output panel, for example, to another application.
Note:
The cut-and-paste feature cannot be used to change the sequence of
the nodes within the schema tree. If you want to change the sequence, see
Moving an Element Up and Down
in the Schema Tree.
To cut the selection and transfer it to the clipboard
From the menu, choose .
Or:
Press CTRL+X.
Or:
Choose the following toolbar button:
![]()
The selection is deleted at its original position and is copied to the clipboard.
To copy the selection to the clipboard
From the menu, choose .
Or:
Press CTRL+C.
Or:
Choose the following toolbar button:
![]()
The selection remains at its original position and is copied to the clipboard.
To paste the content of the clipboard
In tree view, select the node below which you want to paste the information from the clipboard.
In tree view, it is only possible to paste information at a position which syntactically fits into the schema definition.
Or:
In the logical or physical properties, select the value field to
which you want to paste the previously cut or copied information. If required,
move the insertion point to the required position.
Or:
In code view, place the insertion point at the position at which you
want to paste the previously cut or copied information.
From the menu, choose .
Or:
Press CTRL+V.
Or:
Choose the following toolbar button:
![]()
In tree view, the Tamino Schema Editor tries to insert the previously cut or copied node below the selected node. If single nodes cannot be inserted (because they are not allowed at this point of the schema or because the Tamino Schema Editor cannot handle them), they will be lost and a warning will be written to the output panel.
In the logical or physical properties, the previously cut or copied information is inserted in the selected value field.
In code view, the previously cut or copied information is inserted at the insertion point. There is no immediate validity check. However, any errors are reported in the output panel when you try to switch to one of the code views.
You can copy or move information in the schema tree using drag-and-drop. Since drag-and-drop can only be used within the schema tree, the origin of a node to be pasted is known and can be parsed prior to insertion. Thus, it is only possible to drop a node at a position in the tree where it is allowed. As long as you are dragging a node, the mouse pointer always indicates whether a node can be dropped or not.
Caution:
Only the child nodes on the first level are parsed. When the first
level is allowed at a position in the schema tree, the node can be dropped.
However, if there are further child nodes on the second level or lower which
cannot be inserted at that position (because they are not allowed at this point
of the schema or because the Tamino Schema Editor cannot handle them), they
will be lost and a warning will be written to the output panel. You can undo
the drag-and-drop action immediately. See Undoing and Redoing the Previous
Action.
As long as you are dragging a node, you can use the following features:
Place the mouse pointer briefly over a node which is preceded by a plus sign. This expands the node so that you can examine its contents.
Place the mouse pointer briefly over the upper or lower border of the pane containing the schema tree. This scrolls the top or bottom of the schema tree into view.
Note:
The drag-and-drop feature cannot be used to change the sequence of
the nodes within the schema tree. If you want to change the sequence, see
Moving an Element Up and Down
in the Schema Tree.
To copy a node to another position in the tree
In tree view, click the node to be copied and hold down the mouse button.
Hold down CTRL.
Drag the node to another position in the tree at which it can be dropped.
When the node can be dropped, the mouse pointer shows a rectangle containing a plus sign.
Release the mouse button and then CTRL.
The node is copied to the new position.
To move a node to another position in the tree
In tree view, click the node to be moved and hold down the mouse button. Do not press any key.
Drag the node to another position in the tree at which it can be dropped.
When the node can be dropped, the mouse pointer shows an empty rectangle.
Release the mouse button.
The node is moved to the new position.
You can copy the path for the currently selected element or attribute to the clipboard. It is copied as an XPath expression. This is helpful, for example, if you want to use the path in the physical properties of a node that can be accessed via multiple paths (see Advanced Physical Properties), or if you want to copy the path to another application.
The format of the path depends on the setting of the
form
property for the selected element or attribute:
When the form property is set to
"qualified", the prefix from the
target namespace definition
is used.
Example for an element:
/myPrefix:Telephone/myPrefix:Lastname
Example for an attribute:
/myPrefix:Telephone/@myPrefix:EntryID
When the form property is set to
"unqualified", a prefix is not used.
Example for an element:
/myPrefix:Telephone/Lastname
Example for an attribute:
/myPrefix:Telephone/@EntryID
When a value has not been defined for the
form property, the value
("qualified" or
"unqualified") defined for one of the following
schema properties is used:
elementFormDefault in the case of an
element.
attributeFormDefault in the case of an
attribute.
To copy the path to the clipboard
In tree view, select the desired element or attribute.
From the menu, choose .
The path is copied to the clipboard. You can now use the command to insert the path at the desired position.
You can delete the following:
A node in the schema tree, including all child nodes.
Text in code view.
To delete the selection
From the menu, choose .
Or:
Press DEL.
Or:
Choose the following toolbar button:
![]()
The selection is deleted immediately. You are not asked to confirm the deletion.
However, when you delete a referenced element, group or attribute group in tree view, a dialog box appears, asking whether you also want to delete the references to the deleted node. When you choose the button, you confirm the deletion.
When you delete a type, all schema elements using the deleted type are listed in the output panel. Hyperlinks are provided. When you choose a hyperlink, the node which uses the deleted type is selected in the schema tree. It is your responsibility to define an existing type.
You can rename elements, types, groups and attribute groups in the schema tree. When an item cannot be renamed (for example, an element reference), the command is not available.
To rename an element in the schema tree
Select the tree element that you want to rename.
From the menu, choose .
Or:
In the pane displaying the logical properties, select the value for
the property name.
Or:
In the context menu of the selected tree element, choose
.
Specify the new name.
Press ENTER or click any other position in the application window.
When you rename an element, type, group or attribute group, a dialog box appears for each node in the schema tree which uses the renamed item, and you are asked whether you want to adapt the corresponding property for this node. When you choose the button, the property value is renamed.
You can find and replace a node, property or string within the current schema.
To find information
In the schema tree, select the node that is to be the starting point for your search.
Or:
In code view, place the insertion point at the position that is to be
the starting point for your search.
From the menu, choose .
Or:
Press CTRL+F.
Or:
Choose the following toolbar button:
![]()
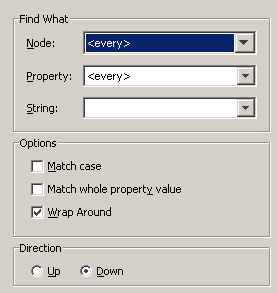
The Find dialog box appears. The information that can be specified in the dialog box depends on the view in which it has been invoked. The Find dialog box appears in tree view.
Note:
When you invoke this dialog box in code view or from a property
editor, the drop-down list boxes Node and
Property and the check box Match whole property
value are not shown.
Specify all required search criteria:
- Node
Not available in code view.
This drop-down list box provides for selection all elements that may occur in a schema (for example, a simple element or annotation).
- Property
Not available in code view.
This drop-down list box provides for selection all properties that are valid for the selected node (for example, a name or ID). For information concerning the possible entries, see Properties Explained.
- String
This drop-down list box provides for selection the search strings that you have previously entered. You can also enter a new string.
- Match case
When this check box is selected, the search is case-sensitive.
- Match whole property value
Not available in code view.
When this check box is selected, the search is restricted to matching whole values only. This is useful for searching for "a" or "A" without finding all words including "a".
- Wrap around
When this check box is selected, the complete schema is searched, even if your starting point for the search is in the middle of the schema.
- Direction
Select the option button Up or Down to search the schema in the desired direction.
Choose the button.
If the specified information is found in tree view, the node containing this information is expanded and the found element is selected.
If the specified information is found in code view, it is selected.
To find the next occurrence, choose the button once more.
Or:
Find the next or previous occurrence as described below; see
Finding the Next or Previous
Occurrence.
To close the dialog box, choose the button.
To replace information
In the schema tree, select the node that is to be the starting point for your search.
Or:
In code view, place the insertion point at the position that is to be
the starting point for your search.
From the menu, choose .
Or:
Press CTRL+R.
The Replace dialog box appears. The information that can be specified in the dialog box depends on the view in which it has been invoked. The Replace dialog box appears in tree view.
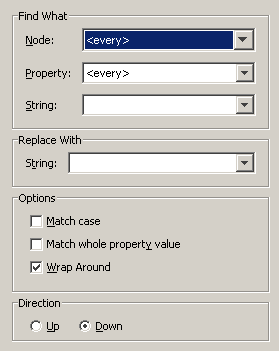
This dialog box contains the same options as the Find dialog box. It contains an additional drop-down list box in which you enter the replace string, and it contains additional command buttons.
Note:
When you invoke this dialog box in code view or from a property
editor, the drop-down list boxes Node and
Property and the check box Match whole property
value are not shown.
Specify all required search criteria. See the above description of the Find dialog box for detailed information.
Specify the string with which a found occurrence is to be replaced.
To replace all occurrences that match your search criteria at once, choose the button.
If Wrap around has not been specified, only the occurrences between the current position and the end or start of the schema (depending on the specified direction) are replaced.
Note:
The button only replaces those
occurrences that are allowed to be replaced with the current replace string.
Strings that have not been replaced are reported in the
output panel.
Or:
To replace one occurrence after the other, choose the button. This selects the next occurrence and you can now
choose the button, or the button if you do not want to replace the current
occurrence.
Note:
The button only finds those
occurrences that are allowed to be replaced with the current replace
string.
To close the dialog box, choose the button.
The commands for finding the next or previous occurrence always use the information that has previously been entered in the Find or Replace dialog box (see Finding and Replacing Information). This is helpful, if these dialog boxes have been closed.
You can use these commands in both tree view and code view. If the occurrence is found in tree view, the node containing this occurrence is expanded and the occurrence is selected. If the occurrence is found in code view, it is selected.
To find the next occurrence
From the menu, choose .
Or:
Press F3.
To find the previous occurrence
From the menu, choose .
Or:
Press SHIFT+F3.
You can undo and redo your previous actions in the current view.
Caution:
The undo/redo history is cleared when you switch to another
view.
To undo the previous action
From the menu, choose .
Or:
Press CTRL+Z.
Or:
Choose the following toolbar button:
![]()
To redo the previous undo action
From the menu, choose .
Or:
Press CTRL+Y.
Or:
Choose the following toolbar button:
![]()
You can define the options for external schemas.
To open the Options dialog, choose
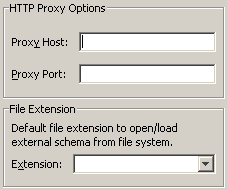
- HTTP Proxy Options
The address (host name and port number) for your proxy server has to be defined in the following cases:
When a referenced schema is to be opened in a new window via HTTP. See Opening a Referenced Schema in a New Window.
When elements from an external schema are to be loaded via HTTP. See Loading and Unloading the Elements from an External Schema.
- File Extension
When you import an external schema, Tamino requires that the schema location is relative, i.e. an extension must not be defined.
When a default file extension has been defined, an external schema for which a file extension has not been defined is automatically opened or loaded from the file system using the default file extension that has been defined in this dialog box.
When an Import, Include or Redefine node is available in
the schema tree, you can define the disk location where the appropriate schema
component is located. A file system browser is available for navigation to the
required location. The location path is subsequently stored in the logical
property Schema
location of the Import, Include or Redefine node.
To browse for a schema location
Select the Import, Include or Redefine node in the schema tree.
Select the logical property Schema
location.
Position the cursor in the Value field next to
Schema location.
To the right of the Value field, a browse button
( ) appears.
Select the button. The dialog box Browse for Base of Location is displayed.
Browse to the schema file and choose the button.
The value of the logical property Schema
location is inserted into the Value field
of the Schema Editor.
When an Import, Include or Redefine node is available in the schema tree
and the logical property Schema
location has been specified, you can open the
referenced schema in a new instance of the Tamino Schema Editor.
Note:
If you want to open the schema via HTTP, you have to define the
address for your proxy server. You can also define a default file extension to
be used when opening a schema from the file system. See
Defining the
Options.
When you modify one of the schemas, this has no effect on the other schema.
To open the referenced schema in a new instance of the Tamino Schema
Editor
In the schema tree, select an Import, Include or Redefine node.
From the menu, choose .
Note:
The command is only available, if
a location has been specified with the property Schema
location.
A cascading menu with the following commands is available when a
relative path has been specified in the Schema
location property:
When an absolute path to the file system or to a database has been specified, a cascading menu with the above commands is not available. In this case, the referenced schema is opened in the same way as the current schema: it is either loaded from the file system or from the database.
When an Import, Include or Redefine node is available in the schema tree
and the logical property Schema
location has been specified, you can load the
elements from the referenced external schema into the internal model, in
addition to the current schema. The global elements or types of the external
schema can then be selected from a drop-down list box in the logical properties
(properties Reference,
Datatype, Base type,
itemType and
memberTypes).
The external schema itself is not visible in the Tamino Schema Editor.
The Tamino Schema Editor uses the global types information of the
external schema to represent the elements that use these types with the correct
icon in the schema tree. In the case of <xs:element
type="userDefinedType"/> , the editor can thus decide whether
to show the element as "Element simple",
"Element with attributes" or "Element
complex". When an external schema has been loaded, each
"Element unknown" for which the type is defined in
the external schema is shown with the corresponding icon. When the external
schema has been unloaded, these elements are shown again as
"Element unknown".
The Tamino Schema Editor does not automatically receive updates to the external schema. If you want to work with the updated schema, you have to unload the schema and then load it once more.
Note:
If you want to load the elements from an external schema via HTTP,
you have to define the address for your proxy server. You can also define a
default file extension to be used when loading a schema from the file system.
See Defining the
Options.
To load the elements from an external schema
In the schema tree, select an Import, Include or Redefine node.
From the menu, choose .
Note:
The command is only available, if
a location has been specified with the property Schema
location.
A cascading menu with the following commands is available when a
relative path has been specified in the Schema
location property:
When an absolute path to the file system or to a database has been specified, a cascading menu with the above commands is not available. In this case, you can directly choose the command.
An external schema can only be loaded when it does not contain any errors.
When the elements of the external schema have been loaded, a small triangle is shown to the right of the icon for the Import, Include or Redefine node.