
In this document, you will find information about the tasks you can accomplish with the Tamino Interactive Interface, illustrated by an example.
The following topics are covered:
The first thing you may want to do when working with a Tamino database is to define a schema. Start the Tamino Interactive Interface and choose the form Define or update a schema by selecting the Define tab. A screen similar to the following is displayed:
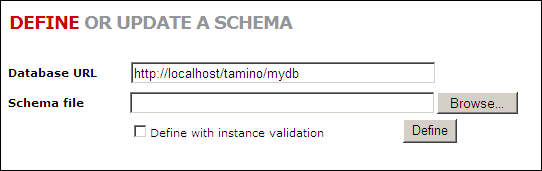
Enter the Database URL (see Database URL). Go to the field Schema file. In this field, you specify a file that contains a schema definition. A schema definition describes the structure, but not the contents, of a set of objects that will be loaded into the database. You can either type in the filename and full path name directly, or you can use the button that is located at the end of the field to locate the file that you want.
By default, the schema is defined without validation. If you check the box Define with instance validation, the schema is defined and validated.
Note:
A sample schema file named HospitalSchema.tsd is
provided in
<TaminoDocRootDir>/examples/patient,
where <TaminoDocRootDir>
is the starting directory of the product documentation. If you want to follow
the example given in this section, use it as your sample schema.
When you have specified the schema definition file, choose the button. This loads the schema into the selected database and collection.
For a full description of creating schema definitions, refer to the documentation about the Tamino Schema Editor.
Note:
Netscape versions 6 and above determine the content type of form data
by the file extension. Schemas named .tsd will be
submitted with the content-type application/octet-stream which Tamino will not
recognize as valid schema data. Use the following workaround: For Netscape 6.x,
rename the schema files to .xml. For Netscape 7.x, rename
the schema files to .xml, or define a "helper
application" within Netscape by choosing . Select the
following options: Extension: tsd Mime
Type: text/tsd Handled by: (blank).
Once you have defined the schema, you can load documents into your database. In the Tamino Interactive Interface, choose the form Load contents of a file to insert or update documents by selecting the Load tab. A screen similar to the following is displayed:
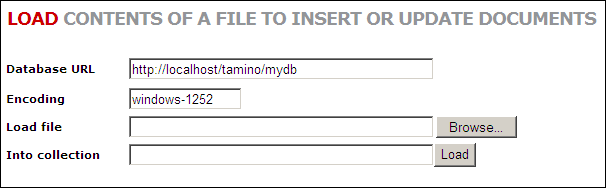
Input for the field Database URL is taken from the specifications you made before. If you want to switch to a different database, enter a new URL (see Database URL). The input for the field Encoding is the browser's default value (see Encoding).
To load XML data into the specified database, go to the field Load file. In this field you specify the name of a file that contains the XML object to be loaded into the database. You can either type in the filename and full path name directly, or you can use the button that is located at the end of the field to locate the file that you want.
The following example uses the sample data from the XML instances bloggs.xml and atkins.xml supplied with the Tamino Documentation. The data are in the directory <TaminoDocRootDir>/examples/patient, where <TaminoDocRootDir> is the starting directory of the product documentation.
Now load the XML instance bloggs.xml into the database. Before loading instances into the database, ensure that the corresponding schema is defined in the database (see section Define or Update a Schema). Select the XML instance bloggs.xml, using the button. Also, specify the collection "Hospital" in the field Into collection. Finally, choose the button when you have specified all input.
If the load is successful, you will get a response document containing lines like the following in the result window (works on XML-capable browsers only!):
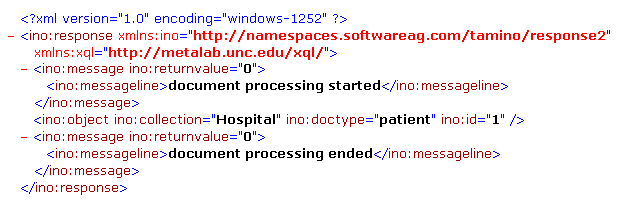
If the XML object was loaded successfully, you will see in two
ino:message elements of this response document that the return
value (ino:returnvalue) is zero, which indicates successful
completion.
In the ino:object element you see the name of the doctype
and the collection into which the object was loaded. In this example, the
doctype name is patient and the collection name is
Hospital.
You also see that the object ID of the object you loaded has been
assigned the internal ID of "1" (ino:id="1"). When
you are retrieving objects at a later stage using database queries, you can use
this object ID to retrieve a particular record.
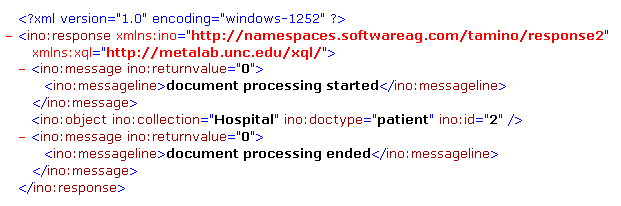
Here is another sample XML object that you can load by the same method. Browse to the sample XML file atkins.xml and choose the button. The object is loaded into the database.
You should get a response document that is identical to the response document for the first object apart from one difference, namely that the object ID has a different value.
If you plan to load large amounts of data into Tamino, it is generally better to use one of Tamino's data loading utilities, especially the Tamino Data Loader. Refer to the documentation on the Tamino Data Loaders for more details.
For testing purposes, create and load a few more XML objects with the same structure as the first two. You can then use these for performing queries or for deleting objects.
If you want to load documents that do not have an XML format, for example graphic or word processing files, a special schema is needed. Here is an example of a schema file for non-XML data:
<?xml version="1.0" encoding="UTF-8"?>

<xs:schema
   xmlns:xs  = "http://www.w3.org/2001/XMLSchema"
   xmlns:tsd = "http://namespaces.softwareag.com/tamino/TaminoSchemaDefinition"
   >
   <xs:annotation>
      <xs:appinfo>
         <tsd:schemaInfo name = "abcNonXML">
            <tsd:collection name = "abcNonXML"/>
            <tsd:doctype name = "xyzNonXML">
             	  <tsd:nonXML/>
            </tsd:doctype>
         </tsd:schemaInfo>
      </xs:appinfo>
   </xs:annotation>
</xs:schema
The decisive element in this schema is
tsd:nonXML. It tells Tamino to not treat the data as
XML data.
To load the data into Tamino, first define the schema above to Tamino. The next step is to load the non-XML files into Tamino.
Use the Interactive Interface as follows:
 To load non-XML data into Tamino with the Tamino Interactive
Interface
To load non-XML data into Tamino with the Tamino Interactive
Interface
Choose the Load tab.
Enter the database URL.
Enter the file to be loaded. Use the button to locate the file, if necessary.
The entry in the field Into collection is special for non-XML data. Enter the following:.
(collection name)/(doctype name)/(document name)
If, for example, you want to load a file named patient.doc with the example schema file above, enter:
abcNonXML/xyzNonXML/patient.doc
The document with ino:docname patient.doc is loaded into Tamino, and you can query for it.
Specifying the document name is optional, but recommended, since it
provides the possibility to query the document via the ino:docname attribute
(with XQuery). Use the function
tf:getDocname
to get the document name for the non-XML document element.
To query non-XML data with the Tamino Interactive Interface
Choose the X-Query tab.
Enter the database URL.
In the Collection field, enter the following:
(collection name)/(doctype name)/(document name)
You do not need to enter anything in the X-Query field, as any input in this field is ignored. Note that it is not possible to use the XQuery form for querying non-XML data, as plain URL addressing is necessary. With the Interactive Interface, plain URL addressing can only be done with the X-Query form.
Tamino supports two query languages, the Tamino specific X-Query (spoken X-dash-Query) and the new Tamino XQuery (without a "dash"), which follows the proposals of the W3C about XML query languages. If you want to use the new Tamino XQuery (without the dash), choose the Query a database using XQuery form by selecting the appropriate tab in the Tamino Interactive Interface. A screen similar to the following is displayed:
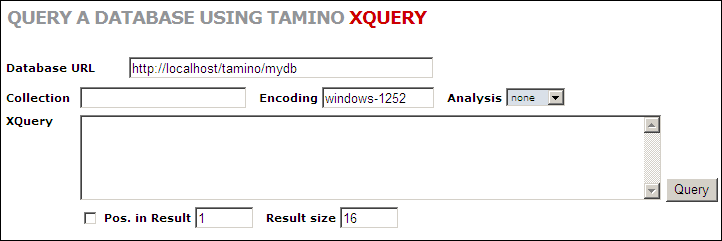
Input for the field Database URL is taken from the specifications you made before. If you want to switch to a different database, enter a new URL (see Database URL). The input for the field Encoding is the browser's default value (see Encoding).
For querying the data, you need to specify the collection into which the objects belong. Enter the name of the collection that you wish to access. For this example, the name of the collection is "Hospital".
If you do not want to display the complete result set of your query, you can specify the index of the first document to be returned in the field Position in Result.
If you want to include an analysis of the query, choose the option Default in the Analysis list box. Otherwise, the query is performed without analysis. For further information, see the reference section about XQuery.
Also, it is possible to limit the number of documents returned. Enter a number in the field Result Size. It is also possible to enter the value "0". This is necessary for update queries.
In the field XQuery, you can enter queries to the selected database and collection using the new Tamino XQuery language according to proposed W3C standards. Refer to XQuery 4 User Guide for more information about this query language.
The following examples assume that you have loaded the two XML objects for Peter Atkins and Fred Bloggs, as described in the section Load XML Documents into a Database into a test database and collection.
In the XQuery field, enter the following query, then choose the button.
input()/patient
This query means: find all elements of type patient in the
current collection (Hospital).
You should receive a response document that contains lines similar to these (other header and general processing information is also returned, as well as more data about the patients Atkins and Bloggs, but not shown in the examples):
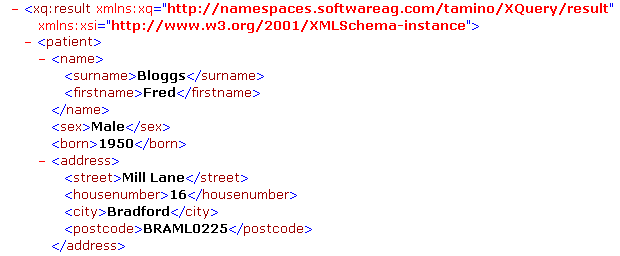
Now change the query to
input()/patient/name/surname
and choose the button. The response document should contain the following lines:

Note that this time, only the text in the surname element
has been returned.
For a description of the XQuery language, refer to the document XQuery 4 User Guide or the XQuery 4 Reference Guide.
Tamino supports two query languages, the Tamino specific X-Query (spoken "X-dash-Query") and Tamino XQuery (without a "dash"), which follows the recommendation of the W3C about XML query languages. If you want to use the Tamino specific query language X-Query, choose the Query a database using Tamino X-Query form by selecting the appropriate tab in the Tamino Interactive Interface. A screen similar to the following is displayed:
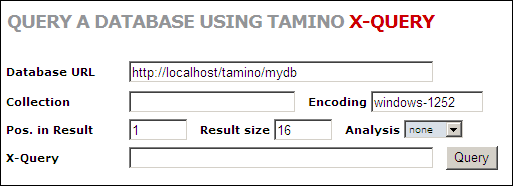
Input for the field Database URL is taken from the specifications you made before. If you want to switch to a different database, enter a new URL (see Database URL). The input for the field Encoding is the browser's default value (see Encoding).
For querying the data, you need to specify the collection to which the objects belong. Enter the name of the collection that you wish to access. For this example, the name of the collection is "Hospital".
If you do not want to display the complete result set of your query, you can specify the index of the first document to be returned in the field Position in Result.
Also, it is possible to limit the number of documents returned. Enter a number in the field Result Size. If you enter the value "0", cursoring is switched off.
Note:
If you switch off cursoring, there is no limit for the result size.
Thus the result size may become very large.
In the field X-Query, you can enter queries to the selected database and collection using the Tamino XML database query language X-Query. Refer to the X-Query User Guide for more information about this query language.
The following examples assume that you have loaded the two XML objects for Peter Atkins and Fred Bloggs, as described in the section Load XML Documents into a Database into a test database and collection.
In the X-Query field, enter the following query, then choose the button.
patient
This query means: find all elements of type patient in the
current collection (Hospital).
You should receive a response document that contains lines similar to these (other header and general processing information is also returned, as well as more data about the patients Atkins and Bloggs, but not shown in the examples):

Now change the query to
patient/name/surname
and choose the button. The response document should contain the following lines.
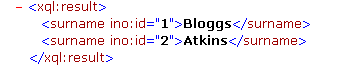
Note that this time, only the surname element has been
returned.
The Tamino Interactive Interface offers the possibility to obtain information about how the query is processed. This may be helpful for performance reasons, e.g. if you want to find out if the post processor is used for the query and if there might be another possibility of issuing a query request. See the documentation of ino:explain for detailed information.
To obtain information concerning the query
Enable the Analysis dropdown box by selecting one of the possible values in the list. You can choose among the following options:
| Option | Description |
|---|---|
| None | No analysis is done, the query is executed. |
| Default | Default analysis of the query is done, using
the function ino:explain.
|
| Path | Analysis is done with explanation level
path using ino:explain.
|
| Tree | Analysis is done with explanation level
tree using ino:explain.
|
Enter a query into the X-Query field.
Execute the query by choosing the button.
In the result window, information about the query is displayed.
Using this command, you can delete XML objects that you have previously loaded. In the Tamino Interactive Interface, choose the Delete documents using Tamino X-Query form by selecting the Delete tab. A screen similar to the following is displayed:

Use X-Query syntax to identify one or more objects on the basis of their content.
To select an object for deletion based on its content, proceed as follows. If, for example, you want to delete the object for the patient named Fred Bloggs, enter the collection name "Hospital" and then the following command in the Delete Query field: "patient[name/surname="Bloggs"]".
You can use wildcards to select multiple objects for deletion. If, for example, you type "patient[name/surname~="B*"]"
you will select for deletion all objects in the schema "patient" in which the surname begins with the letter "B".
To select an object for deletion based on its object ID, proceed as
follows. If, for example, you want to delete the object for the patient named
Fred Bloggs, which was created with an ino:id of
"1", enter the following command:
"patient[@ino:id=1]" and choose the
button.
If the command is successful, the response document will inform you that "document(s) have been deleted".
If you do not need a schema, collection or doctype any longer, the Tamino Interactive Interface offers a convenient way of undefining one or the other or all of them from the Tamino database that you have specified. Choose the form Undefine a collection, schema or document type by selecting the appropriate tab in the Tamino Interactive Interface. A screen similar to the following is displayed:
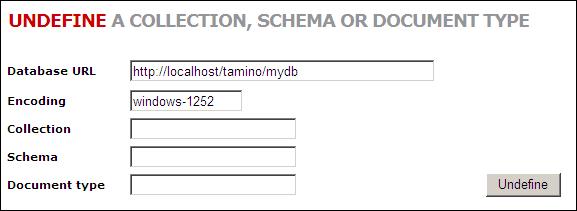
Here you specify the name of a collection, schema or document type that you want to undefine for the current database.
| Warning: If you undefine a doctype, its data is deleted and it is removed from its enclosing schema. Undefining a schema will remove the schema and all doctypes including their data, that are part of the schema. Consequently, undefining a collection will remove the collection with all schemas and doctypes and all documents. |
If you follow the example given in the section Define: Define a collection or schema, you have a collection called "Hospital" that contains a doctype called "patient" in the database "mydb".
To undefine the doctype "patient" from the collection "Hospital", enter the names in the appropriate fields Collection, Schema and Document type , then select the button. Make sure that you have entered the correct database URL and schema file.
If the command is successful, the response document will contain a message that the doctype and collection have been undefined. Also, the data for the patient Atkins have been deleted from the database along with all other documents in that doctype.
Note that the collection name, schema name and doctype name are case-sensitive, i.e. "hospital" is not the same as "Hospital", and "Patient" is not the same as "patient".
The Tamino Interactive Interface provides the possibility to send diagnostic requests to a Tamino database. Choose the form Request diagnose information about databases by selecting the appropriate tab in the Tamino Interactive Interface. A screen similar to the following is displayed:
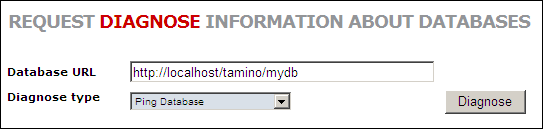
Choose a diagnose type for the current database. The following types are available:
| Diagnose Type | Description |
|---|---|
| Ping Database | Tries to establish an HTTP connection and returns a positive answer in the case that the server could be reached and is online. |
| Show Database Version | Returns the version of the Tamino Server. |
| Request Echo from Database | Delivers the HTTP headers seen in the Tamino Server if X-Machine is reachable by the web server, otherwise an error message is generated by the web server. |
| Get Time Information | Returns the total amount of time that the server has been active in user mode (i.e. executing user requests) since the database server was started, and the total amount of time that the server has been active in system (kernel) mode (i.e. executing system calls that result from user requests) since the database server was started. The values returned are the total times for all users together, not the individual times for each user. |
When you have selected the diagnose type, choose the button . Diagnose information about the current database is displayed in the result window. For further information, see the documentation about X-Machine Programming.
If a Tamino database or collection is protected and can be modified only by certain users, a user name and password have to be provided to work with the database. Choose the form Enter authentication information for execution of commands by selecting the appropriate tab in the Tamino Interactive Interface. A screen similar to the following is displayed:
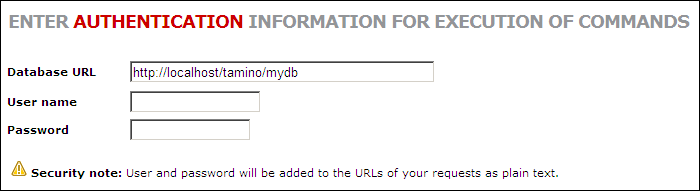
Enter your user name and password for the current database in the appropriate fields. The information is used on all other forms of the Tamino Interactive Interface.
Caution:
User name and password are added to the URLs of your request as
plain text. You might want to switch to secure communication (https) if this
causes problems in your environment.