
The Tamino forms handler allows the Tamino server to support the creation
of XML documents directly from an HTML form. An HTML form is defined by the
<FORM ...> statement in HTML code. Refer to the HTML
specification at http://www.w3.org/ for details.
To create an XML document, you must provide the following information in the HTML form:
The name of the database and collection where the new document should be created;
The fact that you want to create an XML document (rather than sending a query);
The names of the elements and attributes in the document and their associated values.
Note:
The name of the first element that you specify in the HTML form must
correspond to the name of a doctype in the specified collection. The generated
document will be stored as a document of that doctype. If the schema for the
doctype specifies mandatory elements or attributes, these must be included in
the HTML form, otherwise Tamino rejects the document.
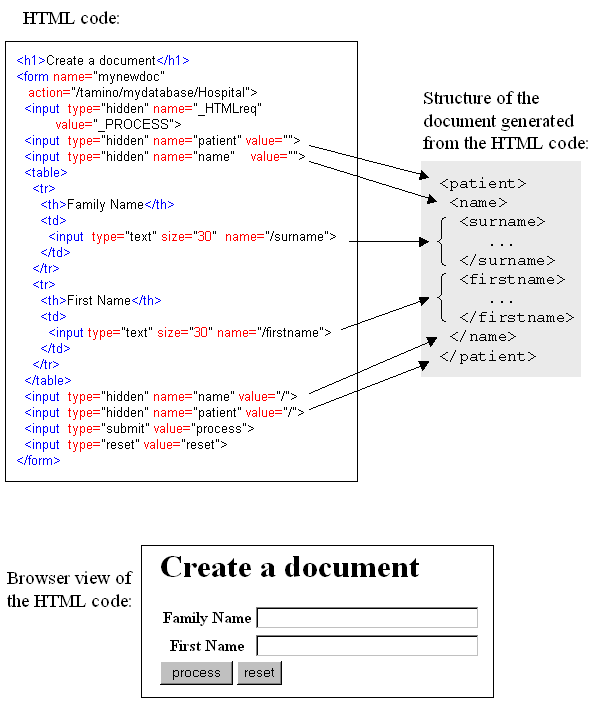
The following example illustrates the relationship between the HTML code
for the form, the structure of the XML document that is created from the form,
and the HTML document as it is displayed in a browser. The example is based on
the Patient DTD, in
which the root element is called patient, which has
a child element called name, which in turn has child
elements called surname and
forename. The example assumes that the database is
called mydatabase and the collection is called
Hospital.
The name of the database, collection and doctype are specified in an
attribute of the <FORM> statement, using the following
syntax:
<FORM action="CollectionURL">
CollectionURL is the URL of the collection in which you want to create the new document. CollectionURL is either an absolute URL (for example, http://mynode/tamino/mydb/mycollection) or a URL relative to the URL used to retrieve the HTML form. Hence, the HTML document must be retrieved using HTTP rather than directly from the file system, since Tamino cannot be accessed using a file URL (file://...).
<FORM action="/tamino/mydb/mycollection">
Here, "mydb" is the name of the database and "mycollection" is the name of the collection.
To create a new XML document, use the following code in the HTML form:
<input type=hidden name="_HTMLreq" value="_PROCESS">
The command _HTMLreq is a special X-Machine
command used only in the context of HTML forms for creating XML documents.
Note the specification of type=hidden, which means that
there is no visible entry in the HTML form to which this corresponds. This
mechanism allows required information to be passed to Tamino without being
displayed in the browser.
To create the opening tag of an XML element, use the following code in the HTML form:
<input type=hidden name="ElementName" value="">
where ElementName is the name of the element
you want to create. Note the type=hidden specification on this
statement.
To create the closing tag of an element, use the following code in the HTML form:
<input type=hidden name="ElementName" value="/">
To assign a user-defined value to an attribute of the most recently opened element, use an HTML statement of the following form:
<input type="text" size="SizeOfField" name="@AttributeName">
If there are several attribute/value pairs for the element, use one such statement for each pair.
If you want to define an attribute of the most recently opened element with a fixed (i.e. not user-defined) value, use a statement of the form:
<input type=hidden name="@AttributeName" value="AttributeValue">
where AttributeName is the name of the attribute (note the "@" character preceding it), and AttributeValue is the value to be assigned to the attribute. If the element has multiple fixed attributes, use one such HTML statement per attribute.
If you want to define attributes and child elements for the most
recently opened element, you must specify <input> statements
for all attributes before you specify the <input> statement
for the first child element.
To create an element's start tag, non-structured contents (e.g. PCDATA content as defined in a DTD) and end tag in a single step, use an HTML statement of the following form:
<input type="FieldType" [size="SizeOfField"] name="/ElementName">
where FieldType is a standard field type as
defined for the HTML <input> statement (such as
"text"), SizeOfField
optionally specifies the size of the input field in the browser, and
ElementName is the name of the element to be
created.
<input type="text" size="30" name="/surname">
Here, a text field is specified that appears with a width of 30
characters in the browser representation of the HTML code. The specification of
name="/surname" indicates that an opening
<surname> tag is to be written to the output stream, then
the value that the user inserts into this input field is written, followed by a
closing </surname> tag, producing a result such as the
following:
<surname>
 ...user input ...
</surname>
To create an element's start tag with attributes, followed by non-structured contents (e.g. PCDATA content as defined in a DTD), followed by the closing tag, use HTML statements as follows:
<input type="FieldType" name="ElementName">
<input type="text" size="SizeOfField" name="@AttributeName">
...
<input type=hidden name="ElementName" value="/">
where FieldType is a standard field type as
defined for the HTML <input> statement (such as
"text"), ElementName is
the name of the element to be created, SizeOfField
specifies the size of the input field in the browser and
AttributeName is the name of the attribute to be
created.