
The following topics are covered below.
The result of a query is shown as different packs in the Result pane. You can specify the number of instances that are to be shown with each pack.
The default values are defined in the Options dialog box. See Setting the Tamino XQuery Tool Options for further information.
 To specify the result fetch options
From the menu, choose .
Or:
Choose the following toolbar button:
![]()
The Specify Instance Fetch Options for Result dialog box appears.
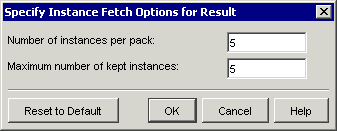
Specify the following information:
- Number of instances per pack
The number of instances or fragments that are to be fetched with each pack.
- Maximum number of kept instances
The maximum number of instances or fragments that can be shown at the same time.
Optionally: if you want to reset the values that are currently defined in the dialog box to the default values, choose the button.
Choose the button to use the new values.
When more instances or fragments are available than can be shown on the Result pane, you can browse through the result packs.
You can display the next or previous pack. Or you can immediately jump to the last pack or to the first pack.
The browse commands (see below) that are currently not available are disabled. For example, when the entire result is provided in one pack on the Result pane, all browse commands (and the corresponding toolbar buttons) are disabled.
To go to the first result pack
From the menu, choose .
Or:
Choose the following toolbar button:
![]()
To go to the last result pack
From the menu, choose .
Or:
Choose the following toolbar button:
![]()
To go to the previous result pack
From the menu, choose .
Or:
Choose the following toolbar button:
![]()
Or:
When the navigation tree is shown, click the plus sign next to the
up-arrow at the top of the list. When using the keyboard, select the up-arrow
and press ENTER.
To go to the next result pack
From the menu, choose .
Or:
Choose the following toolbar button:
![]()
Or:
When the navigation tree is shown, click the plus sign next to the
down-arrow at the bottom of the list. When using the keyboard, select the
down-arrow and press ENTER.
You can save the result pack that is currently shown in the navigation tree of the Result pane to your file system.
To save the current result pack
From the menu, choose .
The Save As dialog box appears. File name and extension are automatically provided.
Optionally: specify another file name and extension.
Select the path in which you want to save the file.
Choose the button.
You can save the item that is currently selected in the navigation tree of the Result pane to your file system.
To save an instance or fragment
In the navigation tree of the Result pane, select the item to be saved.
From the menu, choose .
The Save As dialog box appears. File name and extension are automatically provided.
Optionally: specify another file name and extension.
Select the path in which you want to save the instance or fragment.
Choose the button.