Creating, Editing, Copying, and Deleting Configurations
The Add/Edit Overview Configuration page which is accessible from the Overview Configuration page enables you to add, edit, or copy a configuration. Also, you can delete configurations from the Overview Configuration page.

To create or edit a configuration on the Overview Configuration page
1. In My webMethods, select: Navigate > Applications > Administration > Analytics > Overview Configuration
2. To create an overview configuration, click Add Configuration. If you want to edit an existing configuration, click the configuration name, or click the Edit icon ( ) to the right of the configuration name.
 The Add/Edit Overview Configuration page is displayed.
3. In the Configuration Information panel, complete the following fields:
 Configuration Name
 (required): Type a unique name for the configuration.
 Description
: Provide a description of the configuration.
 Shared
: Select this check box if you want the configuration to be available for viewing by all users. If this check box is unchecked, the configuration is available only to the user who created the configuration and to system administrators.
4. In the Components panel, you can click the question mark icon (across from the Tree Components heading) to display a Help dialog box.
5. Also in the Components panel, you can specify the Display Depth for the component tree. The default setting for Display Depth is 2.
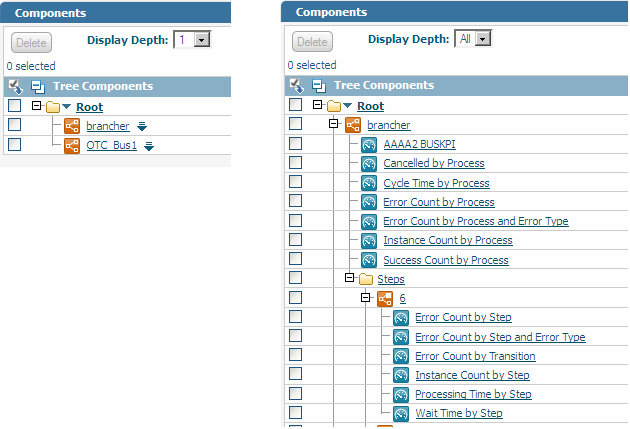
The Display Depth setting controls the number of levels displayed on the component tree, and it affects the performance of the page display. The more levels that are displayed, the longer the page requires to display, so you should configure the Display Depth to show only the levels that you need to see. If the Display Depth is configured so that node levels are hidden, a Down arrow icon appears adjacent the applicable nodes to indicate that some node levels are hidden.
The following image shows two views of the component tree. In the view on the left, the Display Depth is configured as “1,” so only one level of the component tree is visible. In the view on the right, the Display Depth is configured as “All,” and the entire tree is visible. Note the Down arrow icon beside the tree components on the left view, which indicates that there are additional undisplayed levels.
In the component tree, the target node is the base node from which the tree is expanded according to the Display Depth setting. By default, the Root node is the target node. However, you can designate any node in the component tree as the target node by clicking the desired component name. If you designate a new node as the target node, the component tree is redrawn around that node according to the Display Depth setting. Note that parent nodes above a target node display only the direct path between the root node and the target node.
Note:
A filter icon on the tree (

), it identifies a node that is a KPI filter.
6. Also in the Components panel, you can click the component menu icon ( ) that appears across from the name of each node to access the component menu for that node. The component menu enables you to add any of the following node types to an overview configuration:
Folders

Processes

Process steps

Process stages

KPIs

KPI Filter
In addition, the component menu enables you to perform several editing functions on nodes.
For more information about adding each node type to the component menu, see the appropriate procedure in the
Working with Configuration Components section that follows. For more information about editing nodes, refer to
Editing Components on the Component
Tree.
7. When you complete your changes, save the configuration by clicking Save.
Important:
If you refresh the page or leave this page without clicking Save, everything you've done will be lost.

 ), it identifies a node that is a KPI filter.