
Step | Description | |
1 | This step creates an empty MIME object. It does not take any inputs. It puts an empty MIME object named mimeData in the pipeline. | |
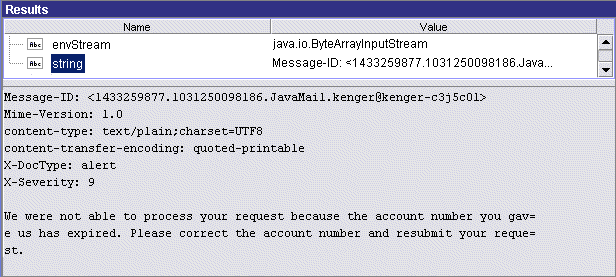
2 | This step adds two application-specific message headers in the MIME object. If you view the pipeline, you will see that the mimeHeader input variable is set as follows: | |
Name | Value | |
X-DocType | alert | |
X-Severity | 9 | |
3 | This step generates the content of the message. This example uses a custom Java service to convert a String containing the following text to an InputStream: We were not able to process your request because the account number you gave us has expired. Please correct the account number and resubmit your request In practice, you are more likely to acquire your content from a file, the network, or a back-end system. | |
4 | This step adds the content produced by step 3 to the mimeData object. If you view the pipeline, you will note that the stream output variable from step 3 is linked to this step’s content input variable. Because content contains a simple text message, the contenttype and encoding parameters are set as follows: | |
Parameter | Value | |
contenttype | text/plain;charset=UTF8 | |
encoding | quoted-printable | |
isEnvStream is set to “no” because the payload is not a MIME entity. | ||
5 | This step generates the finished MIME message. It takes the mimeData object that was populated in steps 2 and 4 and produces an InputStream called envStream that contains the MIME message. At this point, you could pass envStream to any process that expects a MIME message as input. | |
6 | Because you cannot view an InputStream, this example includes a step that converts envStream to a String so you can examine the finished message with Designer. This technique is useful for testing and debugging. If you examine the contents of string on the Service Result view, you will see a MIME message similar to the following:  | |