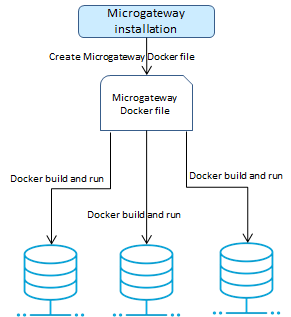
Docker-based Provisioning
Docker-based provisioning involves the creation of a Microgateway Docker file from an existing installation, building the image, and running it multiple times in a container environment as depicted in the following figure.
Microgateway Docker image
For the Docker-based provisioning the Microgateway CLI provides the createDockerFile command. The command creates a Docker file that can be consumed by docker build for creating a Docker image. The Microgateway Docker image contains an unzipped Microgateway package.
The command takes the command line options detailed in the Command Line Reference.
You can run the Docker image to spawn a Docker container from the created docker image.
The Docker images resulting from Docker files created using the createDockerFile command feature the following:
 Docker logging
Microgateway Docker containers log to stdout and stderr. The Microgateway logs can be fetched with the Docker logs command.
Docker health check Microgateway Docker containers perform health checks.
HEALTHCHECK CMD ${MICROGW_DIR}/microgateway.sh status 2>&1 | grep 'Server active'
The status command checks the Microgateway availability. If the status command confirms an active Microgateway the container is considered healthy.
Graceful shutdown When the docker stop command is used on a Microgateway container it performs a graceful shutdown.
Entrypoint support Microgateway Dockerfile exposes an ENTRYPOINT. The options provided to the createDockerFile command are supplied to the ENTRYPOINT through a CMD specification. An example of a generated Docker file is as follows:
FROM openjdk:8-jre-alpine
ENV MICROGW_DIR /opt/softwareag/Microgateway
MAINTAINER SoftwareAG
RUN mkdir -p ${MICROGW_DIR}/logs
RUN adduser -u 1724 -g 1724 -D -h ${MICROGW_DIR} sagadmin
RUN chown -R 1724:1724 /opt/softwareag
COPY --chown=1724:1724 ./config/ ${MICROGW_DIR}/config/
COPY --chown=1724:1724 ./lib/ ${MICROGW_DIR}/lib/
COPY --chown=1724:1724 ./files/ ${MICROGW_DIR}/files/
COPY --chown=1724:1724 ./resources/ ${MICROGW_DIR}/resources/
COPY --chown=1724:1724 ./*.jar ${MICROGW_DIR}/
COPY --chown=1724:1724 ./*.sh ${MICROGW_DIR}/
COPY --chown=1724:1724 ./tmp-docker/EmployeeService.zip ${MICROGW_DIR}/config
USER 1724
EXPOSE 4001
WORKDIR ${MICROGW_DIR}
ENTRYPOINT ["java","-jar","microgateway-server.jar"]
CMD [ "-p", "9090", "-a", "config/EmployeeService.zip", "-lv", "INFO"]
When running a Microgateway Docker image the default options may be overridden by supplying them as options to the docker run command line.
docker build -t sag:mcgw -f Microgateway_DockerFile .
docker run -d -p 9091:9091 --name mcgw sag:mcgw -p 9091
-a config/EmployeeService.zip -lv TRACE
This docker run command overrides the default port, asset archive, and logging levels specified by the Dockerfile CMD.
JRE support The createDockerFile command adds a Microgateway JRE to the Docker file so that Microgateway Docker image can be self-contained. Since the custom base image provides a JRE, the createDockerFile command supports the jre=none option to reuse the existing JRE and not copy the Microgateway JRE.
Microgateway provides a musl libc compatible JRE to support Alpine Docker-based images. The Microgateway installation provides the musl libc compatible JRE in the microgateway-jre-linux-musl folder. You have to specify the jre=linux-musl option in the createDockerFile command to copy the musl libc compatible JRE. If there is no base image specified the musl libc compatible JRE is copied. The available JRE options are linux, linux-musl, and none. The default value for the jre option depends on the docker_from value:
If there is no docker_from value specified, then the JRE used is linux-musl as the default base image is Alpine.
If you specify docker_from value, then the JRE used is linux
A Sample workflow for Docker-based Provisioning with Asset Archive
A sample sequence for executing a Docker-based provisioning with the asset archive looks as follows.
1. Create API Gateway archives and set the configuration file accordingly
---
ports:
http: 5554
https: 5553
api_endpoint:
base_path: /gateway
api_gateway:
url: http://localhost:5555/rest/apigateway
user: Administrator
password: <pwd>
admin_api:
base_path: /rest/microgateway
archive:
file: asset.zip
---
You can specify the archive zip file in the custom settings YAML file or have it on the command line.
Note:
The command line parameters take precedence over the configuration values specified in the custom settings YAML file.
2. Create Microgateway Docker file.
./microgateway.sh createDockerFile --docker_dir . -p 9090 -a <file-name>.zip
The command creates the Docker file Microgateway_DockerFile that copies the asset archives referenced by the zip file into the Docker image.
The createDockerFile command allows to configure the Docker file creation using command line parameters. For example, the following command sequence creates a Docker file for a Microgateway container listening on port 9090 and with the assets from the archives apis.zip and policies.zip.
./microgateway.sh createDockerFile -p 9090 -c custom-settings.yml
-a apis.zip,policies.zip
3. Create the Docker image with asset archive.
docker build -t sag:mcgw-static -f Microgateway_DockerFile .
The command creates the image sag:mcgw-static from the generated Docker file.
4. Run the Docker image.
docker run -d -p 9090:9090 --name mcgw-static sag:mcgw-static
The command spawns a Docker container from the image sag:mcgw-static. The Microgateway container listens on the host port 9090.
A Sample workflow for Docker-based Provisioning with pulling from API Gateway
A sample sequence for executing a Docker-based provisioning with pulling from API Gateway looks as follows.
1. Create Microgateway Docker file points to an API Gateway for pulling APIs on startup.
./microgateway.sh createDockerFile --docker_dir . -c config/custom-settings.yml
The command creates the Docker file Microgateway_DockerFile that copies the API Gateway configurations from the custom settings YAML file into the Docker image.
2. Create the Docker image.
docker build -t sag:mcgw-dynamic -f Microgateway_DockerFile .
The command creates the image sag:mcgw-dynamic from the generated Docker file.
3. Run the Docker image.
docker run -d -p 9090:9090 --name mcgw-dynamic sag:mcgw-dynamic
The command spawns a Docker container from the image sag:mcgw. The Microgateway container listens on the host port 9090.
A Sample workflow for Docker-based Provisioning with dynamic configuration
Dynamic configuration is applied by mapping a volume holding the config folder of the Microgateway instance.
A sample sequence for executing a Docker-based provisioning with dynamic configuration looks as follows.
1. Create Docker file pointing to the user-defined custom settings YAML file.
./microgateway.sh createDockerFile --docker_dir . -c config/custom-settings.yml
-p 9090
The command creates the Docker file Microgateway_DockerFile that copies the configurations from the custom-settings.yml file into the Docker image.
2. Create the Docker image.
docker build -t sag:mcgw-dynamic -f Microgateway_DockerFile .
The command creates the image sag:mcgw-dynamic from the generated Docker file.
3. Provide config directory with host file system with required Microgateway configurations:
> ls ~/mcgw-conf/
custom-settings.yml keystore.jks license.xml system-settings.yml
4. Start container with volume mapping pointing to config directory in host file system.
docker run -d -v ~/mcgw-conf:/Microgateway/config
-p 9090:9090 --name mcgw-dynamic sag:mcgw-dynamic
The command spawns a Docker container from the image sag:mcgw-dynamic. The Microgateway container listens on the host port 9090.
A Sample workflow for Docker-based Provisioning with Custom Settings
A Microgateway Docker instance can be established and run using customized settings. A sample sequence for docker-based provisioning with custom settings looks as follows.
1. Create the custom settings file. These settings are pulled from a specified API Gateway
./microgateway.sh downloadSettings -gw http://hostname:port
–-output my-custom-settings.yml
These settings are pulled from a particular API Gateway instance specified by its hostname and port number.
2. Create Docker file pointing to the customized settings file.
./microgateway.sh createDockerFile --http_port 7071 --docker_dir .
--archive myarchive.zip --config my-custom-settings.yml
The command creates the Docker file Microgateway_DockerFile that copies the API Gateway configurations from the my-custom-settings.yml file into the Docker image.
3. Create the Docker image.
docker build -t sag:mgcustomsettings -f Microgateway_DockerFile .
The command creates the image sag:mgcustomsettings from the generated Docker file.
4. Run the Docker image.
docker run -d -p 7071:7071 --name mgcustomsettings sag:mgcustomsettings
The command spawns a Docker container from the image sag:mgcustomsettings. The contained Microgateway listens at the host port 7071.
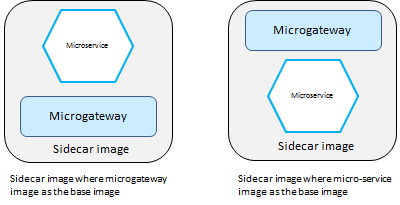
Sidecar Container support
You can have Microgateway in a sidecar deployment mode where Microgateway runs with micro-services in the same Docker container. This provides protection to the micro-service as the micro-services can only be reached through the Microgateway. In the sidecar deployment, you can have the Microgateway Docker image in one of the following ways:
Microgateway Docker image is the base image for the sidecar image.
Microgateway is added on top of an existing custom image holding the micro-service
This figure depicts the two different ways in which you can have the Microgateway Docker image in the sidecar deployment.
The sidecar deployment requires to spawn multiple processes in Microgateway container. Therefore, the createDockerFile command supports the exec option.
The purpose of the exec option in the createDockerFile command is to start the micro-service process. The exec option allows you to specify a shell command that is being added to the Microgateway docker-entrypoint.sh. For example, the following command creates a sidecar Docker image based on a micro-service base image running the SAG node-tours application:
./microgateway.sh createDockerFile -dor sag:node-tours
-exec "(cd /usr/src/app; npm start)" -dod . -p 9090 -a ../node-tours.zip
When starting the image the command specified in the exec option is executed first. The Docker file looks as follows:
FROM sag:node-tours
MAINTAINER SoftwareAG
ENV MICROGW_DIR /opt/softwareag/Microgateway
RUN mkdir -p ${MICROGW_DIR}/logs
COPY adduser.sh ${MICROGW_DIR}
RUN ${MICROGW_DIR}/adduser.sh sagadmin 1724 ${MICROGW_DIR}
RUN chown -R 1724:1724 /opt/softwareag
COPY --chown=1724:1724 ./config/ ${MICROGW_DIR}/config/
COPY --chown=1724:1724 ./lib/ ${MICROGW_DIR}/lib/
COPY --chown=1724:1724 ./files/ ${MICROGW_DIR}/files/
COPY --chown=1724:1724 ./resources/ ${MICROGW_DIR}/resources/
COPY --chown=1724:1724 ./*.jar ${MICROGW_DIR}/
COPY --chown=1724:1724 ./*.sh ${MICROGW_DIR}/
COPY --chown=1724:1724 ./tmp-docker/node-tours.zip ${MICROGW_DIR}/config
COPY --chown=1724:1724 ./microgateway-jre-linux/
${MICROGW_DIR}/microgateway-jre-linux/
EXPOSE 9090
HEALTHCHECK CMD ${MICROGW_DIR}/microgateway.sh status 2>&1 |
grep 'Server active'
WORKDIR ${MICROGW_DIR}
USER 1724
ENTRYPOINT ["./docker-entrypoint.sh"]
CMD ["-p", "9090", "-a", "config/node-tours.zip", "-lv", "ERROR"]
The simple docker-entrypoint.sh script is as follows:
#!/bin/sh
(cd /usr/src/app; npm start) &
./microgateway-jre-linux/bin/java -jar microgateway-server.jar $@
The sample script runs the provided command to start the node.js based micro-service in the background. Then Microgateway is started with the command line parameters.
The Docker file can be used for creating an image using the docker build command.
docker build -t sag:mcgw-node-tours .
The resulting Docker image sag:mcgw-node-tours holds the Microgateway and the NodeTours micro-service. Starting the Docker container starts the Microgateway and the node.js at runtime.
docker run -d -p9090:9090--name mcgw-node-tours
sag:mcgw-node-tours
The Docker container only exposes the Microgateway port the node.js port is not exposed. Therefore the NodeTours micro-service can not be called directly.
Microgateway image based on an MSR image
You can use the --msr option in the createDockerFile command to detect an image holding a webMethods Microservice Runtime (MSR).
If a MSR image is detected, the createDockerFile command does not add any jre, since the MSR already provides a jvm. The createDockerFile command for creating an MSR based sidecar image is as follows:
./microgateway.sh createDockerFile -dod . -dor sag:msr-employee-service
-msr -p 9090 -a ../EmployeeService.zip
The Docker file created by the command is as follows:
FROM sag:msr-employee-service
MAINTAINER SoftwareAG
ENV MICROGW_DIR /opt/softwareag/Microgateway
RUN mkdir -p ${MICROGW_DIR}/logs
COPY --chown=1724:1724 ./config/ ${MICROGW_DIR}/config/
COPY --chown=1724:1724 ./lib/ ${MICROGW_DIR}/lib/
COPY --chown=1724:1724 ./files/ ${MICROGW_DIR}/files/
COPY --chown=1724:1724 ./resources/ ${MICROGW_DIR}/resources/
COPY --chown=1724:1724 ./*.jar ${MICROGW_DIR}/
COPY --chown=1724:1724 ./*.sh ${MICROGW_DIR}/
COPY --chown=1724:1724 ./tmp-docker/EmployeeService.zip ${MICROGW_DIR}/config
EXPOSE 9090
HEALTHCHECK CMD ${MICROGW_DIR}/microgateway.sh status 2>&1 | grep 'Server active'
WORKDIR ${MICROGW_DIR}
USER 1724
ENTRYPOINT ["./docker-entrypoint.sh"]
CMD ["-p", "9090", "-a", "config/EmployeeService.zip", "-lv", "ERROR"]
The Docker image sag:msr-employee-service provides an MSR instance that runs the micro-service EmployeeService. The API definition for the micro-service is provided by the exported API Gateway asset archive, EmployeeService. The image can be created using the docker build command.
docker build -t
sag:mcgw-msr-employee-service .
The resulting Docker image sag:mcgw-msr-employee-service holds the Microgateway and the MSR. Starting the Docker container starts the Microgateway and the MSR.
docker run -d -p9090:9090--name mcgw-msr-employee-service
sag:mcgw-msr-employee-service
The Docker container only exposes the Microgateway port and the MSR port is not exposed. Therefore the MSR can not be called directly.