Two-Way SSL communication for hybrid integrations
webMethods Integration Server 10.7 and later versions support two-way SSL communication between the on-premises webMethods Integration Server and Integration Cloud. webMethods Integration Server, by default, supports one-way SSL communication in which the on-premises webMethods Integration Server acts as a client and validates the certificate issued by Integration Cloud that acts as a server.
In two-way SSL communication, both the on-premises webMethods Integration Server and Integration Cloud validate each other’s certificate using private keys. If you want more secure communication between two business applications, you can set up two-way SSL communication.
Note:
Before you set up a two-way SSL communication, you need to download the Integration Cloud signed certificate and generate a keystore file. Then use the keystore file to generate a keystore alias on the on-premises Integration Server. When you set up a connection to Integration Cloud, you need to use these keystore details so that Integration Cloud can validate the certificate. Ensure that you have Integration Server 10.7 or any later version installed for two-way SSL communication.
How to set up two-way SSL communication between the on-premises Integration Server and Integration Cloud
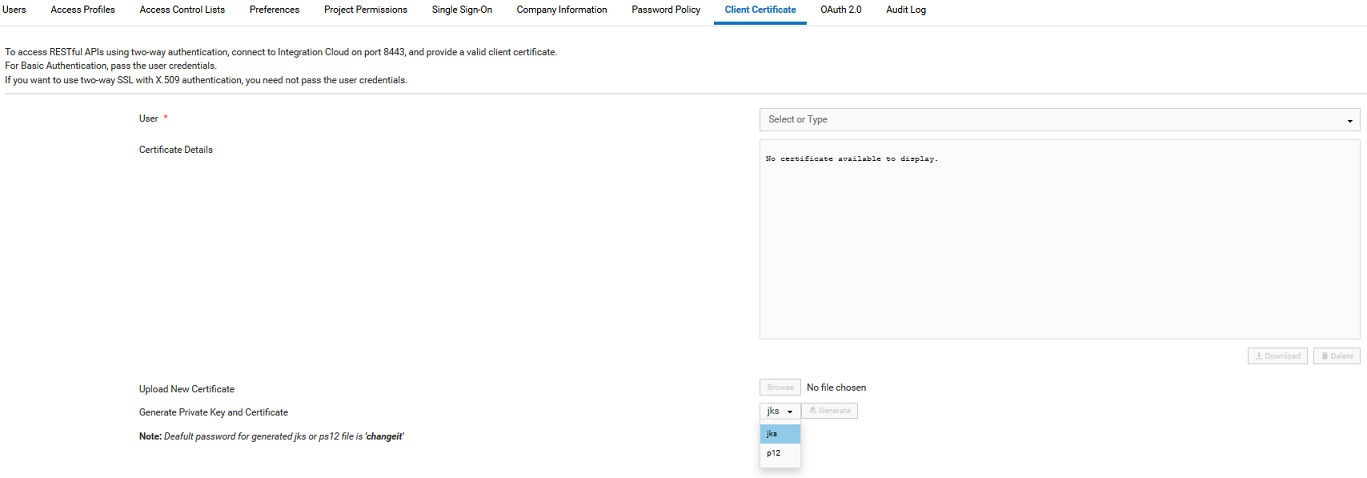
1. Go to the Certificates page in Integration Cloud (Settings > Client Certificate) and download the webMethods signed certificate file in jks or p12 format, which contains the private key and the certificate. You can also upload your own CA signed certificate. Integration Cloud does not support uploading self signed certificates.
Note:
You can either directly generate the JKS file, or if you have generated a text file, use the JKS tools or utilities to generate the JKS file.
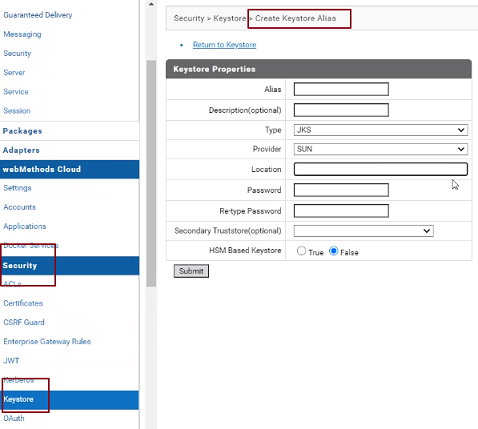
2. Go to webMethods Integration Server Administrator and add the JKS file in the webMethods Cloud > Security > Keystore > Create Keystore Alias page. Provide the keystore or JKS file path in the Location field and specify the keystore password. The default password is changeit. You should update the password for enhanced security. Click Submit.
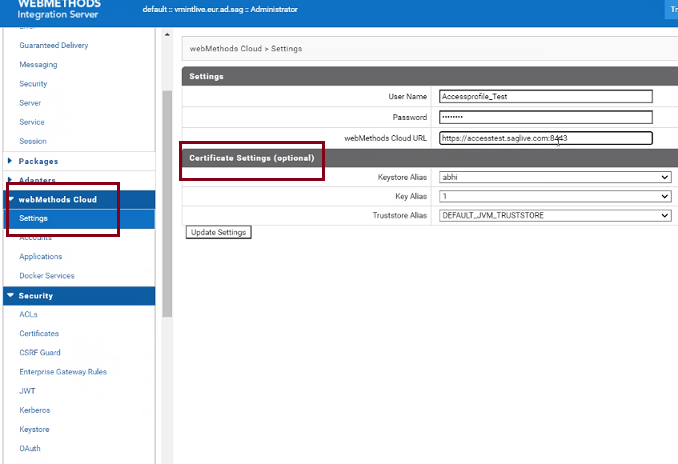
3. In webMethods Integration Server Administrator, click webMethods Cloud > Settings and specify the details.
Field | Description |
User Name | User name for an account on Integration Cloud. |
Password | Password identified in the user account for User Name. |
webMethods Cloud URL | The URL of Integration Cloud with which to share accounts and applications created on the on-premises webMethods Integration Server. For example, the URL would be of the following format: https://<sub-domain>.<domain-name> For example, https://softwareag-education.webmethodscloud.com Note:
To set up a two-way SSL communication, add port 8443 in the URL. For example, https://<sub-domain>.<domain-name>:8443. |
Under Certificate Settings (optional), complete the fields if you want to set up a two-way SSL communication with Integration Cloud. If you do not configure these settings, Integration Server uses one-way SSL communication with Integration Cloud.
Field | Description |
Keystore Alias | A user-specified, text identifier for the webMethods Integration Server keystore. This is the alias for the keystore that contains the client certificates that you want webMethods Integration Server to use when connecting to Integration Cloud. Select the same keystore alias that you have created in Integration Server. |
Key Alias | The alias for the private key, which must be stored in the keystore specified by the above keystore alias. This value is automatically selected. |
Truststore Alias | The alias for the truststore that contains the trusted root certificate for the CA that signed the Integration Server certificate associated with the key alias. The truststore also contains the list of CA certificates that Integration Server uses to validate the trust relationship. Select Default_JVM_Truststore. |
4. Click Update Settings. webMethods Integration Server connects to Integration Cloud specified in the webMethods Cloud URL field and downloads the configuration information that is required to receive any incoming requests.
5. Create an account in Integration Server (webMethods Cloud > Accounts).
6. Create the application in Integration Server (webMethods Cloud > Applications).
7. Select the account and upload the application to Integration Cloud. The application will be listed on the On-Premises Applications page in Integration Cloud (Project > Applications > On-Premises Applications).