Adding or Editing Operations
Use the Operations page to add, edit, or delete custom operations.

To add or edit a custom operation
1. From the Integration Cloud navigation bar, click Projects > <Select a Project> > Applications.
2. Select an Application from an Application category and then select Operations.
To use an Application, you are required to agree to the summary of terms. Click I agree to use the Application. Click I do not agree if you disagree with the summary of terms and do not want to use the Application. Click Cancel to go back to the Applications page.
3. From the Operations page for the selected Application, click Add New Operation to add a custom operation or click Edit to update an existing custom operation. The Add New Operation option is not available for some Applications.
4. On the Select your <...> account page, complete the following fields. Required fields are marked with an asterisk on the page.
Field | Description |
Save as | Provide a name for the custom operation. |
Description | Provide a description for the custom operation. |
Select account | Select an Account created for the Application from the drop-down list. Only active or enabled Accounts are listed in the drop-down list. Note:
If you select an Account with a different Authentication Type, existing Integrations that are using this Account may not work. |
Select functional area | Select the Application service from the drop-down list. Note:
This option is available only for certain Applications. |
Enable dynamic account configuration at runtime | For REST Application operations, you can now provide account configurations at runtime during integration execution. Select the Enable dynamic account configuration at runtime check box and then click Configure Fields to run the operation by passing authentication details that may be different from the authentication details configured in the Account configuration page. Dynamic authentication overwrites the Account configuration details. |
| For example, suppose you have configured authentication details X for Account A. You can use different authentication details Y to run the service, by overwriting the authentication details X of Account A. Note:
Enable dynamic account configuration at runtime is currently supported only for custom REST Applications. Further, the option is enabled only after you have selected an Account in the Select account field. While creating an operation, if you select the Enable dynamic account configuration at runtime check box and click Configure Fields, the Dynamic Account Configuration Fields window appears. Select the fields you want to include in the operation input signature. When you select the fields, the operation input signature will be automatically updated based on your selections. Only the fields that are part of the signature gets mapped as the input request. You can override the field values at run time. Default Account configuration values will be used for other fields while creating the operation. Note:  You cannot clear encrypted fields like Access Token and Consumer Secret. Further, you cannot enter a value for encrypted fields. You can enter the values for encrypted fields only while running the operation. While running the operation, if you have provided details in both the Account configuration page and in the Dynamic Account Configuration Fields dialog box, Integration Cloud reads the data from the Account configuration page and merges the data with the data provided in the Dynamic Account Configuration Fields dialog box. Existing Account configuration details will not be modified. Details specified in the Dynamic Account Configuration Fields dialog box take precedence over the details specified in the Account configuration page. If you pass incorrect values in the Dynamic Account Configuration Fields dialog box, service execution will fail while running the operation. |
5. Click Next.
The Select the Operation page appears. If you do not want to add Headers and Parameters, skip to Step 9.
6. For a REST-based Application, select an operation and click Headers to add input Headers, if required. Integration Cloud displays the default HTTP transport headers for the operation, along with their default values. At run time, while processing the headers, Integration Cloud substitutes the values as necessary. In order to customize the headers, do the following:
a. Click Add Header to add a custom Header. Specify the Header name. To specify an optional default value for the header variable, click the Default Value box and type or paste the new value. If the variable is null in the input pipeline, this value will be used at run time. If the variable already has an existing default value defined, this value will overwrite the existing value at run time.
b. If headers appear in the signature, select Active to activate the headers in the signature.
c. To delete a custom header that you have added, select the header and click Delete.
Note:
You cannot delete the required headers.
7. For a REST-based Application, select an operation and click Parameters. To customize the parameters, do the following:
a. Review the operation parameter details. Integration Cloud displays the parameter Name and Description, the Data Type used to represent the kind of information the parameter can hold, the parameterization Type of the request, and the default value needed to access the operation.
b. To specify a default value for the parameter, click the Default Value box and then type or paste the default value. The default value is used at run time.
You cannot add or delete request parameters. You can only modify the default value of a parameter. All parameters appear in the signature.
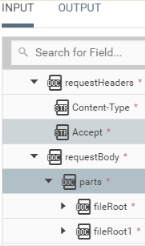
8. For some Applications and Operations, for example, for the CloudStreams Connector for Salesforce(R) Bulk v2 Data Loader Application and Create Job and Upload Job Data Operation, Integration Cloud supports multipart request body. For example, if you want to create a user as well as upload a photo, the request has to be a multipart request where one part is an image file while the other part is a JSON request body.
Though application/x-www-form-urlencoded is a more natural way of encoding, it becomes inefficient for encoding binary data or text containing non-ASCII characters. The media type multipart/form-data is the preferred media type for request payloads that contain files, non-ASCII, and binary data. Integration Cloud supports this media type using which you can embed binary data such as files into the request body.
A multipart/form-data request body contains a series of parts separated by a boundary delimiter, constructed using Carriage Return Line Feed (CRLF), "--", and also the value of the boundary parameters. The boundary delimiter must not appear inside any of the encapsulated parts.
Each part has the Type, Name, Content-Type, and Part ID fields.
Example of a multipart request
--BOUNDARY
Content-Type: application/json
Content-Disposition: form-data; name="job"
{
"object":"Contact",
"contentType":"CSV",
"operation":"insert"
}
--BOUNDARY
Content-Type: text/csv
Content-Disposition: form-data; name="content"; filename="content"
(Content of your CSV file)
--BOUNDARY—
Part Configuration
The Part Configuration window lists all the configured parts to be sent to the service provider. To view the Part Configuration window, on the Select the Operation page, select Attachments.
The configured parts appear in the input signature.
Name - The
Name field displays the name of the file part as documented in the SaaS provider API documentation.
Content Type - The
Content Type field displays the content type of the file you are uploading.
Type -
Document - Some back ends expect application/json or application/xml content in the part body. This represents a part where the content of the part is of type application/json or application/xml.
File - Represents a binary part of a multipart/form-data payload where the content of the part is binary or the content of the file itself. For file upload kind of use cases, this part is the main or mandatory part required by the service provider.
9. On the Select the Operation page, select the operation to be performed and then click Next. Depending on whether the operation is Complex, Simple, or Dynamic, the Business Object or the Interactions page appears. Examples of Business Objects are Contact, Account, and so on and examples of Interactions are Create, Update, Upsert, Delete, and so on.
Note:
For some operations, Integration Cloud displays appropriate Business Object pages, for example, for the createMultiple and updateMultiple operations in the Salesforce v42 Application, or Interactions (sub-operations) pages, for example, for the Batch and ChangeSet operations in the OData 4.0 Application, depending on whether the selected operation requires metadata, such as a business object, fields, and data types of fields. You can add or edit multiple business objects in a single request. You can also add or edit interactions and then associate those interactions with business objects in a single request. Interactions or multiple business objects will be executed in the same sequence as they appear in the table. You can drag and drop the interactions or multiple business objects to change the order in which they will be executed.
Different pages appear based on the scenarios mentioned in the following Single or Multiple Interactions with Single or Multiple Business Objects with dependencies section.
Single or Multiple Interactions with Single or Multiple Business Objects with dependencies
Single operation has a single Business Object - An operation has only a single business object. The operation has neither multiple interactions nor has records. An example of a single operation and a single object can be a "create" operation that contains only the "contact" business object.
Single operation has multiple Business Objects - A single operation has multiple business objects. An example of a single operation with multiple business objects can be a "create" operation that contains two business objects, "contact" and "account".
Single operation has multiple Business Objects with dependencies - A single operation has multiple business objects and some of the business objects may have dependencies on other business objects.
Multiple Interactions have multiple Business Objects - Multiple Interactions have multiple business objects. For example, the "create" and "update" Interactions can act on the "account" and "contact" business objects respectively.
Multiple Interactions have multiple Business Objects with dependencies - Multiple Interactions have multiple business objects and some of the business objects may have dependencies on other business objects. For example, the "create" and "update" Interactions can act on the "account" and "contact" business objects respectively.
Further, for some operations, for example, for the Retrieve Contained Or Derived Entity operation in the OData 4.0 Application, Integration Cloud displays nested, hierarchical, or multi-level business objects if the operation is designed to support nested business objects. You can expand the nested business objects to display the child-level objects.
10. Select the Business Object to be associated with the operation you have selected in the previous step and then click Next. For some operations, you must select the Interaction and then the Business Object. Business Objects and Interactions appear only for certain Applications and operations.
11. In the Data Fields page, select the data fields for the Business Object you have chosen in the previous step and then click Next. Data fields appear only for certain Applications and operations. Mandatory data fields for the Business Object are selected by default and cannot be cleared.
Note:
For some operations of certain Applications, for example, Coupa, you can add your own fields. Such fields are called custom fields. Custom fields are marked by
custom on the page. You can add, edit, or delete only custom fields. Click the

icon to add a custom field. The
icon appears only if you are allowed to add custom fields for the selected operation. After you have added a custom field, you can click on the custom field to edit the field properties.
Simple fields appear with a check box while complex fields appear with a check box followed by an arrow mark. The following states are observed for complex fields:
Unchecked - For unchecked complex fields, only the mandatory child fields are selected but those fields will not be added to the signature, unless you select the parent field.
Checked - If a complex field is selected by default, then only the mandatory child fields are selected. You can select the optional fields, if required. If you select a complex field, then all the child fields are selected.
Note:
For some Applications, for example, Microsoft Dynamics CRM, you can choose the way a query can be executed in the Confirm operation page. Choose the operation and then click Finish.
12. In the Confirm Operation page, verify the details. You can click the Data Fields link to view the data fields you have added. For some operations, you can click the Business Object link to view the data fields added.
13. Click Finish to create the custom operation.
After you click Finish or Save, if there are any Business Parameters, you will be asked to configure the Business Parameters.