
The Web Services Wrapper for Natural allows you allows you to generate Web services from Natural subprograms in a NaturalONE project in Eclipse. The generated Web service objects, which are WS-Stack Web service archives (file extension .aar) can be deployed in a Web Services Stack runtime, registered in CentraSite and tested with the EntireX XML Tester. Web services client applications can then access these Web services that expose some business logic implemented by Natural server components.
This document describes the steps for generating a Web service using Web Services Wrapper for Natural. It covers the following topics:
To use the Web Services Wrapper for Natural you need Designer with the NaturalONE and EntireX plug-ins installed.
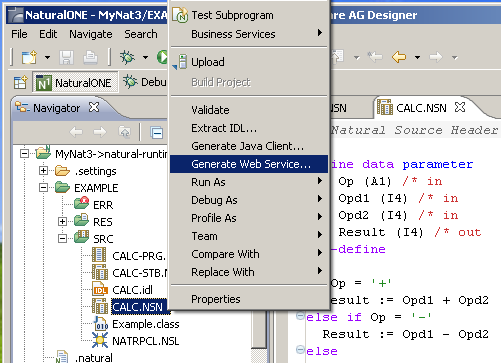
To start the Web Services Wrapper for Natural, select a Natural subprogram (file extension .NSN) located in a library of a NaturalONE project, and from the context menu choose . Alternatively you can start the Web Services Wrapper for Natural from the context menu of the Natural source folder or any parent folder in the project, including the Natural library and the Project folder.
If you have started the wizard from a folder containing multiple Natural libraries, the wizard displays a page showing all available libraries from which you can select one.
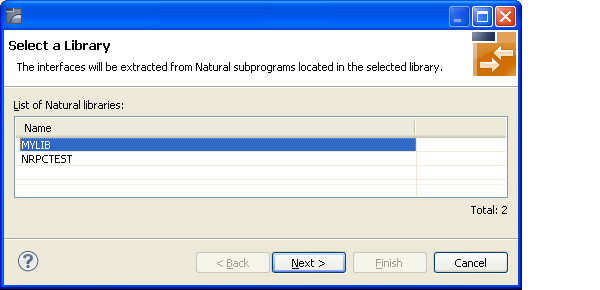
Select the Natural library from the list and continue with Step 3: Select the Natural Subprograms.
The following wizard page provides a list of available Natural subprograms.
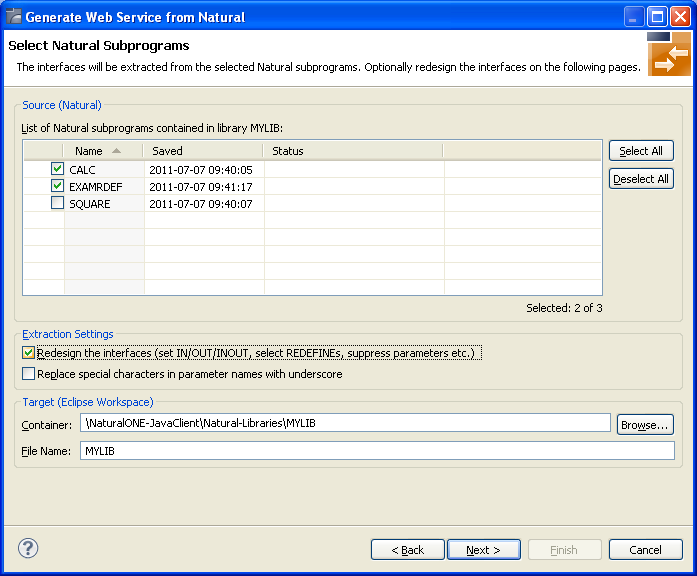
In the Source pane, select at least one program from the list of Natural subprograms (CALLNATs). You can also choose or .
In the Extraction Settings pane, check Redesign the interfaces if you want to design the extracted interfaces to the Natural subprograms. The button will be enabled. See Step 4: Redesign the Interface for Natural Subprograms (Optional). If you do not check Redesign the interfaces, see Natural to IDL Mapping for default mappings.
Check Replace special characters in parameter names by underscore to substitute the special characters '$', '#', '&', '@', '/' by underscores. See also Extracting IDL Parameter Names.
Press to continue.
If Redesign the interfaces is checked, continue with Step 4: Redesign the Interface for Natural Subprograms (Optional).
Otherwise continue with Step 5: Configure the Web Service Client.
In this step, you can redesign the interface. This includes:
Use this page for the following tasks:
Define the direction of parameters in the extracted interface. Choose Map to In, Map to Out or Map to InOut for each parameter on level 1.
Define which parameters redefined in the Natural PDA are part of the
extracted interface. Choose Map to In, Map to
Out or Map to InOut for the
REDEFINE base parameter or any
REDEFINE path.
Hide or suppress unneeded parameters in the extracted interface. Choose Suppress.
Set parameters to constants and hide or suppress them in the extracted interface. Choose Set Constant.
This page consists of the following main parts:
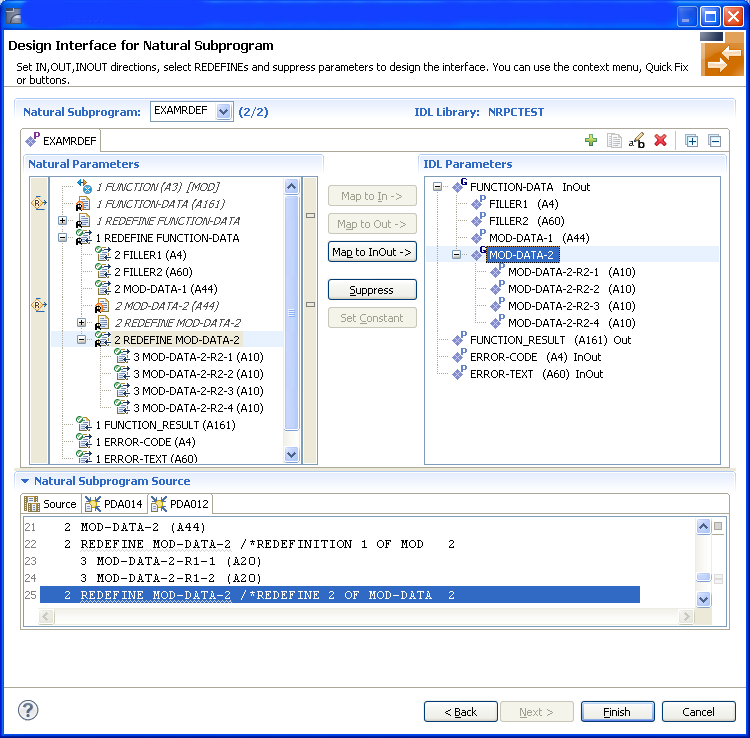
Top line
The top line contains the current Natural subprogram and the IDL library
name. The combo box can be used as quick navigation if more than one Natural
subprogram is selected.
Middle
The middle part contains a tab item for each interface ( IDL program)
extracted from the Natural subprogram.
Note:
It is possible to extract more than one interface (IDL program) from a
Natural subprogram. To create, rename and remove interfaces, use the toolbar on
the right side of tab folder.
| Icon | Function | Description |
|---|---|---|
|
|
Create | Create a new interface (IDL program) based on the original parameters of the Natural subprogram. |
|
|
Duplicate | Create a new interface (IDL program) based on the current interface (active tab). All modifications of the current interface are copied. |
|
|
Rename | Change the name of the current interface (active tab). The name must be unique. |
|
|
Remove | Remove the current interface (active tab). At least one interface must exist. |
|
|
Expand All | Expand the Natural and IDL tree. |
|
|
Collapse All | Collapse the Natural and IDL tree. |
Middle left
Input pane. The parameters of the Natural subprogram to extract from. For
each Natural subprogram parameter you can choose one of the operations
Map to In, Map to Out, Map
to InOut, Suppress and Set
Constant. Additionally for REDEFINEs, a quick fix is available
(icons on the left side of the pane) to choose which parameters redefined in
the Natural PDA are part of the extracted interface.
Notes:
FUNCTION (A3) is set to constant; FILLER1(A4) and
FILLER2(A60) are suppressed; FUNCTION-DATA(A161) and
its first REDEFINE path are implicitly suppressed because the
second REDEFINE path with prefix MOD-DATA-2-R2 is
selected.
FUNCTION (A3) [MOD]).
 ).
).
Middle right
Output pane. The extracted interface (IDL).
Bottom
Reference. The Natural subprogram source and its PDA sources, each
displayed in a separate tab.
The panes can be resized.
To enlarge parameter lists, use the vertical bars on the side.
You can close the bottom pane if it is not needed by clicking on the triangle next to Natural Subprogram Source. In this way, you have more space for viewing the upper panes.
Use the quick navigation or choose to continue. If multiple Natural subprograms have been selected in the Natural subprogram selection step, redesign the next interface. The amount of subprograms extracted so far is indicated by the fraction next to the title (current/total).
If multiple Natural subprograms have been selected in the Natural subprogram selection step, redesign the next interface. The number of subprograms extracted so far is indicated by the fraction next to the title (current/total).
If only one Natural subprogram has been selected or no further one has to be redesigned, continue with Step 5: Configure the Web Service Client.
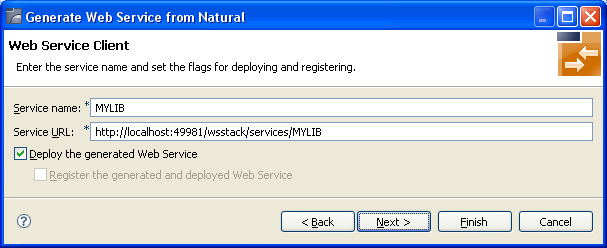
On the next wizard page you can specify the name of the Web service and service URL (which depends of course on where it is deployed) and whether to deploy the Web service in a WS-stack runtime and register it in a CentraSite instance. You can change the proposed default values according to your needs.
If you chose to deploy the Web service, a wizard page is displayed where you can select the target WS-stack instance for the deployment. In the workspace preferences () you can define a list of additional WS-stack deployment targets. Select one of these targets.
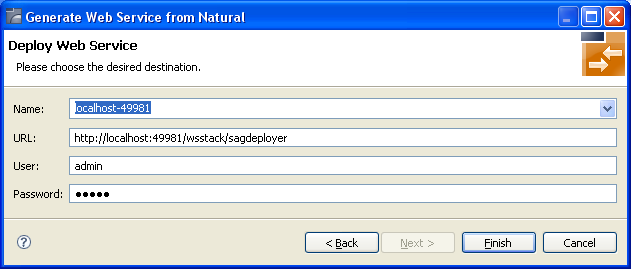
Note:
Deployment in WS-stack requires authentication. The default
authentication credentials are preconfigured (user: admin, password: axis2). If
the WS-stack installation was secured differently, contact you administrator
for the current credentials. See also Deploy Web Services Stack in the Software AG Infrastructure Administrator's Guide, also available under http://documentation.softwareag.com > Guides for Tools Shared by Software AG Products.
If you chose to register the Web service in a CentraSite, additional Wizard pages will be displayed that guide you through the Web service registration process. See the WS-stack documentation, section Configuration > Eclipse Plug-in > Registering a Web Service Package in CentraSite for more information.
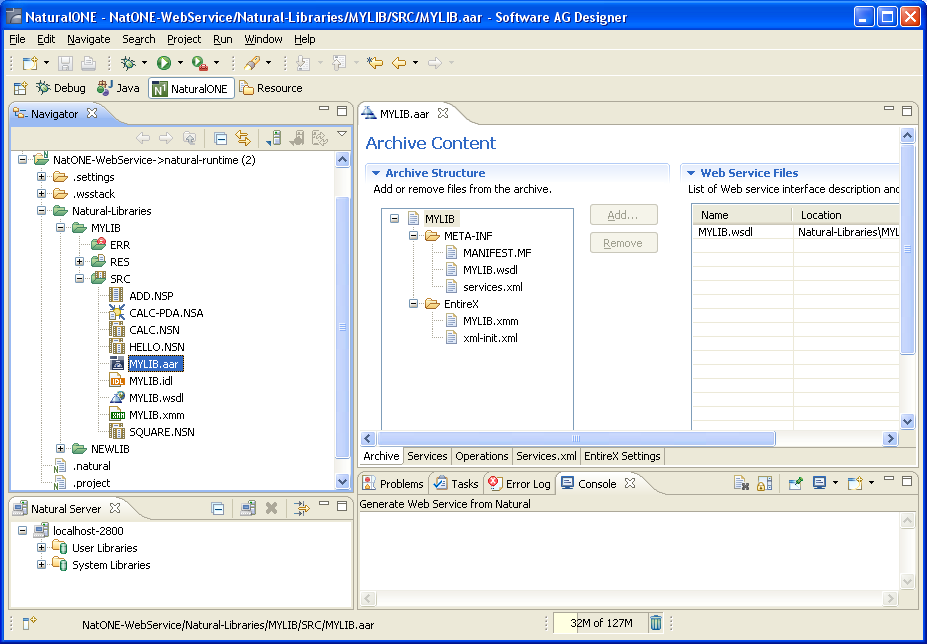
When the wizard has finished successfully, you will see additional artifacts in your Eclipse project:
.aar file
This is the generated Web service package (containing the metadata
files that define the Web service).
.wsdl file
This is the Web service description language file that describes the
basic interface of the service to be used by Web service client
applications.
Note:
The actual WSDL of the deployed Web service might differ from this
file (containing the actual service URL, transport bindings and policies that
are in effect according to the service configuration in the target WS-stack).
You can query the effective WSDL of the deployed service using the service's
URL, appended with "?wsdl" (without quotes).
.idl file
The Software AG IDL file that describes the RPC interface of the
Natural server component that implements the service's business logic.
The IDL file is opened
with the IDL Editor. See Software AG IDL File in the IDL Editor documentation.
.cvm file (optional)
This server mapping file completes the IDL file with a mapping from the
programming-language-neutral parameter definition in the IDL file to the
parameters and data types expected by the Natural subprograms (CALLNATs).
Always keep the server mapping file in the same folder as its related IDL file.
See Server Mapping Files for Natural.
.xmm file
This is a mapping file that specifies the mapping of XML/SOAP to
EntireX RPC and back. You can edit this file with the
EntireX XML Mapping Editor and customize it for subsequent Web service
re-generation.
For more information see the NaturalONE documentation.
Use the preference page for the IDL Extractor for Natural to manage the default values relevant for step Step 3: Select the Natural Subprograms. See Preferences under Using the Software AG IDL Extractor for Natural.