
This document provides information needed to install Adabas in batch mode and with its teleprocessing (TP) monitors. It covers the following topics:
This section describes the preparation of Adabas link routines for TP monitors for IBM platforms. The source modules for Adabas 8 link routines are not provided in the Adabas 8 base source library. The Adabas 8 link routines can only be tailored via zap or using a link globals table.
Important:
If an ADALNK batch link routine has been linked or modified
by Software AG product modules or user exits, it cannot be used in any
application startups of Adabas utility jobs or Adabas, Entire System Server,
Adabas Review Hub, or Entire Net-Work nuclei.
All Adabas 8 link routines include AMODE and RMODE assembly directives. These assembly directives allow the linkage editor to produce warning messages when conflicting AMODE or RMODE linkage-editor control statements are encountered in the link JCL, JCS, or EXECs.
These assembly directives also serve to document the preferred AMODE and RMODE for each link routine. It is important to note that in and of themselves, these directives do not alter the actual addressing mode of the link routine during execution.
When re-linking the Adabas 8 link routines with certain
AMODE and RMODE combinations, a
warning message may be generated by the linkage editor. This may be safely
ignored as long as it pertains to a conflict of AMODE or
RMODE in the ESD record of one or more of the load
modules that comprise the link routine, and as long as the resulting module has
the proper AMODE and RMODE
attributes for execution with the intended calling application programs.
Care must be taken to ensure that
AMODE(24) applications will operate properly when
invoking the link routine with the attributes chosen when it is re-linked. This
is particularly important if the RMODE(ANY) attribute is
associated with a link routine that will be loaded dynamically but invoked by a
program that is AMODE(24). In this case, the link
routine should be re-linked
AMODE(31),RMODE(24) to avoid
addressing exception ABENDs because the AMODE(24)
application cannot correctly invoke the link routine if it resides above the
16-megabyte line.
The Adabas 8 link routines all run
AMODE(31) after initialization, but they will return to
the caller in the caller's AMODE.
Note:
Under CICS, the version 8 links run
AMODE(31), but the Dataloc RDO parameter governs the
AMODE and RMODE of the running
CICS transaction.
The batch/TSO non-reentrant link routine,
ADALNK, has been assembled and linked with
AMODE(31),RMODE(24), and that is
the recommended configuration to support AMODE(24) or
RMODE(24) application programs. It may be re-linked
AMODE(31),RMODE(ANY) if desired,
but this should only be done if it is certain that all calling programs are
AMODE(31).
The ADALNKR batch TSO reentrant link
routine has been assembled and link-edited with
AMODE(31),RMODE(ANY). If it is
loaded by an application that is AMODE(24), it should be
relinked AMODE(31),RMODE(24).
The z/OS Com-plete module ADALCO has been assembled and linked
AMODE(31),RMODE(ANY). The
Com-plete TP monitor ensures proper AMODE switching between
AMODE(24) or RMODE(24) programs
that invoke ADALCO through the Com-plete Adabas interface routine,
TLOPADAB.
All of the version 8 CICS link routine modules -
ADACICS, ADACICT, and
ADACIC0 - have been assembled and link-edited
AMODE(31),RMODE(ANY). CICS
manages the loading of programs and their invocation depending on the DATALOC
values associated with their program and transaction definitions.
The Adabas IMS interface link routine
ADALNI has been assembled and link-edited
AMODE(31),RMODE(ANY). This is the
preferred configuration for modern IMS applications, but if there are still
AMODE(24) IMS applications executing at your
installation, ADALNI may be re-linked
AMODE(31),RMODE(24).
Software AG recommends that all batch applications invoke Adabas
calls through the ADAUSER module. This module is normally link-edited with the
application program and it then loads the appropriate link routine as well as
ADARUN and ADAIOR/ADAIOS. The source member has the
AMODE and RMODE directives coded
as AMODE 31, RMODE ANY. This is
the most flexible configuration for assembling and linking ADAUSER with the
widest variety of application programs. However, if ADAUSER is dynamically
loaded, either the RMODE assembler directive should be
changed to RMODE 24 before re-assembling it or the
ADAUSER module should be re-linked
AMODE(31),RMODE(24) to ensure
that AMODE 24 application programs may invoke it
properly below the 16-megabyte line.
This section describes installation of the Adabas link routine for the IMS TM TP monitor with Adabas 8.
IMS requires an Adabas link routine if it is to communicate with Adabas databases. The Adabas Version 8 executable default link routine is delivered in member ADALNI of the AIIvrs.LOAD library (where vrs is the number of the latest Adabas version delivered on the tape). If you want to modify this link routine, use member ADALNI8 to do so. ADALNI8 must be linked with a link globals module you prepare and with any link routine exits you require to create the final ADALNI load module that is loaded by the IMS message processing program (MPP) regions when an application calls them. Members ADALNI and ADALNI8 are provided with some default settings.
For a COBOL IMS message processing program (MPP) to call ‘ADABAS’ USING …” in an IMS environment you must link ADALNI to the application that runs in the message processing program (MPP). Since ADALNI is non-reentrant, a link of ADALNI will make the application non-reentrant too. To resolve this:
Add ALIAS ADABAS to the link of ADALNI.
Add the load module name ADABAS to the preload list of the MPP.
Add the load library that contains ADABAS to the steplib chain of the MPP.
Use the DYNAM option of COBOL to force a dynamic load of ADABAS for the CALL ‘ADABAS’ statement.
Note:
If CALL ‘ADABAS’ results in a dynamic load of the Adabas link
routine, the load module name of the Adabas link routine must be called ADABAS.
As ADALNI saves the address of its working storage in itself, ADALNI must never
be unloaded in the MPP. Otherwise you will get memory leaks.
This section covers the following topics:
These are Adabas 8 link routines for IMS TM:
ADALNI is the executable default module for message processing programs (MPPs). If you require no changes to the defaults provided in the link routine, use this module.
Use ADALNI8 as the base module for message processing programs (MPPs). If you need to tailor ADALNI for your installation, use ADALNI8 to generate an updated ADALNI.
ADALNK is the batch Adabas link routine for batch message processing (BMP) programs, batch-oriented BMP programs, and batch processing programs (DLIBATCH).
ADALNI and ADALNK use the CSECT name and ENTRY directive ADABAS by default.
The Adabas Version 8 ADALNI and ADALNK are UES-enabled as distributed.
This section describes using ADALNI and ADALNI8 only. For information on using ADALNK, read General Considerations for Installing Adabas with Batch/TSO.
The Adabas user ID is obtained at execution time by the ADALNI load module from the LTERM field (first eight bytes) of the IOPCB. The user ID is stored in the Adabas user block field UBUID and will be used for the last eight bytes of the Adabas communication ID.
The SAF ID is supported for use by Adabas SAF Security (ADASAF) if an external security package such as IBM’s RACF or CA’s ACF2 is present. The SAF ID is obtained at execution time by the ADALNI load module from the user ID field (bytes 33-40) in the IOPCB. To get a valid SAF user ID, SAF sign-on must be active in your IMS installation and the user must have performed an IMS /SIGN command to log onto an IMS terminal.
 To modify the default settings and prepare the Adabas 8 link
routine for IMS:
To modify the default settings and prepare the Adabas 8 link
routine for IMS:
Copy the sample member LNIGBL provided in the Adabas 8 AIIvrs.SRCE library to any appropriate user source library where they can be modified. These modules contain LGBLSET parameters that are used to create default settings for link components. A complete description of LGBLSET parameters can be found in Modifying Source Member Defaults (LGBLSET Macro) in Version 8.
Modify the LNIGBL member in the user source library.
Note:
The OPSYS parameter must be set to ZOS.
Modify and run sample job ASMGBLS as described at the top of the job. ASMGBLS can be found in the Adabas 8 ADAvrs.JOBS library. When fully modified, the SET statement in the job should reference the LNIGBL member you prepared in the previous step and the NAME link edit control statement should reference the name specified by the GBLNAME parameter in the LNIGBL member.
Once modified, submit the ASMGBLS job to assemble and link-edit the link globals module.
A new link globals module (with the name specified by the GBLNAME parameter in LNIGBL) will be generated in the user load library identified in the ASMGBLS job.
Copy sample job LNKLNI8 to a user source library and modify it to link the new link globals module you created in the previous step and any required exits with the ADALNI8 base module. Instructions for modifying the sample job are described at the top of the job. Be sure to direct the output from this job to an appropriate user load library. LNKLNI8 can be found in the Adabas 8 AIIvrs.SRCE library.
Note:
If you use link routine user exits, Adabas Review, or
Adabas System Coordinator, the jobs used to link these components with the
batch, reentrant batch or the IMS link routine should be modified to explicitly
include the LNKIND module when the link routines are relinked to incorporate
user or Software AG product link routine exits.
The module resulting from this job is ADALNI.
Place the ADALNI module in a load library available for IMS MPP regions.
The Adabas 8 link routine is prepared.
The macro-level link routine ADALNC is no longer supported for all levels of CICS running under z/OS. These environments must run a current version of Adabas and use the supplied command-level link component.
The Adabas command-level link routine supports the CICS transaction server (CTS) environment. The CICS components from Adabas 8 are required when running with an Adabas 8 SVC.
The following sections describe specific points of Adabas/CICS installation and operation from the CICS perspective:
If you are running Adabas Bridge for VSAM 4.2 or 5.1 under CICS, you must run CICS 3.3 or above and the Adabas Version 8 or above command-level link routine.
If you run the Adabas CICS command-level link routine with the CICS multiple region option (MRO), you must set the MRO parameter to "YES" and use the default for the NETOPT parameter. In an Adabas 8 installation, these parameters are supplied via the LGBLSET macro (read Modifying Source Member Defaults (LGBLSET Macro) in Version 8).
You can use the LGBLSET NTGPID parameter to provide a 4-byte literal for the Adabas communication ID to be used by the Adabas SVC when applications that call Adabas span multiple application regions.
Alternatively, you can create a user exit for the link routine that:
sets UBFLAG1 (byte X’29’ in the UB DSECT) to a value of X’08’ (UBF1IMSR); and
places a 4-byte alphanumeric value in the UB field UBIMSID.
This exit is link user exit 1 (LUEXIT1). The exit then allows the Adabas SVC to provide a proper Adabas communication ID in the Adabas command queue element (CQE) even when transactions originate in multiple regions.
The storage protection mechanism (STGPROT) was introduced under CICS/ESA 3.3. Storage protection permits resources to access either CICS or user storage by using the storage protection keys.
User keys may not overwrite CICS storage, thus affording a degree of protection to CICS.
CICS keys may read or write either CICS or user key storage, affording the highest degree of access to CICS resources.
Transaction isolation is an extension of the storage protection mechanism. It further protects CICS resources by isolating them in subspaces. This protects user key resources from one another, and protects CICS key resources from the CICS kernel. Transaction isolation can be enabled globally through the CICS TRANISO system initialization (SIT) parameter, and for each CICS transaction with the new resource definition ISOLATE keyword. Transaction isolation places some restrictions on CICS resources that must be available both during the life of the CICS system and to all transactions running in the CICS system.
In Adabas 8 installations, the CICS link routine always uses a task-related user exit, module ADACICT, so storage protection is supported by default.
The preferred method for defining and installing CICS programs and transactions is RDO (resource definition online). The CICS documentation no longer recommends the assembly of PPT and PCT entries to define resources.
Modify and use the sample DEFINE statements located in member DEFADAC as input to the IBM DFHCSDUP utility to define the Adabas CICS command-level components. Consult the appropriate IBM CICS documentation for information on the DFHCSDUP utility. The DEFADAC member can be found in the Adabas CICS command-level source library (ACIvrs.SRCE).
The Adabas CICS link routines require a command security level of "UPDATE" for the EXITPROGRAM CICS command resource identifier. This allows the Adabas CICS application stub to issue the EXEC CICS EXTRACT EXIT command without raising the NOTAUTH response from CICS and the security software. The Adabas CICS application stub needs to issue the EXEC CICS EXTRACT EXIT to determine that the given Adabas task-related user exit (TRUE) is installed and enabled, and to locate the CICS global work area (GWA) associated with the given TRUE so that various data structures are made available to the Adabas CICS application stub programs.
A CICS application that uses Adabas services requires an Adabas CICS execution unit to function.
In Adabas versions prior to 8.2, the Adabas CICS execution unit was comprised of:
the Adabas CICS stub, ADACICS
the stub module's direct call interface ADADCI
the Adabas task-related user exit (TRUE), ADACICT
the globals table, named CICSGBL by default.
The stub module needs to know the name of the Adabas TRUE it is to invoke. In addition, the Adabas TRUE needs to know the name of the globals table so that it can obtain run-time information, such as the locations of callable exits and the settings of various operating parameters (such as the length of user information).
Effective with Adabas 8.2 and later versions, the Adabas CICS execution unit is comprised of:
the Adabas CICS stub, ADACICS
the stub module's direct call interface, ADADCI
an Adabas CICS names module, ACINAMES
one or more Adabas task-related user exits (TRUEs), ADACICT
a globals table associated with the stub module and the TRUE.
The names module (ACINAMES) is linked with the stub (ADACICS) to provide the name of the associated TRUE and the globals table for a given CICS application. In addition, an Adabas CICS installation options table (ACIOPT) is required and used by the Adabas CICS installation program, ADACIC0, to load the Adabas globals tables required by the Adabas CICS execution units that will be installed and activated in the CICS region.
This section covers the following topics:
The Adabas CICS application stub is invoked via EXEC CICS LINK or via the direct-call interface from a CICS application program that intends to use Adabas database services. The stub consists of the ADACICS module, the ADADCI module, the CICS modules DFHEAI and DFHEAI0, and the ACINAMES module. The resultant load module may be given any name that is specified in the link globals ENTPT keyword for the Adabas execution unit. The new module name is most easily created with the linkage editor.
The Adabas CICS names module (ACINAMES) is a small stub containing the name of the TRUE to be invoked from this stub and the name of the link globals table associated with the Adabas CICS execution unit. The link globals table also contains the names of the stub and the TRUE, but linking it with the stub has the following performance disadvantages:
The stub is functionally reentrant and the link globals table in CICS is modifiable during execution
Linking the globals table with the stub would also cause duplicate copies of the link globals table to be kept in CICS storage at the same time, wasting space and possibly leading to problems if the copy loaded by ADACIC0 differs from the copy linked with the Adabas stub
Using the ACINAMES module allows you to relink the Adabas CICS stub with any supported load module name and gives that stub the ability to invoke the Adabas CICS TRUE with the name provided in the ACINAMES module. The TRUE may also be relinked with any given valid load module name. This permits the CICS region to execute different Adabas stubs and TRUEs built out of the same load modules but tailored as required for different CICS applications. No changes are needed in the CICS application programs themselves.
The Adabas CICS names module is built using the MACINS macro. The ACINAMES module may be given any load module name, but the generated CSECT name (ordinarily generated by the MACINS macro assembly job, ASMCINS) within the load module must be ACINAMES.
An additional component, an Adabas CICS installation options table (ACIOPT) is required and used by the Adabas CICS installation program, ADACIC0, to load the Adabas globals tables required by the Adabas CICS execution units that will be installed and activated in the CICS region.
The Adabas CICS installation options table is built using the MACIOPT macro.
Use the MACINS macro to build the Adabas CICS names module, ACINAMES. The ACINAMES module may be given any load module name, but the generated CSECT name (ordinarily generated by the MACINS macro job) within the load module must be ACINAMES. In addition, the ACINAMES module should be included when the Adabas CICS stub is relinked.
The MACINS macro is provided in the Adabas CICS z/OS source library. A sample ACINAMES source member is provided in the ACIvrs source library on z/OS systems.
The syntax of the MACINS macro is shown below:

All MACINS parameters are required and are described in the following table:
In the following example, an ACINAMES module is prepared for an Adabas CICS stub named ADABAS that will use an ADABAS CICS TRUE named ADATRUE and a link globals table named CICSGBL. The source member to create the ACINAMES module might look like this:
*        Sample "ACINAMES" for Adabas multiple-TRUE support.
         MACINS TRUENAME=ADATRUE,                                      X
               GTNAME=CICSGBL
Use the MACIOPT macro to build the Adabas CICS installation options table which may either be linked with ADACIC0 or, if named ACIOPT (the default), is defined to CICS and loaded by ADACIC0 when the Adabas CICS installation process is started.
The MACIOPT macro is located in the ACIvrs source library on z/OS systems. A sample ACIOPT source member is provided in the ACIvrs source library on z/OS systems.
The syntax of the MACINS macro is shown below:
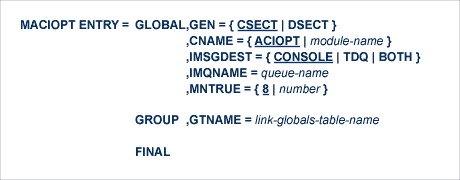
An ENTRY statement is required on every invocation of the MACIOPT macro. It designates the ENTRY type, which in turn, determines which additional parameters are valid for the given entry. The three types of ENTRY statement and their associated parameters are described in the rest of this document.
The ENTRY=GLOBAL statement is always the first entry for the ACIOPT source member. Only one ENTRY=GLOBAL statement should be specified per source member and it should precede all other MACIOPT statements.
The ENTRY=GLOBAL statement specifies global parameters to be used by the CICS installation program. The parameters associated with ENTRY=GLOBAL are described in the table below:
ENTRY=GROUP statements define the names of the Adabas globals tables that should be loaded and used to install the Adabas CICS execution units. More than one ENTRY=GROUP statement can be specified in the ACIOPT source member; all ENTRY=GROUP statements must be specified after the ENTRY=GLOBAL statement and before the ENTRY=FINAL statement.
Only one parameter can be specified for ENTRY=GROUP:
The ENTRY=FINAL statement must be the last MACIOPT statement in the source member. It causes the actual ACIOPT CSECT statements to be generated. Only one ENTRY=FINAL statement may be specified in the source member.
There are no parameters for the ENTRY=FINAL statement
If assembled and link-edited, the following source member will produce the load module ACIOPT and will install two Adabas CICS execution units. One will load a globals table named LNKCI02 and the other will load a globals table named CICSGBL. Installation messages will be written to the CICS transient data queue named ACIQ, if that queue is available.
         MACIOPT ENTRY=GLOBAL,IMSGDEST=TDQ,IMQNAME=ACIQ,MNTRUE=2
         MACIOPT ENTRY=GROUP,GTNAME=LNKCI02
         MACIOPT ENTRY=GROUP,GTNAME=CICSGBL
         MACIOPT ENTRY=FINAL
In a simple Adabas CICS transaction that uses the EXEC CICS LINK command to communicate with Adabas, there should be one invocation of the Adabas Task Related User Exit (TRUE) for each EXEC CICS LINK issued from the application.
If the Adabas CICS interface employs exits such as the Adabas Fastpath exit or other System Coordinator facilities, there may be more than one invocation of the Adabas TRUE for each EXEC CICS LINK issued by the application program. Other Software AG products that can have multiple TRUE invocations for each LINK to Adabas are the Adabas Bridge for DL/I and Natural. If the Adabas high-performance stub (BALR interface) is employed by applications, including Natural, there will be multiple invocations of the Adabas TRUE for each EXEC CICS LINK to the Adabas interface module.
Adabas supports the installation of multiple CICS task-related user exits (TRUEs) and Adabas application stubs from a single execution of the ADACIC0 installation program. Multiple TRUEs allow your site to tailor different Adabas CICS execution options in the same CICS region with a centralized installation procedure and software.
The following diagram depicts the processing flow of the installation of multiple Adabas CICS TRUE and application stub support.
The following diagram depicts the processing flow of the execution of this multiple Adabas CICS TRUE and application stub support.

The following table lists the modules supplied in your Adabas installation to support the installation of Adabas with CICS under Adabas 8.
| Module | Description |
|---|---|
| ADACIC0 | CICS installation program |
| ADACICS | CICS command-level module. |
| ADACICT | CICS task-related user exit (TRUE) module. |
| ASMCINS | Assembles the ACINAMES module and links it with the Adabas CICS application stub |
| ASMCOPT | Assembles and links the ACIOPT source module as the standalone module named "ACIOPT" |
To install the Adabas 8 CICS link routine components, complete the following steps:
Copy the Adabas 8 CICS load modules from the Adabas distribution library to a load library that will be in the CICS DFHRPL concatenation (see sample member CPYCICSM in the Adabas 8 ADAvrs.JOBS library).
An Adabas CICS installation options table (ACIOPT) is required to identify all the Adabas globals tables that will be needed for the proper execution of each Adabas CICS execution unit in the CICS region or CICSplex. The installation program (ADACIC0) run in Step 12 will obtain information of a global nature from the table such as the destination for writing of installation messages. It will also scan the table and load each Adabas globals table named in the ACIOPT module. In turn, each loaded globals table serves as the basis for installing each Adabas CICS execution unit.
The Adabas CICS installation options table is built by coding a series of MACIOPT macros into a source member, then assembling and linking that source member into a library that will be available during CICS execution. The load module may be linked:
With the ADACIC0 installation program, or
As a standalone module named "ACIOPT", which is then defined as a program of the same name to CICS.
For best performance, Software AG recommends linking a standalone ACIOPT module, defining it to CICS as program ACIOPT. This will allow ADACIC0 to load ACIOPT during the installation process.
To prepare the Adabas CICS installation options table,
complete the following steps:
Code a source member, preferably called ACIOPT that contains MACIOPT macro statements to be loaded by the ADACIC0 program at execution time. The MACIOPT macro statements define each globals table that will be needed by each Adabas CICS execution unit.
The ACIOPT source member will consist of one MACIOPT ENTRY=GLOBAL entry, multiple MACIOPT ENTRY=GROUP entries and one MACIOPT ENTRY=FINAL entry.
The MACIOPT ENTRY=GLOBAL specification must be first specification in the source member; only one MACIOPT ENTRY=GLOBAL specification can be made per ACIOPT generation.
The MACIOPT ENTRY=FINAL specification must be the last entry for the ACIOPT generation; only one MACIOPT ENTRY=FINAL specification can be made per ACIOPT generation.
Multiple MACIOPT ENTRY=GROUP entries may be specified, but they must follow the MACIOPT ENTRY=GLOBAL specification and precede the MACIOPT ENTRY=FINAL specification in the source member.
The MACIOPT macro is located in the ACIvrs source library on z/OS systems. For complete information on the MACIOPT macro, read The MACIOPT Macro, elsewhere in this section. A sample ACIOPT source member is provided in the ACIvrs source library on z/OS systems.
Assemble and link the ACIOPT source module either as the standalone module named "ACIOPT" or with any load module name linked with ADACIC0. If linked as a standalone module it must be named "ACIOPT" (see sample job ASMCOPT located in the ACIvrs source library) and it must be defined as a program to CICS.
The ACIOPT module may be defined to CICS using the CEDA/RDO facility or the DFHCSDUP utility. Sample DFHCSDUP statements are provided in the DEFADAC member in the ACIvrs source library on z/OS systems.
An Adabas task-related user exit (TRUE) is created by relinking the Adabas ADACICT module with a NAME statement, providing the desired TRUE name. One or more Adabas TRUEs can be created.
Note:
The Adabas TRUE name is specified later in the TRUENM
parameter
in the link globals table (set
Step 6) and in the TRUENAME
parameter when the ACINAMES module (see
Step 4) is
prepared.
To prepare the Adabas CICS TRUE, complete the following
steps:
Relink the ADACICT module with a NAME or PHASE statement giving a new name for each Adabas TRUE.
Define each named Adabas TRUE as a program to CICS.
A sample job, LNKATRU, is provided in the ACIvrs source library. This sample links the Adabas TRUE with a load module named ADATRUE so that it can be installed and referenced in CICS.
The ACINAMES module is a small stub containing the name of the TRUE to be invoked from this stub and the name of the link globals table associated with the Adabas execution unit. After the ACINAMES source member is coded, it should be provided as input to the assembler and either punched by the assembler to a text library or directly link-edited as a load module. The subsequent text deck or load module would then be made available to the linkage editor when the Adabas CICS stub is relinked to change its name or to update the ACINAMES module it uses.
To prepare the ACINAMES module, complete the following
step:
Code the source for the ACINAMES module using the MACINS macro. For complete information, read The MACINS Macro.
The MACINS macro is provided in the Adabas CICS z/OS source library.
Sample job, ASMCINS, which is provided in the ACIvrs source library, assembles the ACINAMES module and links it with the Adabas CICS application stub (see Step 5), and names the stub "ADABAS".
For example, the source member to create the ACINAMES module might look like this:
*        Sample "ACINAMES" for Adabas multiple-TRUE support.
         MACINS TRUENAME=ADATRUE,                                      X
               GTNAME=CICSGBL
This ACINAMES module uses an ADABAS CICS TRUE named ADATRUE and a link globals table named CICSGBL.
The Adabas application stub is invoked via EXEC CICS LINK or via the direct-call interface from a CICS application program that intends to use Adabas database services. The application stub consists of the ADACICS module, the ADADCI module, the CICS modules DFHEAI and DFHEAI0 and the ACINAMES module. The resultant load module may be given any name that is specified in the link globals ENTPT keyword for the Adabas execution unit. The new module name is most easily created with the linkage editor.
To prepare the CICS application stub (ADACICS), complete the
following step:
Relink the Adabas CICS application stub module, ADACICS, replacing ACINAMES in the module with the name of the ACINAMES module created in the previous step (Step 4).
Sample job, ASMCINS, which is provided in the ACIvrs source library, assembles the ACINAMES module and links it with the Adabas CICS application stub (see Step 4), and names the stub "ADABAS".
For example, the link-edit control statements to create the Adabas module as the Adabas CICS stub might be:
//LKED.SYSIN   DD   *
  MODE AMODE(31),RMODE(ANY)
  REPLACE ACINAMES
  INCLUDE ADALIB(ADACICS)
  INCLUDE USERLIB(ACINAMES)
  ENTRY ADACICS
  NAME ADABAS(R)
/*
In this example, the prepared ACINAMES module is used for an Adabas CICS stub named ADABAS.
Link globals tables must be prepared to match the Adabas CICS execution units defined in the ACIOPT module. These are built by editing or creating source members that use the LGBLSET macro and its keywords.
Modify the sample CICSGBL member found in the Adabas 8 ACIvrs.SRCE library. This member contains sample default installation (LGBLSET) parameter settings. For more information about what to modify in this member, read Modifying Source Member Defaults (LGBLSET Macro) in Version 8.
Notes:
To prepare the link globals table, complete the following
steps:
Code the link globals table using the LGBLSET macro as described in Modifying Source Member Defaults (LGBLSET Macro) in Version 8.
The OPSYS parameter must be set to ZOS.
Be sure to code the ENTPT and TRUENM parameters on each LGBLSET macro so they match the intended Adabas CICS stub name and Adabas CICS TRUE name to be used in a given Adabas CICS execution unit. The Adabas CICS installation program attempts to load each globals table in turn and uses the loaded table to provide the data required to install and activate the components of the execution unit.
In CICS environments only, if you want your security system user IDs to be stored in Adabas user queue elements (making them available for display and review as well as preventing response code 200, ADARSP200, subcode 21 when ADARUN SECUID=REQUIRE is in effect for Adabas), you must code the SAF parameter as YES. This is only required in CICS environments; in other environments, the security system user IDs are automatically stored.
Save the modified CICSGBL member with a unique name in an appropriate user source library.
Modify and run sample job ASMGBLS as described at the top of the job. ASMGBLS can be found in the Adabas 8 ADAvrs.JOBS library. When fully modified, the SET statement in the job should reference the CICSGBL member you prepared in Step 6 and the NAME link edit control statement should reference the name specified by the GBLNAME parameter in the CICSGBL member.
Review and run the LNKGCICS member in the ACIvrs.SRCE library to link the newly assembled globals table from the previous step with any user or Software AG product exits. (For information about specific Software AG product exits, read the installation documentation for the product.) The LNKGCICS member provides specific instructions. Be sure to link the globals table into a load library that will be made available to CICS in the DFHRPL library concatenation. Note that any user or Software AG link routine exits should be link-edited with this load module.
Modify the DEFADAC member to provide the correct name of the link routine globals default table created in Step 6. The default module name is CICSGBL. Tailor this member for any other CICS installation values as required.
Run the IBM DFHCSDUP utility to update the CICS CSD file for the desired CICS using the modified DEFADAC member as input.
Modify the CICS PLTPI table to add an entry for the CICS installation program ADACIC0. The ADACIC0 installation program will start the TRUEs once CICS is started. Use member ADAPLTXX from the Adabas 8 ACIvrs.SRCE library as a sample for enabling and starting a legacy Adabas TRUE and the new Version 8 TRUE in the second phase of the PLT.
Once the PLTPI table is modified, assemble and link the modified PLTPI table into a library that will be available to the desired CICS region.
Start the CICS and note any messages relating to the installation of the Adabas TRUE modules that appear on the console. When CICS starts, it will call ADACIC0 (because it is in the PLTPI table), which will install the Adabas CICS TRUEs.
Certain Adabas parameters are required by Com-plete, Software AG’s TP monitor, when installing Adabas. For more information, see the Com-plete System Programmer’s manual.
Software AG’s TP monitor, Com-plete requires an Adabas link routine if it is to communicate with Adabas databases, use Software AG’s Entire Net-Work product, or use products like Entire System Server running under Com-plete. Com-plete must be run with an Adabas 8 link routine.
The Adabas Version 8 link routine is delivered in member ADALCO of the Adabas 8 z/OS load library. This member must be linked with a link globals module you prepare and with any link routine exits you require to create the final ADALCO load module that is loaded by Com-plete when Com-plete is initialized. The final ADALCO load module and any exits linked with it must be reentrant.
The following table lists the modules supplied in your Adabas installation to support the installation of Adabas with Com-plete under Adabas 8.
| Module | Description |
|---|---|
| ADALCO8 | Base module |
| ADALCO | Executable default module |
To prepare the Adabas 8 link routine:
Copy sample member LCOGBL provided in the Adabas 8 ADAvrs.SRCE library to any appropriate user source library where it can be modified (where vrs is the number of the latest Adabas version delivered on the tape). LCOGBL is a module containing LGBLSET parameters that are used to create default settings for command-level link components. A complete description of LGBLSET parameters can be found in Modifying Source Member Defaults (LGBLSET Macro) in Version 8.
Modify the LCOGBL member in the user source library.
At a minimum supply values for the following LGBLSET parameters in LCOGBL:
| Parameter | Specify... |
|---|---|
| LOGID | The default database or target ID.
This should be a numeric value between "1" and
"65535". The default value is
"1".
Note: |
| SVCNO | The default Adabas SVC number. For
z/OS, this number should be between "200" and
"255".
Note: |
| OPSYS | The three-character abbreviation
for the operating system under which Com-plete executes. Valid values include
"ZOS" and "VSE".
Note: |
| TPMON | COM. This keyword specifies the three-character TP monitor abbreviation. For Com-plete, this value should be "COM". |
| RENT | YES. This keyword indicates whether or not the module is serially reentrant. For Com-plete, this value should be "YES". |
| GEN | CSECT. This keyword indicates whether a CSECT or DSECT is generated. CSECT must be specified so an object module is generated that can be linked as the link routine globals load module. |
| UES | Whether Adabas Universal Encoding Support (UES) should be enabled. The default is YES. . |
| exit parameters | Whether any other exits are to be active, and in the case of user exits you provide, specify the user exit module names. Specify this information in other parameters of LGBLCOM, as described in Modifying Source Member Defaults (LGBLSET Macro) in Version 8. |
Modify and run sample job ASMGBLS as described at the top of the job. ASMGBLS can be found in the Adabas 8 ADAvrs.JOBS library. When fully modified, the SET statement in the job should reference the LCOGBL member you prepared in the previous step and the NAME link edit control statement should reference the name specified by the GBLNAME parameter in the LCOGBL member.
Once modified, submit the ASMGBLS job to assemble and link-edit the link globals module.
A new link globals module (with the name specified by the GBLNAME parameter in LCOGBL) will be generated in the user load library identified in the ASMGBLS job.
Copy sample job LNKLCO8 to a user source library and modify it to link the new link globals module you created in the previous step and any required exits with the ADALCO8 base module. Instructions for modifying the sample job are described at the top of the job. Be sure to direct the output from this job to an appropriate user load library. LNKLCO8 can be found in the Adabas 8 ADAvrs.JOBS library.
The module resulting from this job is called ADALCO.
Place the ADALCO module in a load library available in the job step that will start Com-plete.
The Adabas 8 link routine is prepared.
When installing Adabas 8 on TSO systems, Adabas-TSO communication is provided by the batch link routines ADALNK8 (non-reentrant) and ADALNKR8 (reentrant).
In this version of Adabas, the ADALNK routines are UES-enabled as distributed.
However, it is important to note that user programs linked with ADAUSER also load ADARUN. ADARUN, in turn, loads other modules.
To start a user program linked with ADAUSER, the following modules must all be available from the defined load libraries for that specific TSO user at execution time:
ADAIOR ADAMLF
ADAIOS ADAPRF
ADALNK ADARUN
This section covers the following topics:
Important:
If an ADALNK batch link routine has been linked or modified
by Software AG product modules or user exits, it cannot be used in any
application startups of Adabas utility jobs or Adabas, Entire System Server,
Adabas Review Hub, or Entire Net-Work nuclei.
The ADALNK module in the Adabas 8 load library operates when the following conditions are met:
The calling application must be linked with ADAUSER. If the calling application is not linked with ADAUSER, the ADALNK will not work.
The ADARUN module from the most recent Adabas 8 load library must be used.
The database ID and Adabas SVC number must be provided as input through DD statements. Otherwise, the values in the link globals table will override these values.
If all three of these conditions are met, the default database ID and Adabas SVC number will be overridden by the values provided in the DD statement input and passed to the link routine by ADARUN.
Operating in this fashion requires the fewest changes on the part of your data base administrator (DBA) and application programmer. This is also the recommended mode of operation when executing Adabas utilities.
Several Software AG products require the use of a reentrant batch link routine and the ADALNKR load module is provided in the Adabas load library to support them. The Adabas 8 ADALNKR source module is not provided.
You can change default values for these reentrant batch link routines. For more information, read one of the following sections:
Changing Default Values for the Adabas 8 ADALNK or ADALNKR Modules
Zapping the Default Values for the Adabas 8 ADALNK or ADALNKR Modules
When using the latest Adabas 8 ADALNKR module to obtain reentrant operation under batch or TSO, you must prepare the ADALNKR module in advance. It must be linked with a customized link globals table that provides defaults for the database ID, Adabas SVC number, and other requirements. Any reentrant exits should also be linked with it as required.
When installing Adabas 8 on TSO systems, the standard Adabas 8 batch link routine (ADALNK) provides Adabas/TSO communication (SMA job number I056).
This section covers the following topics:
Changing Default Values for the Adabas 8 ADALNK or ADALNKR Modules
Zapping the Default Values for the Adabas 8 ADALNK or ADALNKR Modules
Important:
If an ADALNK batch link routine has been linked or modified
by Software AG product modules or user exits, it cannot be used in any
application startups of Adabas utility jobs or Adabas, Entire System Server,
Adabas Review Hub, or Entire Net-Work nuclei.
The following table lists the modules supplied in your Adabas installation to support the installation of Adabas with batch/TSO under Adabas 8.
| Module | Description |
|---|---|
| ADALNK8 | Base module |
| ADALNKR8 | Base reentrant module |
| ADALNK | Executable default module |
| ADALNKR | Executable default reentrant module |
You can change default values for various link routine parameters used by the Adabas 8 ADALNK and ADALNKR modules.
To change default values, complete the following steps:
Copy the sample member LNKGBLS (for non-reentrant links) or LNKRGBL (for reentrant links) members provided in the Adabas 8 ADAvrs (where vrs is the number of the latest Adabas version delivered on the tape).SRCE library to any appropriate user source library where they can be modified. These modules contain LGBLSET parameters that are used to create default settings for link components. A complete description of LGBLSET parameters can be found in Modifying Source Member Defaults (LGBLSET Macro) in Version 8.
Modify the LNKGBLS or LNKRGBL member in the user source library. Provide values for the LOGID, SVC, and other keywords to suit your installation requirements.
Note:
The OPSYS parameter must be set to ZOS.
Modify and run sample job ASMGBLS as described at the top of the job. ASMGBLS can be found in the Adabas 8 ADAvrs.JOBS library. When fully modified, the SET statement in the job should reference the LNKGBLS or LNKRGBL member you prepared in the previous step and the NAME link edit control statement should reference the name specified by the GBLNAME parameter in the LNKGBLS or LNKRGBL member.
Once modified, submit the ASMGBLS job to assemble and link-edit the link globals module.
A new link globals module (with the name specified by the GBLNAME parameter in the LNKGBLS or LNKRGBL member) will be generated in the user load library identified in the ASMGBLS job.
Copy sample job LNKLNK8 or LNKLNKR8 (reentrant) to a user source library and modify it to link the new link globals module you created in the previous step and any required exits with the appropriate ADALNK8 or ADALNKR8 (reentrant) base module. Instructions for modifying the sample job are described at the top of the job. Be sure to direct the output from the job to an appropriate user load library. LNKLNK8 and LNKLNKR8 can be found in the Adabas 8 ADAvrs.SRCE library.
Note:
If you use link routine user exits, Adabas Review, or
Adabas System Coordinator, the jobs used to link these components with the
batch, reentrant batch or the IMS link routine should be modified to explicitly
include the LNKIND module when the link routines are relinked to incorporate
user or Software AG product link routine exits.
The module resulting from this job is called ADALNK or ADALNKR (as appropriate).
Tailor the ADARUN DDCARD input for the job steps that will use the Adabas 8 batch/TSO link routines. The DDCARD input should include the following updates:
Specify the ADARUN PROG=USER parameter for a non-reentrant link routine, or specify ADARUN PROG=RENTUSER to use a reentrant link routine in the job step.
Make sure the appropriate load libraries are made available to the job step. These may be STEPLIB, TASKLIB, JOBLIB, or, for reentrant modules, the LPA or LINKLIB.
You can change default values for various link routine parameters used by the Adabas 8 ADALNK and ADALNKR modules.
Changes to some default values for the Adabas 8 batch/TSO link routines, ADALNK and ADALNKR, may occur with a zap to either the ADALNK or ADALNKR module. This includes the default values for the database ID and the Adabas SVC number. All other default values should be set using the link globals table, as described in Changing Default Values for the Adabas 8 ADALNK or ADALNKR Modules. Software AG recommends changing all values in the link globals table and relinking ADALNK or ADALNKR (as appropriate).
Use the following IMASPZAP control statements to change default values in ADALNK or ADALNKR (as appropriate):
NAME ADALNK LNKGBLS
VER 0030 0001                Default DBID
REP 0030 ####                Site-specific DBID
VER 0032 0AF9                Default Adabas SVC number
REP 0032 0A##                Site-specific Adabas SVC number
*
NAME ADALNKR LNKRGBL
VER 0030 0001                Default DBID
REP 0030 ####                Site-specific DBID
VER 0032 0AF9                Default Adabas SVC number
REP 0032 0A##                Site-specific Adabas SVC number
The Adabas 8 LGBLSET macro is used to set default installation values for the Adabas link routines. It is used to prepare an object module which may either be link-edited with the Adabas 8 link routines or provided to the link routines in the job step where they are run. Your Adabas libraries include sample members provided to support the various teleprocessing (TP) monitors in each environment. Each of these sample members may be copied to an appropriate library and modified to provide the necessary customization required for the link routine that is intended to run in a given environment.
The LGBLSET parameter options with their default values (underlined) are described in the rest of this section:
LUINFO: Length of User Data passed to Adabas LUEXIT1 and LUEXIT2
LUSAVE: Size of User Save Area for Adabas LUEXIT1 and LUEXIT2
| Parameter | Description | Syntax |
|---|---|---|
| ADL |
Indicates whether or not the Consistency Interface of Software AG's Adabas Bridge for DL/I is to be supported by this command-level link routine.
|
ADL={NO|YES} |
| Parameter | Description | Syntax |
|---|---|---|
| AVB |
Indicates whether or not Software AG's Adabas Bridge for VSAM is to be supported by this command-level link routine.
|
AVB={NO|YES} |
| Parameter | Description | Syntax |
|---|---|---|
| CITSNM |
Specifies the 16-byte string that represents the CICS TS queue name for Adabas. The default is "ADACICS". |
CITSNM={ADACICS|qname} |
| Parameter | Description | Syntax |
|---|---|---|
| COR |
Indicates whether or not Adabas System Coordinator (SYSCOR), Adabas Transaction Manager, and Adabas Fastpath exits are installed and active.
|
COR={NO|YES} |
| Parameter | Description | Syntax |
|---|---|---|
| DBSVCTN |
Provides the name of the DBID/SVC routing table that should be used by the link routine during its execution, if any. The routing table name must conform to names for z/OS standard load
modules. It is used by a z/OS LOAD macro/SVC during batch, TSO, or IMS
operation or by an If the load module listed is not found, or if it is found to contain invalid header information, user abend U657 is issued in batch, TSO, or IMS environments. If the load module is not defined to CICS or not found in the CICS DFHRPL concatenation, the Adabas CICS link routine environment is not initialized. Note: |
DBSVCTN={name|ADASVCTB} |
| Parameter | Description | Syntax |
|---|---|---|
| DYNDBSVC |
Indicates whether Adabas SVC routing by database ID should be enabled for the link routine. DYNDBSVC=YES enables Adabas SVC routing by database ID; DYNDBSVC disables it. The default is NO. |
DYNDBSVC={YES|NO} |
| Parameter | Description | Syntax |
|---|---|---|
| ENTPT |
The name given to the Adabas CICS command-level link routine. This name is used in EXEC CICS LINK commands to invoke Adabas services from CICS application programs. See also notes 1 and 2 in the installation procedure. |
ENTPT={ADACICS|name} |
| Parameter | Description | Syntax |
|---|---|---|
| GBLNAME |
The name of the link globals module. |
GBLNAME={LNKGBLS|name} |
| Parameter | Description | Syntax |
|---|---|---|
| GEN |
Indicates whether a CSECT or DSECT is generated. |
GEN={CSECT|DSECT} |
| Parameter | Description | Syntax |
|---|---|---|
| IDTNAME |
The common memory pool name of the BS2000 IDT. |
IDTNAME=name |
| Parameter | Description | Syntax |
|---|---|---|
| IDTUGRP |
Indicates whether the common memory pool is user bound (BS2000) |
IDTUGRP={NO|YES} |
| Parameter | Description | Syntax |
|---|---|---|
| LOGID |
The value of the default target database ID. Valid ID numbers are 1-65535. The default is "1". |
LOGID={nnn | 1} |
| Parameter | Description | Syntax |
|---|---|---|
| LUEXIT1A |
The length of the work area for link user exit 1. Valid values are numbers from zero (0) through 32,767. The default is "0". |
LUEXIT1A={nnn|0} |
| Parameter | Description | Syntax |
|---|---|---|
| LUEXIT2A |
The length of the work area for link user exit 2. Valid values are numbers from zero (0) through 32,767.The default is "0". |
LUEXIT2A={nnn|0} |
| Parameter | Description | Syntax |
|---|---|---|
| LUINFO |
The length of the user data to be passed to target user exit 4. Valid values are numbers from zero (0) through 32,767. If LUINFO is not specified, the default is zero (no user save area is passed). |
LUINFO={0|length} |
| Parameter | Description | Syntax |
|---|---|---|
| LUSAVE |
The size of the user save area to be used by Adabas user exits LUEXIT1 and LUEXIT2. Valid values range from zero (0) through 256. The default is "72". If LUSAVE is not specified, the default is zero (no user data is passed). |
LUSAVE={72|size} |
| Parameter | Description | Syntax |
|---|---|---|
| LX1NAME |
The name of the link user exit 1 module |
LX1NAME={LUEXIT1|name} |
| Parameter | Description | Syntax |
|---|---|---|
| LX2NAME |
The name of the link user exit 2 module |
LX2NAME={LUEXIT2|name} |
| Parameter | Description | Syntax |
|---|---|---|
| MRO |
Indicates whether or not the CICS multiple region option (MRO) support is required. If you run the CICS command-level link with the CICS MRO, set this to MRO=YES; otherwise, use the default value MRO=NO. If MRO=YES, NETOPT must be set to NETOPT=NO (the default) to prevent non-unique LU names from multiple application regions. If NETOPT=YES and MRO=YES are specified, an assembler MNOTE and a return code of 16 are produced from the assembly step. |
MRO={NO|YES} |
| Parameter | Description | Syntax |
|---|---|---|
| NETOPT |
If NETOPT=YES is specified, an 8-byte user ID will be constructed from the VTAM LU name. If NETOPT=NO is specified, the user ID is created from the constant CICS plus the four-byte CICS terminal ID (TCTTETI) for terminal tasks. For non-terminal tasks, the user ID comprises the constant CIC plus the CICS task number. If you run with the CICS multiple region option (MRO), you must use the default value for this option. If NETOPT=YES and MRO=YES are specified, an assembler MNOTE and a return code of 16 are produced from the assembly step. |
NETOPT={NO|YES} |
| Parameter | Description | Syntax |
|---|---|---|
| NTGPID |
Specifies a four-byte Natural group ID as required for unique Adabas user ID generation in the CICSplex environment with Natural Version 2.2.8 and above. The value is associated with all users who call the Adabas command-level link routine assembled with the specified value. There is no default value. If no value is specified, the Adabas internal user ID is built in the conventional manner. Any four-byte alphanumeric value may be specified, but it must be unique for each Adabas command-level link routine running in a CICSplex, or z/OS image. If more than one NTGPID is required (for example, both test and production Natural 2.2.8), more than one Adabas command-level link routine with associated TRUE must be generated. If you run with the CICS multiple region option (MRO), you may use NTGPID to provide a 4-byte literal for the Adabas communication ID to be used by the Adabas SVC when multiple application regions call Adabas. |
NTGPID=4-byte-value |
| Parameter | Description | Syntax |
|---|---|---|
| NUBS |
The number of user blocks (UBs) to be created in the user block pool by the CICS link routine. The number of blocks must be large enough to handle the maximum possible number of concurrent Adabas requests. Note: |
NUBS={100|blocks} |
| Parameter | Description | Syntax |
|---|---|---|
| OPSYS |
The operating system in use. |
OPSYS={ZOS|VSE|CMS|BS2} |
| Parameter | Description | Syntax |
|---|---|---|
| PARMTYP |
The CICS area which is to contain the Adabas parameter list. "TWA" picks up the parameter list in the first six fullwords of the transaction work area (TWA). When PARMTYP=COM, the Adabas parameters are supplied in the CICS COMMAREA provided by the calling program with the EXEC CICS LINK command. The COMMAREA list for an ACB call must be at least 32 bytes long and begin with the label "ADABAS52". The COMMAREA list for an ACBX call must be at least 24 bytes long and begin with the label "ADABAS8X". In addition, the last ABD in the COMMAREA list for an ACBX call must be indicated by setting the VL-bit -- in other words, the high bit in the address must be on (X'80'). PARMTYP=ALL (the default) uses both the COMMAREA and TWA to pass the Adabas parameters; in this case, the COMMAREA is checked first. We do not recommend that you attempt to map the CICS TWA to the Adabas 8 ACBX direct call. This is because the TWA is of finite size per transaction and because the TWA in not available at CICS startup. We therefore recommend that CICS programs using the Adabas 8 CICS link routines use the COMMAREA only for passing data. |
PARMTYP={ALL|COM |TWA} |
| Parameter | Description | Syntax |
|---|---|---|
| PRE |
The two-byte string to be used as the DSECT data prefix. The default is "LG". |
PRE={LG|prefix} |
| Parameter | Description | Syntax |
|---|---|---|
| PURGE |
The PURGE parameter is used when assembling with CICS 3.2 or above. If PURGE=YES is specified, the CICS WAIT EXTERNAL will contain PURGEABLE as one of its parameters, allowing the transaction to be purged by CICS if the DTIMOUT value is exceeded and PURGE is specified. If PURGE=NO (the default) is specified, the NONPURGEABLE option is generated. |
PURGE={NO|YES} |
| Parameter | Description | Syntax |
|---|---|---|
| RENT |
Indicates whether the globals module is reentrant. |
RENT={NO|YES} |
| Parameter | Description | Syntax |
|---|---|---|
| RETRYX |
Indicates whether the retry command exit is active. |
RETRYX={NO|YES} |
| Parameter | Description | Syntax |
|---|---|---|
| REVIEW |
Indicates whether or not Software AG's Review performance monitor is installed and active. |
REVIEW={NO|YES} |
| Parameter | Description | Syntax |
|---|---|---|
| RMI |
The RMI parameter is used to indicate whether or not the CICS Resource Manager Interface is in use. If RMI=YES is specified, the Adabas task-related user exit (TRUE) will be executed as a resource manager (RM) using the CICS Resource Manager Interface (RMI). RMI=YES is valid only when the Adabas Transaction Manager is installed, enabled, and available to users executing in the CICS environment. Consult the Adabas Transaction Manager documentation for additional instructions related to the installation of the Adabas TRUE. |
RMI={NO|YES} |
| Parameter | Description | Syntax |
|---|---|---|
| RTXNAME |
The name of the command retry exit module. |
RTXNAME={LUEXRTR|name} |
| Parameter | Description | Syntax |
|---|---|---|
| SAF |
Indicates whether Software AG's Adabas SAF Security support is required. |
SAF={NO|YES} |
| Parameter | Description | Syntax |
|---|---|---|
| SAP |
Indicates whether or not SAP user ID generation is supported. If SAP=YES is specified, the program will detect a SAP initialization call and set the user ID for SAP applications from the constant provided on the initialization call, plus the field ACBADD2. For more information, refer to the supplementary information provided to customers using the SAP application system. |
SAP={NO|YES} |
| Parameter | Description | Syntax |
|---|---|---|
| SAPSTR |
The four-byte SAP ID string to use. |
SAPSTR={'SAP*'|string} |
| Parameter | Description | Syntax |
|---|---|---|
| SVCNO |
The value of the Adabas SVC number. On z/OS systems, valid values range from 200-255 and the default is "249". On z/VSE systems, valid values range from 32-128 and the default is "45". |
SVCNO=nnn |
| Parameter | Description | Syntax | ||
|---|---|---|---|---|
| TPMON |
The TP monitor operating environment. Valid values should be specified as follows:
|
TPMON={BAT|CICS|COM|IMS} |
| Parameter | Description | Syntax |
|---|---|---|
| TRUENM |
Specifies the module name of the Adabas CICS task-related user exit (TRUE). The default is ADACICT. |
TRUENM={ADACICT|name} |
| Parameter | Description | Syntax |
|---|---|---|
| UBPLOC |
Specifies whether the user block (UB) pool is to be obtained above (the default) or below the 16-megabyte line in CICS. The ECB used by the EXEC CICS WAIT WAITCICS or the EXEC CICS WAIT EXTERNAL is included in the UB pool. The UBPLOC=BELOW setting supports versions of CICS that do not allow ECBs above the 16-megabyte line; that is, CICS/ESA 3.2 or below. Refer to the IBM manual CICS Application Programming Reference for more information. |
UBPLOC={ABOVE|BELOW} |
| Parameter | Description | Syntax |
|---|---|---|
| UES |
Indicates whether or not Universal Encoding Support (UES) is required. |
UES={NO|YES} |
| Parameter | Description | Syntax |
|---|---|---|
| USERX1 |
Indicates whether or not user exit 1 is active. |
USERX1={NO|YES} |
| Parameter | Description | Syntax |
|---|---|---|
| USERX2 |
Indicates whether or not user exit 2 is active. |
USERX2={NO|YES} |
| Parameter | Description | Syntax |
|---|---|---|
| XWAIT |
Indicates whether a standard EXEC CICS WAITCICS (XWAIT=NO) or a WAIT EVENTS EXTERNAL (XWAIT=YES) will be executed by the Adabas 8 task-related user exit (TRUE). XWAIT=YES is the default. The CICS WAIT EVENTS EXTERNAL (XWAIT=YES) is the recommended interface for CICS/TS 1.1 and above. The CICS WAITCICS statement (XWAIT=NO) is provided for use with CICS/MVS 2.1.2 and for CICS/VSE 2.1 through 2.3. It may also be used for CICS/TS 1.1 and above, but may result in poor CICS transaction performance or unpredictable transaction results in busy CICS environments. Note: |
XWAIT={NO|YES} |
Notes:
CICS WAITCICS (XWAIT=NO) can support a soft post of the specified ECB. This has the disadvantage of becoming a low priority dispatchable unit of work in a CICS environment, since the hand-postable work is not processed by CICS on every work cycle.
EXEC CICS WAIT EXTERNAL (XWAIT=YES), on the other hand, allows CICS to make use of its special post exit code, and will always be checked and processed (if posted) on every CICS work cycle.
For more details on the differences between the various CICS WAIT commands and their relationship to hard and soft posting mechanisms, consult the IBM CICS Application Programming Reference Guide and the texts accompanying IBM APAR PN39579 or "Item RTA000043874" on the IBM InfoLink service.
The Adabas SVC is fully compatible with the XWAIT=YES setting. The SVC performs the necessary hard post for Adabas callers under CICS using the Adabas command-level link routine. The same SVC performs a soft post for batch callers where the hard post is not required.