
EntireX supports template-based provisioning using Command Central since version 10.1. This means you can control and automate the installation, creation and configuration of EntireX component instances (in this case EntireX Broker or RPC servers) using templates. The example in this document shows how to create a distributed environment with a broker and an RPC server. This document is organized as follows:
This document provides EntireX-specific information. For general information on template-based provisioning, see Using Composite Templates in the Software AG Command Central Help, available under Software AG Suite & Cross-Product Guides.
Templates are available at GitHub under https://github.com/SoftwareAG/sagdevops-templates/tree/master/templates. Each template is in a separate directory prefixed with "sag-exx".
Each directory contains a readme file with a short description of how to use the template files.
This example assumes you have Command Central installed on a central host and shows two installations on two remote hosts where the Software AG Platform Manager is already installed. All commands are started from the host where Command Central is installed, and are executed on the target host. This example uses sample files provided in the example folder.
Note:
You can of course also install, create and configure locally on the same host where Command Central is installed.
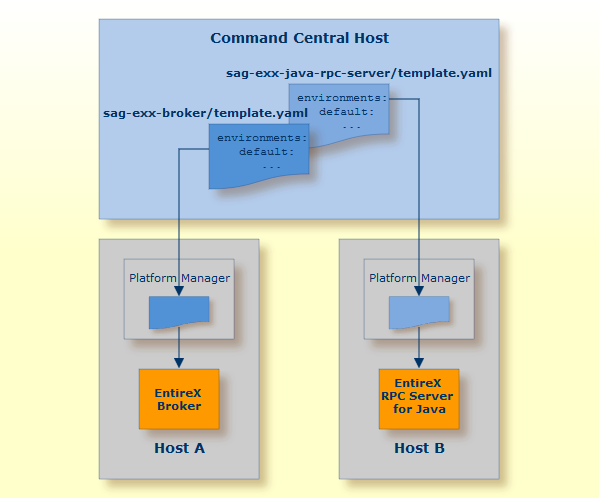
On Host A, package EntireX Broker is installed and a broker instance created. This is done with file template.yaml in directory sag-exx-broker.
On Host B, package EntireX Core is installed and an instance of the RPC Server for Java is created. This is done with the
template template.yaml in directory sag-exx-java-rpc-server.
Installation and creation of instances is controlled by a template file, which consists of the following sections:
In the environments section you can define default values for the parameters of an instance (EntireX Broker or RPC server).
These parameters are used later when creating an instance.
In the provision section you define a layer containing the individual actions for the host you want to install
(installation, creation of an instance, configuration of an instance). Our example uses the layer runtime.
The section layers contains the various actions to be performed with corresponding reference to the template that is to be used.
In our example, it first defines the product repository, the fix repository and the template to be executed,
in this case java.server. You need to make sure that you have defined a valid product and fix repository in Command Central.
The section templates contains the actions to be executed.
It defines the license to be used from the Command Central license repository, the product component to be installed, the
fixes to be applied and the instance to be created.
In the following configuration section, all possible configurations for an existing instance can be made.
When the template is executed, it executes different steps:
First the defined component is installed if not already installed.
Then the defined fixes are applied if not yet applied.
An instance is created if it does not already exit.
Configuration based on the parameters in the configuration section is done.
After you have adapted the files with the necessary parameters, execute the files to run the specified actions.
For this, the YAML files have to be imported into the Command Central repository.
Each YAML file defines an alias name under which the YAML file is registered in Command Central.
In our example these names are sag-exx-broker and sag-exx-java-rpc-server.
Note:
All actions are started on the host where Command Central is installed, and are executed on the target host.
 To register the YAML files
Run the following commands:
sagcc exec templates composite import -i sag-exx-broker/template.yaml [overwrite=true]
sagcc exec templates composite import -i sag-exx-java-rpc-server/template.yaml [overwrite=true]
Note:
The overwrite option is only necessary when the file is already registered in Command Central and you want to replace it with
a newer version.
Now the two templates can be referenced by their alias names and can be executed.
If no additional parameters are specified, the default action in the provision section is executed.
This can consist of multiple steps: in our example the different steps are installation, creating an instance and configuring
an instance as defined in the layers section.
Some of the parameters in the YAML files in the example should be overwritten with other values defined in the corresponding
property file.
To execute the actions on the two different hosts
Run the following commands:
sagcc exec templates composite apply sag-exx-broker nodes=A repo.product=<your-product-repository> repo.fix=<your-fix-repository>
sagcc exec templates composite apply sag-exx-java-rpc-server nodes=B repo.product=<your-product-repository> repo.fix=<your-fix-repository>
This installs the EntireX Broker package on host A with an EntireX Broker instance "ETB009" that has a TCP port 7922, an SSL port 7923 and a trace level 1. On host B, the EntireX Core package is installed together with an RPC Server for Java "JavaRpcSrv" and trace level 1.
The example above shows how to install different packages of EntireX and to install and configure an EntireX Broker and an RPC Server for Java. But EntireX supports some additional RPC servers.
EntireX RPC servers have common parameters valid for all RPC servers and type-specific parameters; these type-specific differences are reflected in the respective template files. This section lists all components currently supported by EntireX and the corresponding template files:
Notes:
<inst_root>/bin/afterInstallAsRoot.sh with root permission if you want to register the EntireX Broker Administration Service as daemon (started when the system
is booted).
Use template file template.yaml in directory sag-exx-broker to create and/or configure an instance of an EntireX Broker.
All available parameters are specified in the template file; you can change them here or overwrite them with a corresponding
attribute file.
See Advanced Configuration.
To install and configure an EntireX Broker instance
Import the template with the following command:
sagcc exec templates composite import –i sag-exx-broker/template.yaml [overwrite=true]
Execute the template with its alias name "sag-exx-broker" to create the Broker:
sagcc exec templates composite apply sag-exx-broker nodes=local repo.product=<your-product-repository> repo.fix=<your-product-repository>
Reconfigure the Broker. After changing the values in the template, you need to import the template again as in step 1, then execute it again as in step 2. If the instance already exists, only the modifications of the configurations are executed.
See Creating a Broker Instance and Configuring a Broker Instance under Administering EntireX Broker using the Command Central Command Line for description of parameters.
Use template file template.yaml in directory sag-exx-mf-broker to create and/or configure a proxy instance of an EntireX Mainframe Broker.
All available parameters are specified in the template file; you can change them here or overwrite them with a corresponding
attribute file.
See Advanced Configuration.
To install and configure an EntireX Mainframe Broker proxy instance
Import the template with the following command:
sagcc exec templates composite import –i sag-exx-mf-broker/template.yaml [overwrite=true]
Execute the template with its alias name "sag-exx-mf-broker" to create a proxy instance of an EntireX Mainframe Broker:
sagcc exec templates composite apply sag-exx-mf-broker nodes=local repo.product=<your-product-repository> repo.fix=<your-product-repository>
Reconfigure the Broker. After changing the values in the template, you need to import the template again as in step 1, then execute it again as in step 2. If the instance already exists, only the modifications of the configurations are executed.
See Creating an EntireX Mainframe Broker Connection and Configuring an EntireX Mainframe Broker Connection in the platform-independent Administration documentation for description of parameters.
Use template file template.yaml in directory sag-exx-java-rpc-server to create and/or configure an instance of an RPC Server for Java.
All available parameters are specified in the template file; you can change them here or overwrite them with a corresponding
attribute file.
See Advanced Configuration.
To create and configure an RPC Server for Java
Import the template with the following command:
sagcc exec templates composite import –i sag-exx-java-rpc-server/template.yaml [overwrite=true]
Execute the template with its alias name "sag-exx-java-rpc-server" to create the RPC server:
sagcc exec templates composite apply sag-exx-java-rpc-server nodes=local repo.product=<your-product-repository> repo.fix=<your-product-repository>
Reconfigure the RPC Server for Java. After changing the values in the template, you need to import the template again as in step 1, then execute it again as in step 2. If the instance already exists, only the modifications of the configurations are executed.
See Creating an RPC Server Instance and Configuring an RPC Server Instance in the RPC Server for Java documentation for description of parameters.
Use template file template.yaml in directory sag-exx-c-rpc-server to create and/or configure an instance of an RPC Server for C.
All available parameters are specified in the template file; you can change them here or overwrite them with a corresponding
attribute file.
See Advanced Configuration.
To create and configure an RPC Server for C
Import the template with the following command:
sagcc exec templates composite import –i sag-exx-c-rpc-server/template.yaml [overwrite=true]
Execute the template with its alias name "sag-exx-c-rpc-server" to create the RPC server:
sagcc exec templates composite apply sag-exx-c-rpc-server nodes=local repo.product=<your-product-repository> repo.fix=<your-product-repository>
Reconfigure the RPC Server for C. After changing the values in the template, you need to import the template again as in step 1, then execute it again as in step 2. If the instance already exists, only the modifications of the configurations are executed.
See Creating an RPC Server Instance and Configuring an RPC Server Instance in the RPC Server for C documentation for description of parameters.
Use template file template.yaml in directory sag-exx-mq-rpc-server to create and/or configure an instance of an RPC Server for IBM MQ.
All available parameters are specified in the template file; you can change them here or overwrite them with a corresponding
attribute file.
See Advanced Configuration.
To create and configure an RPC Server for IBM MQ
Import the template with the following command:
sagcc exec templates composite import –i sag-exx-mq-rpc-server/template.yaml [overwrite=true]
Execute the template with its alias name "sag-exx-mq-rpc-server" to create the RPC server:
sagcc exec templates composite apply sag-exx-mq-rpc-server nodes=local repo.product=<your-product-repository> repo.fix=<your-product-repository>
Reconfigure the RPC Server for IBM MQ. After changing the values in the template, you need to import the template again as in step 1, then execute it again as in step 2. If the instance already exists, only the modifications of the configurations are executed.
See Creating an RPC Server Instance and Configuring an RPC Server Instance in the RPC Server for IBM MQ documentation for description of parameters.
Use template file template.yaml in directory sag-exx-ims-rpc-server to create and/or configure an instance of an RPC Server for IMS Connect.
All available parameters are specified in the template file; you can change them here or overwrite them with a corresponding
attribute file.
See Advanced Configuration.
To create and configure an RPC Server for IMS Connect
Import the template with the following command:
sagcc exec templates composite import –i sag-exx-ims-rpc-server/template.yaml [overwrite=true]
Execute the template with its alias name "sag-exx-ims-rpc-server" to create the RPC server:
sagcc exec templates composite apply sag-exx-ims-rpc-server nodes=local repo.product=<your-product-repository> repo.fix=<your-product-repository>
Reconfigure the RPC Server for IMS Connect. After changing the values in the template, you need to import the template again as in step 1, then execute it again as in step 2. If the instance already exists, only the modifications of the configurations are executed.
See Creating an RPC Server Instance and Configuring an RPC Server Instance in the RPC Server for IMS Connect documentation for description of parameters.
Use template file template.yaml in directory sag-exx-net-rpc-server to create and/or configure an instance of an RPC Server for .NET.
All available parameters are specified in the template file; you can change them here or overwrite them with a corresponding
attribute file.
See Advanced Configuration.
To create and configure an RPC Server for .NET
Import the template with the following command:
sagcc exec templates composite import –i sag-exx-net-rpc-server/template.yaml [overwrite=true]
Execute the template with its alias name "sag-exx-net-rpc-server" to create the RPC server:
sagcc exec templates composite apply sag-exx-net-rpc-server nodes=local repo.product=<your-product-repository> repo.fix=<your-product-repository>
Reconfigure the RPC Server for .NET. After changing the values in the template, you need to import the template again as in step 1, then execute it again as in step 2. If the instance already exists, only the modifications of the configurations are executed.
See Creating an RPC Server Instance and Configuring an RPC Server Instance in the RPC Server for .NET documentation for description of parameters.
Use template file template.yaml in directory sag-exx-xml-rpc-server to create and/or configure an instance of an RPC Server for XML/SOAP.
All available parameters are specified in the template file; you can change them here or overwrite them with a corresponding
attribute file.
See Advanced Configuration.
To create and configure an RPC Server for XML/SOAP
Import the template with the following command:
sagcc exec templates composite import –i sag-exx-xml-rpc-server/template.yaml [overwrite=true]
Execute the template with its alias name "XMLRpcServer" to create the RPC server:
sagcc exec templates composite apply sag-exx-xml-rpc-server nodes=local repo.product=<your-product-repository> repo.fix=<your-product-repository>
Reconfigure the RPC Server for XML/SOAP After changing the values in the template, you need to import the template again as in step 1, then execute it again as in step 2. If the instance already exists, only the modifications of the configurations are executed.
See Creating an RPC Server Instance and Configuring an RPC Server Instance in the RPC Server for XML/SOAP documentation for description of parameters.
Use template file template.yaml in directory sag-exx-cics-socket-listener-rpc-server to create and/or configure an instance of an RPC Server for CICS Socket Listener.
All available parameters are specified in the template file; you can change them here or overwrite them with a corresponding
attribute file.
See Advanced Configuration.
To create and configure an RPC Server for CICS Socket Listener
Import the template with the following command:
sagcc exec templates composite import –i sag-exx-cics-socket-listener-rpc-server/template.yaml [overwrite=true]
Execute the template with its alias name "sag-exx-cics-socket-listener-rpc-server" to create the RPC server:
sagcc exec templates composite apply sag-exx-cics-socket-listener-rpc-server nodes=local repo.product=<your-product-repository> repo.fix=<your-product-repository>
Reconfigure the RPC Server for CICS Socket Listener. After changing the values in the template, you need to import the template again as in step 1, then execute it again as in step 2. If the instance already exists, only the modifications of the configurations are executed.
See Creating an RPC Server Instance and Configuring an RPC Server Instance in the RPC Server for CICS Socket Listener documentation for description of parameters.
You can also specify a complete EntireX Broker attribute file or RPC server configuration file when you configurer an instance. First create the instance with a template, then instead of reconfiguring individual properties, specify an attribute file or configuration file.
Note:
The attribute and configuration files must be on the host where Command Central is installed.
There are two additional templates files in the directories sag-exx-broker-attr and sag-exx-java-rpc-server-config.
The template sag-exx-broker-attr/template.yaml shows how to create a broker with a given attribute file in the template.
The template sag-exx-java-rpc-server-config/template.yaml shows how to create an RPC Server for Java with a complete configuration file in the template.
There is also a readme file with a short description of how to use the templates.