
This document describes how to migrate an earlier version of EntireX to version 10.9 under Linux or Windows. EntireX version 10.9 can only be installed in parallel to an existing EntireX version. In this scenario you can migrate user data from one installation to the other easily, using the steps described here. The information applies to both Linux and Windows systems; any differences are described explicitly.
This document covers the following topics:
Note:
In this document, source refers to an earlier EntireX installation,
and target refers to the current EntireX version 10.9.
The broker attribute files are located at <inst_dir>/EntireX/config/etb. Follow the steps below to migrate broker data from one installation to the other:
 To migrate broker data
Stop all running EntireX brokers in both the source and target installations. EntireX brokers from other installations and platforms are not affected.
Stop all running RPC Servers that are registered to EntireX brokers in source or target installations. This also includes remote RPC servers or RPC servers from other EntireX installations if these RPC servers are registered with the brokers to be shut down.
Stop the Broker Administration Service/Daemon.
Under Linux:
Stop the Administration Service, using the script
EntireX/bin/sag<n>exx109 stop
| where | <n> |
is a sequential, installation-dependent number and |
109 |
is the EntireX version (major and minor version number) |
For example:
sag5exx109 stop
Under Windows:
From the Control Panel in both installations, choose
Note:
The first installation does not have a number to identify it. The second and subsequent installations are appended with (2),
(3) etc.
Copy all relevant directories of defined brokers from source to target installation. These directories - one for each broker - are located under <inst_dir>/EntireX/config/etb.
Note:
Copy the complete directories, not just the attribute
files.
Check the broker attribute files for path names and adapt them to the target installation.
Restart the Broker Administration Service/Daemon.
Under Linux:
Start the Administration Service for both installations, for example
with command
sag5exx109 start
Under Windows:
From the Control Panel, restart the Software AG EntireX Broker Administration
Service for both installations.
Following the above steps, autostart settings and user credentials are not migrated. Apply these manually in the new installation. When you restart the Broker Administration service, all brokers will be shown. Readjust the autostart settings and user credentials, using Command Central.
You do not need to move Broker definitions (attribute file etc.) that are stored outside the EntireX installation directory. Simply makes sure when you start a broker stored externally that the broker executable from version 10.9 is used. This may apply to your scripts or when you start a broker manually.
In EntireX version 9.10 and below, the LDAP configuration was defined in the xds.ini file. From version 9.12, the configuration is defined with the following new attributes in the Broker attribute file. See Security-specific Attributes. The following table gives an overview of the old and the new configuration:
| Configuration File xds.ini | Broker Attribute File |
|---|---|
host=<host> |
LDAP-AUTHORIZATION-URL="ldap://host:port".
|
port=<port> |
LDAP-AUTHORIZATION-URL="ldap://host:port".
|
protocol=<protocol> |
LDAP-AUTHORIZATION-URL="ldap://host:port".
|
authDN=<user> |
LDAP-AUTH-DN="cn=admin,dc=software-ag,dc=de".
|
authPass=<ldap_password> |
LDAP-AUTH-PASSWD=encrypted_ldap_password.
|
baseDN=<DN> |
LDAP-BASE-DN="dc=software-ag,dc=de".
|
To migrate RPC servers
Copy the file <inst_dir>/EntireX/config/rpc.server.properties from source to target installation.
In this file, adapt path names that reference your source installation to your target installation.
Paths of RPC servers other than the source installation can remain unchanged.
Note the following when migrating web services to a more recent version of EntireX:
Artifacts such as XMM or AAR files can be reused without regeneration.
Make sure Web Services Stack and EntireX are on the same level.
Modify your scripts (for example the start script of the RPC Server for XML/SOAP) so that they use the new versions of the relevant JAR files of Web Services Stack and EntireX.
This section applies to EntireX version 8 and above and describes migration steps for the following components:
Update the start script to set the paths to current installation. If the properties file contains a path to the configuration file, you may need to adjust the path. The properties and configuration files can be used as before. See Configuration File in the RPC Server for XML/SOAP documentation for more information.
Update the start script to set the paths to current installation.
The migration steps depend on the Web server you are using:
Using the Software AG Web Server based on Apache Tomcat / Software AG Runtime from Software AG Installation
Save your web services (AAR files) and modified configuration files (that is, axis2.xml).
You do not need to re-generate your web services (AAR files). If the configuration was modified,
perform the same modifications for the new installation and restart Software AG Web Server.
Redeploy the web services (AAR files).
Note:
The new installation will use another port by default, which means that the Web clients need to be adjusted.
Using another Web Server
Save your web services (AAR files) and modified configuration files (that is, axis2.xml).
You do not need to re-generate your web services (AAR files).
For deployment of file wsstack.war and copying file entirex.jar to Web Services Stack,
see the separate Web Services Stack documentation in the Software AG Infrastructure Administrator's Guide under Software AG Suite & Cross-Product Guides.
If configuration was modified, perform the same modifications for new installation and restart the Web server. Redeploy the web services (AAR files).
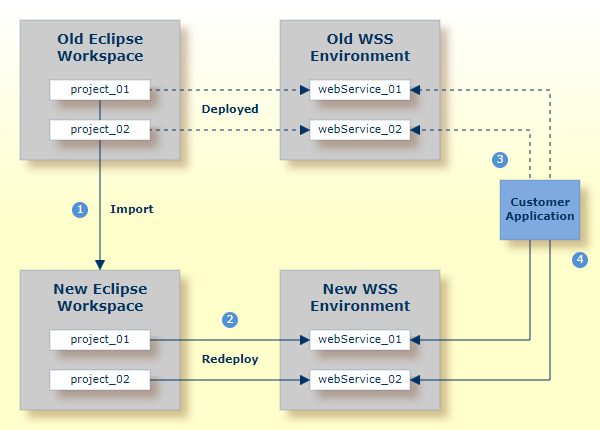
We recommend you import existing projects into a new workspace of your target installation. We do not recommend reusing an existing Eclipse workspace. This may damage data or result in strange behavior.
This section describes how to import the projects of Designer from an earlier version into the workspace of the new Designer 10.9, then redeploy the web services to the new Web Services Stack 10.9. It covers the following topics:
Notes:
Before you migrate your old projects, you can optionally migrate your existing preferences to your new 10.9 installation.
To migrate the preferences to the new workspace (optional)
Open Designer 10.9 and point to a new 10.9 workspace. Accept the default "workspace109" or specify another one.
Export your preferences before upgrading:
Start the old version of Designer with the old workspace.
Choose . In the Select panel, choose and click .
In the To preference file field, specify the EPF (Eclipse Process Framework) file to which you want to export your preferences, then click .
Import these preferences to the new workspace:
Start Designer 10.9 with the new workspace.
Choose . In the Select panel, choose and click .
In the From preference file field, specify the EPF file to which you exported your preferences, then click .
To import projects into Designer 10.9
Choose . In the Select panel, choose and click .
In the panel, choose and go to the old workspace. The projects appear in the Projects box. Select the projects to import into Designer 10.9.
Choose and click .
To redeploy the web services
Select an AAR file and from the context menu choose .
Select the correct URL that points to the Web Services Stack 10.9 installation.