Configuring a Constraint Layout Template
To configure a constraint layout template, you use the Layout Builder. This editor has three tabs that allow you to edit the code of the layout template, to insert Java code, or to add and position user interface objects by drag and drop.

To configure a constraint layout template
1. In the Package Explorer, locate the constraint layout template under your_project/model/layouts/constraint_layout_name.layout.
2. Double-click the file. Or right-click and select Open with > Layout Builder.
The constraint layout template is opened in the Layout Builder.
3. To edit the code of the layout template, select the Model tab and enter code in the text editor. Click CTRL+SPACE to use the content assist.
4. To enter Java code for the layout template, select the Java tab and enter your code in the text editor.
5. To insert and position user interface objects by drag and drop, select the Preview tab and do one of the following:
a. Select a user interface object from the palette and drop it on the parent layout.
The object is inserted and top-left aligned to the parent layout.
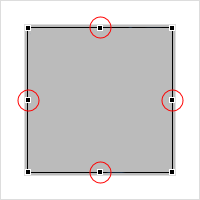
b. To specify constraints, i.e. alignments to sibling user interface objects or the parent layout, click one of the middle black squared handles around the object and drag and drop the object so that it is horizontally or vertically aligned to a sibling or to the parent.
c. To insert a margin between the object and the sibling or to the parent you aligned it with, drag and drop the object until the required margin is reached.
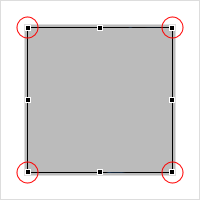
d. To resize the object, click one of the black squared handles in the corners of the object and tear until the required size is reached.
e. In the toolbar of the Layout Builder, you can specify if you want to preview the layout for smartphone or tablet, in portrait or landscape mode, or as full screen or side view. You can also modify the preview size.
6. Click CTRL+S to save your layout template.
Related Topics

