Including Your Own Layouts to the Screen
You can extend CentraSite Control by embedding customized layout pages. This section describes how to create a layout page using the Application Designer IDE and include them onto the screen.
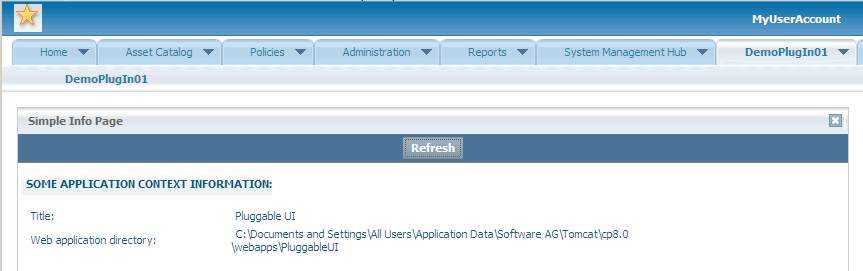
The figure depicts the final result of this procedure:
The CentraSite distribution kit contains an IDE (integrated development environment) that you can use for creating a layout. The IDE is a web application whose clients run on a web browser. The URL (assuming installation defaults) to start the IDE on a machine where CentraSite is installed is http://localhost:53307/PluggableUI/HTMLBasedGUI/workplace/ide.html. There is no shortcut created by the installation to start IDE. Therefore you have to create one manually.
The IDE delivered in the distribution kit needs to be activated before you can use it. For information on how to do this, see .
1. Create the layout page.
a. Start the IDE and leave the Eclipse instance running.
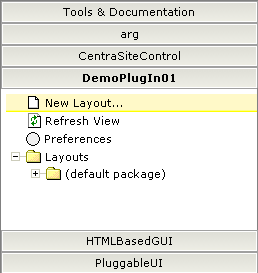
b. Click the DemoPlugIn01 button in the button list displayed on the left.
c. Click New Layout on the left side directly below the DemoPlugIn01 button.
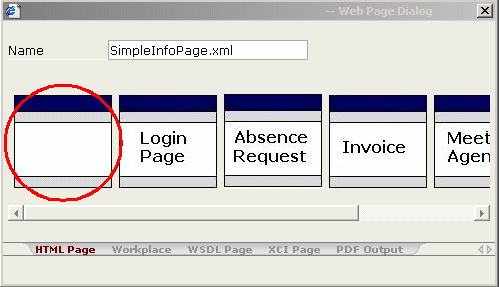
d. Type SimpleInfoPage.xml in the input field labeled Name in the resulting dialog.
e. Click the leftmost image below the input field, as shown, to create an HTML page.
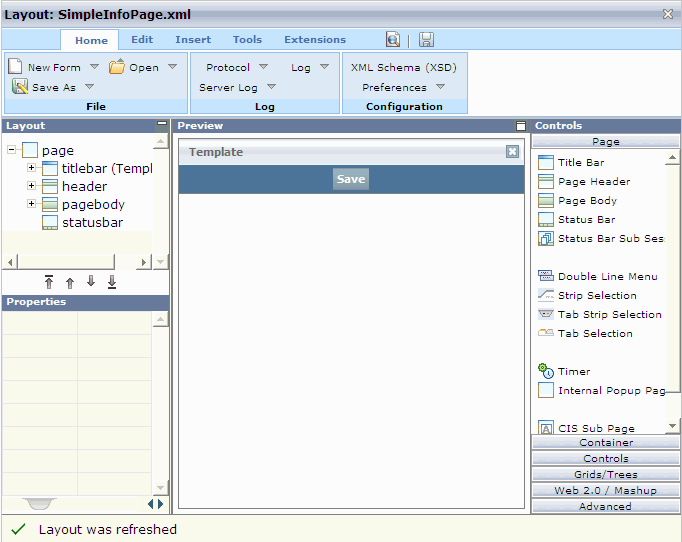
The IDE presents a standard HTML page in the preview area of the layout painter. This displays how the newly created layout looks. To view the preview, select the Preview icon from the toolbar of the layout painter (located beside the diskette symbol). The current look of layout SimpleInfoPage.xml is displayed in the preview area.
2. Design the layout as required.
a. Click on the title bar of the layout.
b. In the Properties view for the title bar, located at the lower left corner of the layout painter, change the name property from Template to Simple Info Page.
c. Click Save.
d. Change the name property from Save to Refresh and set the method property to onRefresh.
e. Click the diskette symbol in the tool bar of the layout painter to save the layout. The preview of the layout changes and now reflects the properties that were modified.
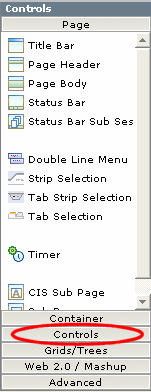
f. Click Controls in the Controls view (located right to the preview area).
g. Add three Independent Row controls to the body of the page:
a. Click Independent Row and hold the left mouse button down.
b. Drag the Independent Row icon to the page body of the layout (the white area below the button that is now labeled Refresh) and release the left mouse button.
c. Click Add as Subnode from the popup menu that appears.
d. Perform the same action to add a second and a third Independent Row control to the page body and click Add as last Subnode from the popup menu that appears after releasing the mouse button.
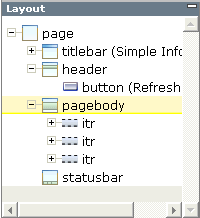
The
pagebody node of the
Layout view (located above the
Properties view) now contains three
itr subnodes, representing the three
Independent Row controls.
h. From the Controls view, drag and drop a Label control onto the first itr sub node of the pagebody node in the Layout view.
i. In the Properties view set the name property to Some application context information.
j. Set the asheadline property of the label to true.
To access this property, you have to select the Appearance tab at the bottom of the Property view. You can select the value true using the combo box to the right of the property name.
k. Drag and drop a Horizontal Distance control onto the second itr sub node of the pagebody node in the Layout view.
l. In the Properties view, set the width property for the Horizontal Distance control to 10 by just typing it in.
m. Drag and drop a Label control onto the second itr sub node of the pagebody node in the Layout view.
n. From the popup menu that appears after you release the mouse button, click Add as last Subnode.
o. Set the name property of the newly added label to Title: and the width property to 200.
p. Add a Dynamic Text control as the last sub node to the second itr sub node of pagebody. Set the valueprop property to title and the width property to 500.
q. Execute the last five steps again for the third itr sub node of the pagebody node in the Layout view. Set the name property of the Label control to Web application directory: and the valueprop property of the Dynamic Text control to webAppDir. All width properties remain the same as for the children of the second itr sub node of pagebody.
r. Surround the first itr sub node with two vertical distances by dragging and dropping two Vertical Distance controls onto the first itr sub node of pagebody (one as a preceding node and one as a subsequent node of the itr). Set the height property for each Vertical Distance control to 10.
s. Click on the diskette symbol in the tool bar of the layout painter to save the layout.
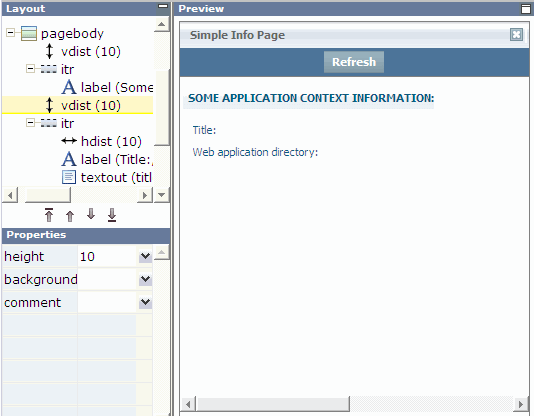
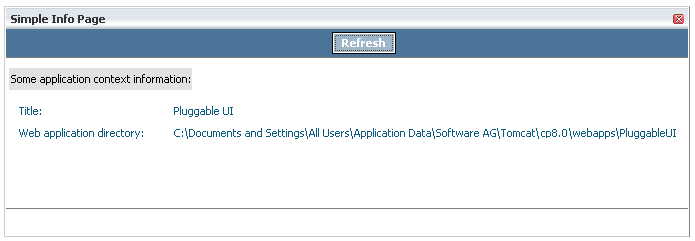
The layout looks as required.
3. Create an adapter for SimpleInfoPage:
Each layout needs to have some code behind it (called the page adapter) which is not provided yet. In the page adapter you can specify how to react on events that occur due to user interactions (the push of a button for example) or fill the controls with application specific values, and so on.
The code behind the layout at this stage is provided by a dummy adapter that comes with the IDE. But you have to provide your own so that the adapter knows what to do when a user presses the Refresh button, for example.
a. Navigate to the Home tab of the layout painter.
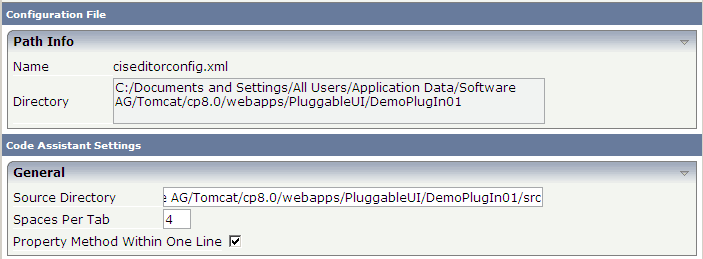
b. Select Preferences and type the absolute path for the Java source directory of the CentraSite Control plug-in DemoPlugIn01.
Tip:
Instead of typing the complete path, you can copy and paste the content of the field labeled
Directory in the input field for the source directory and then append
/src to the copied content as shown.
c. Click Save and Apply.
d. In the Layout view, select the tree node page.
e. Change the model property of page from DummyAdapter to demo.plugin01.adapters.SimpleInfoPageAdapter.
f. Click the diskette symbol to save the layout. The content of the Preview view changes and indicates an error now. This is normal and can be ignored.
g. Click the Tools tab of the IDE and select Code Assistant. The look of the IDE changes and the generated code for the page adapter is visible on the right side.
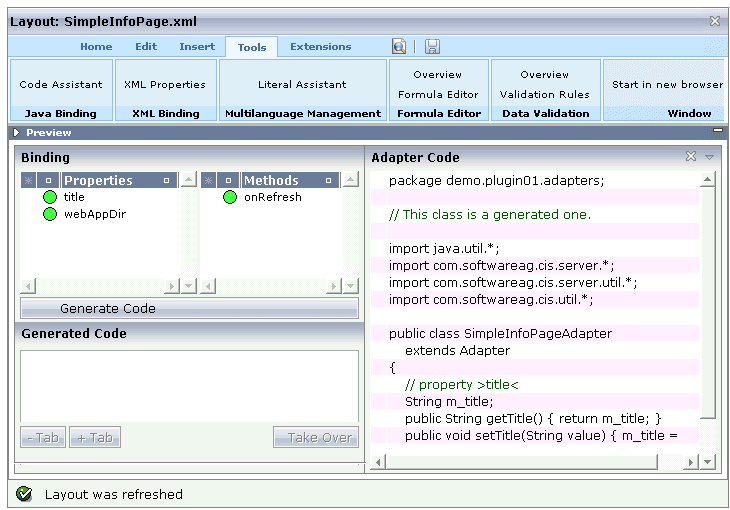
You can apply the necessary changes for the adapter class using the IDE. A easier way is doing this inside the already existing eclipse project. Click the diskette icon again to save the adapter source code in the Java source directory of the
CentraSite Control plug-in
DemoPlugIn01.
4. Close the IDE and return to the Eclipse environment.
5. Refresh the plug-in project
a. Select the folder DemoPlugIn01 and select Refresh from the context menu.
b. Expanding all folders that relate to the plug-in.
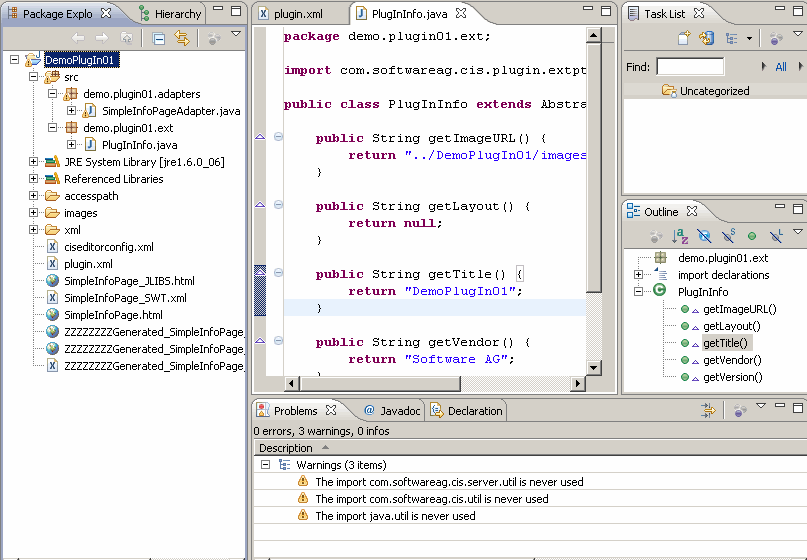
The eclipse project should look like as shown. The contents of subfolders
accesspath and
xml have been created by the IDE activities. There is a new package called
demo.plugin01.adapters containing the class
SimpleInfoPageAdapter. The adapter classes used for plug-ins to
CentraSite Control should be derived from the class
BaseAdapter rather than from the class
Adapter as provided by Application Designer.
6. Apply application code to the adapter SimpleInfoPageAdapter.
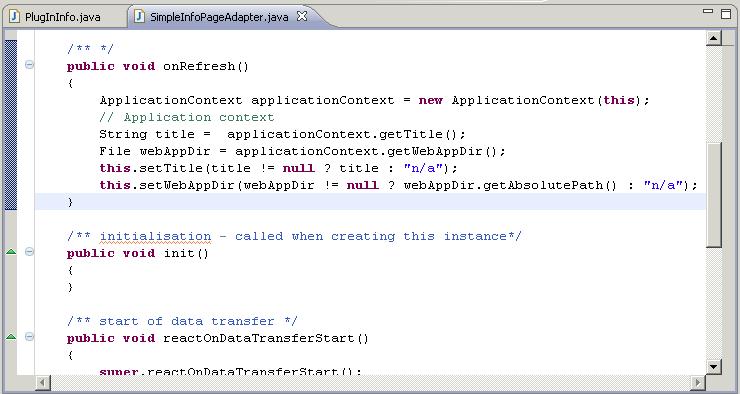
a. Open the file SimpleInfoPageAdapter.java by double-clicking its node in the tree.
b. Type the following code inside the body of method onRefresh:
ApplicationContext applicationContext = new ApplicationContext(this);
// Application context
String title = applicationContext.getTitle();
File webAppDir = applicationContext.getWebAppDir();
this.setTitle(title != null ? title : "n/a");
this.setWebAppDir(webAppDir != null ? webAppDir.getAbsolutePath() : "n/a");
Some types are marked by the Java editor as unknown when you type the code.
c. Press Ctrl + Shift + O to instruct the Java editor to add the necessary import statements automatically (for the missing class called File select java.io.File from the resulting dialog).
d. Save the file
There should be no compilation errors.
7. Bring the user-defined layout inside CentraSite Control to the screen and extend CentraSite Control at another point in order to add a perspective
a. Add the following XML element to the plug-in description file plugin.xml in the Eclipse environment and save it to inform the pluggable infrastructure that we are extending
b. Add the following requiredPlugin XML element after the existing requiredPlugin XML element:
<requiredPlugin id="com.centrasite.control" />
c. Add the following XML element to the already existing XML code:
<!-- Perspective -->
<extension point="com.softwareag.cis.plugin.perspective"
id="DemoPlugIn01Perspective"
class="demo.plugin01.ext.PlugInPerspective" >
</extension>
d. Save the file plugin.xml.
8. The implementation of our new perspective requires a new class which implements the necessary interface:
a. In the context of DemoPlugIn01/src, create a new Java class called PlugInPerspective in package demo.plugin01.ext. Use class com.softwareag.cis.plugin.extpt.util.AbstractPerspective as the superclass.
b. Let method getTitle() return the string DemoPlugIn01.
c. Let the getLogoImageURL() method return the path to our 24x24 icon (../DemoPlugIn01/images/star-24x24.gif).
d. Insert the methods.
public boolean hasTopicTree()
{
return false;
}
and
public boolean supportsViews()
{
return false;
}
The Java source should look like:
package demo.plugin01.ext;
import java.util.List;
import com.softwareag.cis.plugin.extpt.util.AbstractPerspective;
import com.softwareag.cis.plugin.extpt.util.WorkplaceContext;
import com.softwareag.cis.server.util.ICONLISTInfo;
public class PlugInPerspective extends AbstractPerspective
{
public String getTitle()
{
return "DemoPlugIn01";
}
public String getImageURL()
{
return null;
}
public boolean hasTopicTree()
{
return false;
}
public boolean supportsViews()
{
return false;
}
public String getLogoImageURL()
{
return "../DemoPlugIn01/images/star-24x24.gif";
}
public ICONLISTInfo getToolbar()
{
return null;
}
public String getView()
{
return null;
}
public String getViewLabel()
{
return null;
}
public List getViewValues()
{
return null;
}
public String getWorkplaceDefaultLayout()
{
return null;
}
public void setView(String arg0)
{
}
public void setWorkplaceContext(WorkplaceContext arg0)
{
}
}
e. Save and close the Java source file.
9. Extend CentraSite Control with a new topic.
a. Add the following XML element to the plug-in description file plugin.xml in the Eclipse environment and save it.
<!-- Topic -->
<extension point="com.softwareag.cis.plugin.topic"
id="DemoPlugIn01Topic"
perspective="demo.plugin01.DemoPlugIn01Perspective"
class="demo.plugin01.ext.PlugInTopic" >
</extension>
10. Implement the adapter class.
a. In the context of DemoPlugIn01/src, create a new Java class called PlugInTopicAdapter in package demo.plugin01.ext.adapters. Use class com.centrasite.control.adapters.TopicAdapter as the superclass. Do not inherit abstract classes here.
b. Add a public default constructor to the class. The Java source should look like:
package demo.plugin01.ext.adapters;
import com.centrasite.control.adapters.TopicAdapter;
public class PlugInTopicAdapter extends TopicAdapter
{
public PlugInTopicAdapter()
{
}
}
c. Save and close the Java source file.
11. Extend class.
a. In the context of DemoPlugIn01/src, create a Java class called PlugInTopic, in the package demo.plugin01.ext, using the superclass com.centrasite.control.ext.util.BaseTopic. Select Inherited abstract methods.
b. Add a public default constructor that invokes the super(int) constructor to the source.
public PlugInTopic ()
{
super(0);
}
c. Let method getTopicAdapterClass() return PlugInTopicAdapter.class.
d. Let method getTitle() return the string DemoPlugIn01.
e. Add the following code to method initTree.
String title = "Simple Info Page";
String pageUrl = "../DemoPlugIn01/SimpleInfoPage.html";
String adapterClass = SimpleInfoPageAdapter.class.getName();
ActionContext actionContext = getTopicAdapter().getActionContext();
actionContext.showPage(pageUrl, title, adapterClass);
f. Press Ctrl+Shift+O to resolve compilation problems.
g. Save the Java source file and make sure that no compilation errors occur. After applying the changes, the Java source code for class PlugInTopic should look like:
package demo.plugin01.ext;
import com.centrasite.control.ActionContext;
import com.centrasite.control.Item;
import com.centrasite.control.ext.util.BaseTopic;
import demo.plugin01.adapters.SimpleInfoPageAdapter;
import demo.plugin01.ext.adapters.PlugInTopicAdapter;
public class PlugInTopic extends BaseTopic
{
public PlugInTopic()
{
super(0);
}
protected Class getTopicAdapterClass()
{
return PlugInTopicAdapter.class;
}
protected void initTree() throws Exception
{
String title = "Simple Info Page";
String pageUrl = "../DemoPlugIn01/SimpleInfoPage.html";
String adapterClass = SimpleInfoPageAdapter.class.getName();
ActionContext actionContext = getTopicAdapter().getActionContext();
actionContext.showPage(pageUrl, title, adapterClass);
}
public void refresh(Item arg0, int arg1)
{
}
public String getTitle()
{
return "DemoPlugIn01";
}
public String getImageURL()
{
return null;
}
}
12. Restart the Software AG Runtime service.
13. Open CentraSite Control.
The navigation pane shows the new perspective DemoPlugIn01 which has a topic entry DemoPlugIn01. Note that the star-24x24.gif graphic is visible in the header bar.
14. Click Refresh in the Simple Info Page display.
The values for
Title and
Web application directory are updated as shown.