Generating OAuth 2.0 Tokens while configuring connections
In CloudStreams v10.3 and earlier releases, you could not generate Access Tokens required to configure the connection for OAuth 2.0 authorization. From the CloudStreams v10.4 release, for some connectors such as Salesforce CRM v44, you can generate the OAuth 2.0 Access Token while creating a new connection or while editing an existing connection from the connection configuration page in webMethods Integration Server Administrator.
Approaches for generating OAuth 2.0 tokens
 Authorization Code Flow
 – An OAuth 2.0 flow that is used to grant an access token to server-hosted applications. In this flow,
CloudStreams opens the web page for authorization, and after authorization, redirects the authorization code to
CloudStreams.
JSON Web Token (JWT) Flow – Authorization by a signed JWT.
Prerequisites
Install
CloudStreams Server v10.4 or a later version with the latest fix level.
Install the supported v10.4
CloudStreams Provider, for example, v10.4 WmSalesforceProvider v44.
Enable SaaS provider settings. For example, for Salesforce v44, you must have the Salesforce.com Connected App with Digital Certificate created by the keystore configured in
webMethods Integration Server Administrator and enabled the OAuth settings. For information on how to configure
Integration Server keystores, see the
Securing Communications with the Server section in the
webMethods Integration Server Administrator's Guide.
Generating OAuth 2.0 tokens
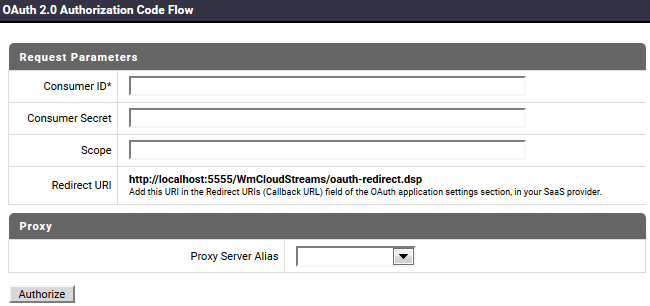
1. To generate tokens using the Authorization Code Flow, on the Configure Connection page in webMethods Integration Server Administrator, click Generate Access Token. The OAuth 2.0 Authorization Code Flow dialog box appears.
2. Obtain the required Request Parameters from the SaaS provider application, for example, OAuth App Consumer ID (Client ID), Consumer Secret (Client Secret), and Scope. The fields in the Request Parameters section may vary as per the SaaS provider.
3. In the OAuth 2.0 Authorization Code Flow dialog box, type the required request parameters you obtained in the previous step. If the request must be sent through a proxy server, in the Proxy Server Alias field, specify the alias name of the enabled proxy server configuration on webMethods Integration Server that will be used to route the request. Add the same Redirect URI in the Redirect URIs (Callback URL) field of the OAuth application settings section in your SaaS provider.
4. Click Authorize.
The authorization URI is built and the authorization page of the SaaS provider opens.
5. Log in to the SaaS provider and grant access to the required scopes, if any. If you have a developer account, you already have a default authorization server created for you. The authorization server is the server that issues the access token.
After successful authorization, the authorization server redirects the authorization code to CloudStreams.
6. CloudStreams exchanges the authorization code for an access token with the SaaS provider. The fields in the Connection Groups: OAuth V2.0 (Authorization Code Flow) section are populated after a successful response from the SaaS provider.
7. To generate tokens using the JSON Web Token (JWT) Flow, on the Configure Connection page in webMethods Integration Server Administrator, click Generate Access Token.
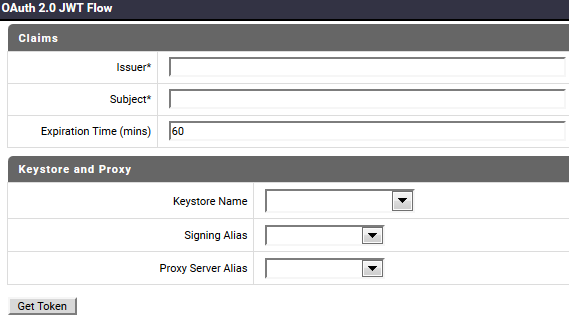
8. For the Claims section, obtain the Claims information from the SaaS provider application, for example, Issuer and Subject. The fields in the Claims section may vary as per the SaaS provider.
9. Type the following required claims you obtained in the previous step:
Issuer - Client ID, or Identifier, or name of the server or system issuing the JWT token.
Subject - Identifier or the name of the user this token represents.
10. In the Claims section, type the following details:
Expiration Time (mins) - Time after which the JWT expires.
11. In the Keystore and Proxy section, type the following details:
Keystore Name - The
Integration Server keystore that
CloudStreams should use. This field lists all available
Integration Server keystores. If there are no configured
Integration Server keystores, the list will be empty. For information on how to configure
Integration Server keystores, see the
Securing Communications with the Server section in the
webMethods Integration Server Administrator's Guide.
Signing Alias - This alias is the value that is used to sign the outgoing request from
CloudStreams to the authentication server. It is auto-populated based on the keystore selected in the
Keystore Name field. This field lists all the aliases available in the chosen keystore. You must provide a signing alias to sign the JWT payload.
Proxy Server Alias - If the request must be sent through a proxy server, in the
Proxy Server Alias field, specify the alias name of the enabled proxy server configuration on
webMethods Integration Server that will be used to route the request.
12. Click Get Token.
The generated JWT token will be sent to the authentication server and the fields in the Connection Groups: OAuth V2.0 (JWT Flow) section will be populated after a successful response from the SaaS provider.