Implementing Communication Between Gadgets
Create a new HelloWorld2 gadget to trigger events, and pass information from HelloWorld2 gadget to the HelloWorld gadget.
1. Create HelloWorld2 gadget and provide the following to the new gadget.
 Gadget Name
: HelloWorld2
Gadget Title: Hello World 2
2. Open the view.xhtml file of HelloWorld2, and add the following code.
<input type="button" value="Click to Publish Data" ng-click="publishData()">
</input>
3. Open the controller.js file of HelloWorld2, and add the following code under the defineScope block.
defineScope : function() {
var _this=this;
this.$scope.publishData= function(){
_this.eventBus.fireEvent("PUBLISH_DATA", "Hello using Event");
}
}
4. Open the view.xhtml file of HelloWorld, and add the following code.
<h3>HelloWorld Gadget</h3>
<div class="hello-world">Hello World!</div>
{{data}}
5. Open the controller.js file in HelloWorld, and add the following code under defineListeners block.
defineListeners:function(){
this._super();
this.eventBus.addEventListener("PUBLISH_DATA",this.
_handleEvents.bind(this));
}
6. In the same controller.js file of HelloWorld, add the following code under defineScope block.
_handleEvents:function(eventType,payload,context){
if(eventType=="PUBLISH_DATA"){
this.$scope.data=payload;
}
},
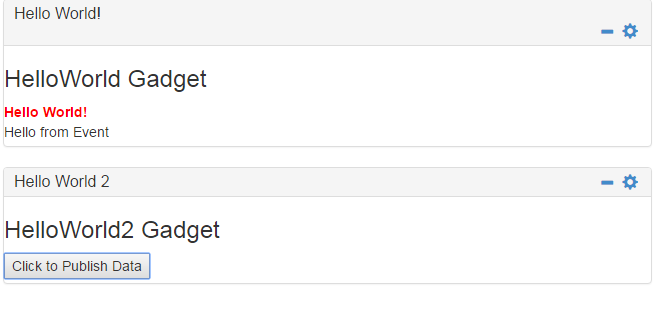
7. Deploy both the gadgets.
8. To test the gadgets, log on to Business Console using URL format: http://<HOST>:<PORT>/business.console.
9. Create a dashboard and add the two gadgets side by side.
10. Click Click to Publish Data in HelloWorld2 gadget.
HelloWorld gadget displays Hello using Event text as shown below.