
An application is a project which can contain an internal system within an organization, such as human resources, billing, customer services etc. The following topics provide detailed step-by-step instructions for various application connected tasks:
Refer to Application Configuration Parameters for further details regarding all the application parameters.
In this task, you will create a new ApplinX application. Every ApplinX application is connected to a host and has a repository containing all the ApplinX entities. The steps detailed in this task include the basic steps required to create an application. Advanced configuration is explained in the reference to Application Parameters.
 To create an ApplinX application
Before creating a new application, ensure that ApplinX server is available and running, and start the Designer. Login to the relevant server or add an additional server as required (refer to Designer to the Logging on and Adding a New Server Connection sections.
In the ApplinX Explorer, right-click on the ApplinX Server and choose .
Or:
Choose the menu item. The New Project wizard window is
displayed.
Expand the Software AG node and choose Application then click to display the New ApplinX application wizard:
Create a New Application wizard is displayed.
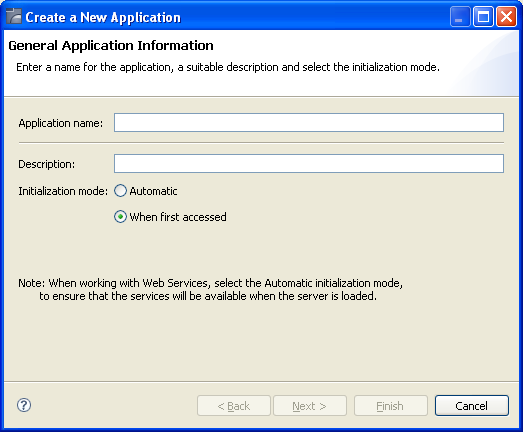
Enter a name for the application and a suitable description.
Select the Initialization mode:
- Automatic
Automatically loaded when the server is started.
- When first accessed
Loaded when first accessed, in other words, when the code that initializes startup is first called (default).
Click . The Select Host screen is displayed. Select whether to use an existing host or to create a new host.

When selecting to define a new host, enter a name for the host and select the relevant type of host. Click . The host connection and conversion parameters are displayed.
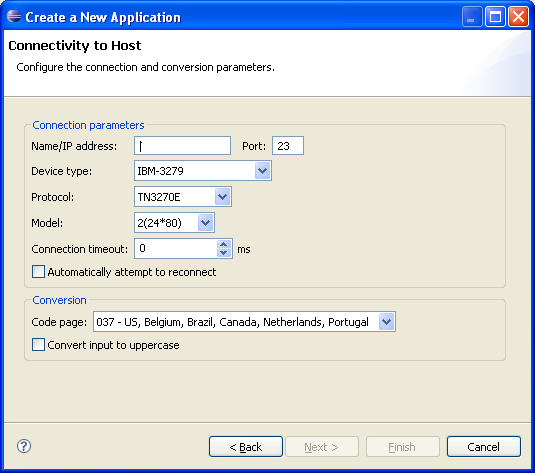
It is mandatory to enter the host's name/IP address (IPv4 and IPv6 address formats are supported). Configure the other parameters as required. Further details of these parameters are available in Host Parameters.
Click . The application is displayed in the ApplinX Explorer. It is possible to further configure the application properties by right-clicking on the application name and selecting . Refer to the Application Configuration Parameters in the Reference section for details regarding the advanced configuration properties.
Note:
ApplinX provides predefined, built-in transformations. These are a
basic kit of commonly used transformations that can be used as-is, or you
customize them to suit your exact needs, building up your own transformation
library. See Transformations.
To use ApplinX predefined built-in transformations
Right-click on the Repository node of your selected application and choose .
The Application Properties dialog box contains additional parameters that can be configured such as the language, printer configuration, process tracing, screen content definitions etc. For details of each node of the application properties refer to the Application Reference section. To edit an application's configuration, right-click on the application's node (in the ApplinX Explorer) and choose .
Note:
Notice that in the Host name field (in the Host
tab), only hosts of the same type as the configured host are listed.
To delete an application
Right-click on the application's node and choose . In addition to deleting the application it is also possible to determine whether when the host used in this application is not used in any other application, you would like to delete the host and also whether you would like to delete the entire application from the file system.
Reload an application when there is new data that the application requires, such as when repository definitions change or when the database file is replaced. Reloading the application will reload the repository, close all connection pools, stop running connection pools and if the database is synchronized at the end of the reload process will automatically restart the connection pools.
To reload an application
Right-click on the application's node and choose Reload Application.
It is possible to import:
A complete ApplinX application, including the application configuration, the application entities and a trace file, i.e. a gxar file.
An application's entities, i.e. a gxz file.
Note:
It is not possible to import entities exported from a higher server
or database version than the current version that you are using.
Note:
In ApplinX versions prior to version 8.0, gxz files included the
application's configuration and/or the application's entities. From version
8.0, gxz files include the entities only, and gxar files can include the
application's configuration, the entities, and trace files. gxz files from
previous ApplinX versions which include the application configuration and you
would like to use, require conversion. Refer to
Convert Utility Batch File on
details regarding converting a gxz file to a gxar file.
Important:
As the import process may consume a lot of memory, it is
recommended to restart ApplinX server after completing the
process.
When importing a complete ApplinX application, you will require a gxar (ApplinX application archive) file. This file includes the application configuration, ApplinX entities (as a read only gxz file) and a trace file. The gxar file can be imported into ApplinX in two different methods:
"Hot Deploy": The gxar file is simply located and placed in the host-applications directory as the file to be imported.
Import wizard
To import an application in the "Hot Deploy" method
Open your Windows Explorer.
Locate the relevant gxar file and place it in the host-applications directory of your ApplinX installation.
In ApplinX Designer, right-click on the server and choose
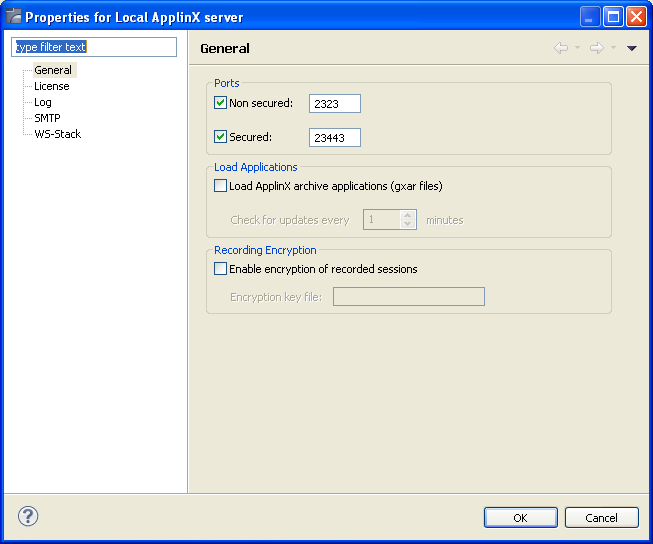
In the General tab, determine to load ApplinX archive applications. Set the interval to look for updates. This determines how often the ApplinX server should check to see if the gxar file to use has changed. Once a different gxar file is detected, it will be used.
It is also possible to use the gxar file by reloading the server (right-click on the server and choose Reload).
To import an application
Right-click on the application's node and choose . The Import Application wizard is displayed.
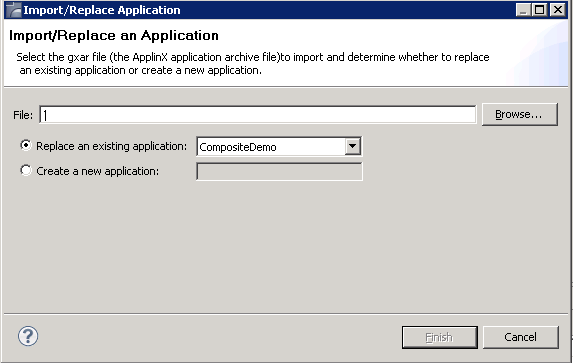
Enter a file name, or browse and select the file to import.
Select whether to replace an existing application (selected by default), or to create a new application. Enter a name accordingly.
Click . Wait a few minutes while the application is imported.
To import entities
Right-click on the application's Root node and choose . The Import Entities wizard is displayed.
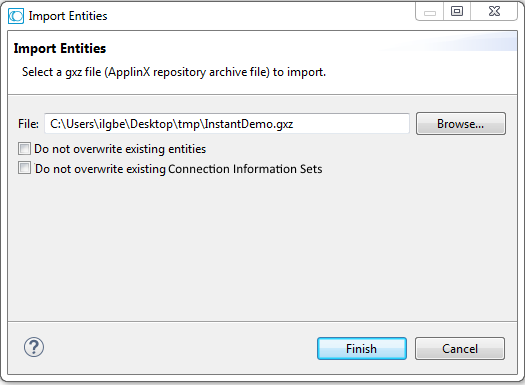
Enter a file name, or browse and select the file to import.
Check Do not overwrite existing entities to determine not to overwrite an existing entity with an imported entity of the same name.
Check Do not overwrite existing Connection Information Sets to determine not to overwrite an existing connection information set with a set of the same name.
Notes:
Click . The entities are imported into the application.
Note:
Clicking Cancel on the Progress Bar dialog box will cause the
process to be stopped and the entities will not be imported.
The Export Wizard allows you to export an application configuration and its repository residing on various database systems into a standard zip file. This wizard guides you through the steps of exporting data.
Note:
When exporting entities, the
Session Data entity
will always be exported.
To export an application configuration with/without its entities
Right-click on the application's node and choose . The Export Application wizard is displayed.

Select whether to export just the application configuration or the application configuration together with the entities.
Enter a folder name, or browse and select the target folder.
Check the Export trace file check box to export a trace file. A list of replay (gct) files that are on the server are displayed. Select a file or click to select a local file to copy to the server.
Click . The application will be exported to the defined folder.
To export entities only
Right-click on the application's Repository node and choose . The Export Entities wizard is displayed.
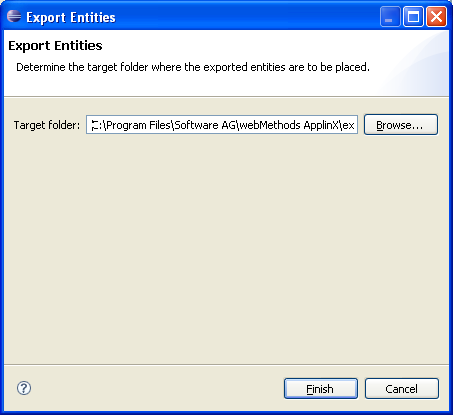
Browse and select the target folder and file name where the exported entities are to be placed.
Click . The export process will commence and the entities will be exported to the selected folder.
Note:
The Session
Data entity will always be exported, regardless of the entities
selected to export.
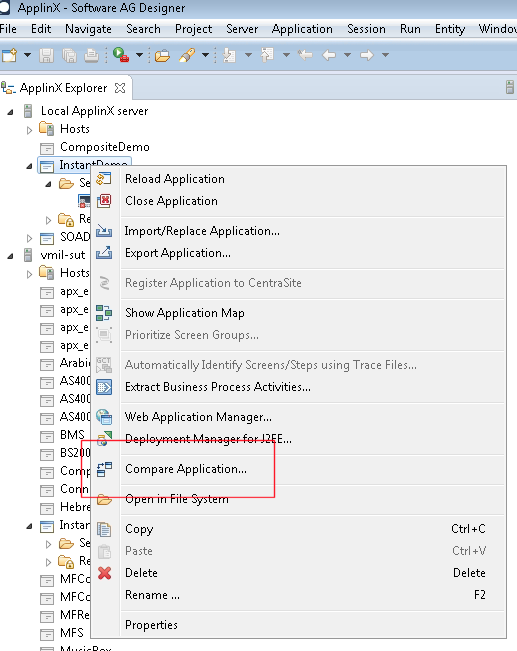
With the function you can compare two ApplinX applications, typically two versions of the same application. In terms of application lifecycle management, being able to compare two different versions means you can perform impact analysis before deploying a new application version. For example, before deploying to your production environment you can compare your current test application with the production version to see what changes were made, make sure the new application version is complete and that all the included changes were intentional.
Any application that is accessible from the Designer can be compared: loaded or unloaded, remote or local. Output from the compare operation is written to the Eclipse Console view and contains the following information:
when the two applications were created/last modified
entities that exist in one application but not the other (indicated by "=>" and "<=")
entities that exist in both applications but with differences (indicated by "!=")
how many entities match (no differences)
entities that moved location between the two applications
entities that were renamed between the two applications (entities are identical in content but with different name)
See Sample Output.
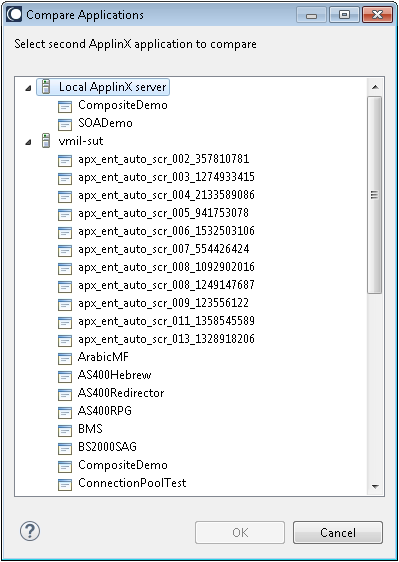
To compare two ApplinX applications
In the ApplinX Explorer, select the first application you want to compare, and from the context menu choose .
Select the second application you want to compare. The list provided includes all applications accessible from the Designer. These can be loaded or not loaded, and either local or remote.
Confirm with to write the output to the Eclipse Console view. See sample output below.
Starting compare process...
Applications loaded successfully


InstantDemo (on Local ApplinX server) and InstantDemo (on APX_Prod) comparison result:


Summary:
--------
InstantDemo (on Local ApplinX server) Last created: 12/08/2015 09:55:31
InstantDemo (on Local ApplinX server) Last modified: 12/08/2015 09:55:41 By: Administrator
InstantDemo (on APX_Prod) Last created: 12/08/2015 09:49:16
InstantDemo (on APX_Prod) Last modified: 12/08/2015 09:49:31 By: Administrator


2 entities exist in InstantDemo (on Local ApplinX server) but not in InstantDemo (on APX_Prod)
2 entities exist in InstantDemo (on APX_Prod) but not in InstantDemo (on Local ApplinX server)
10 entities are different
81 entities match
3 entities moved their location between compared applications
1 entities renamed between compared applications


InstantDemo (on Local ApplinX server)                InstantDemo (on APX_Prod)
------------------                                   ------------------
                                                =>   newScreen (Screen)
                                                =>   HideTextTODel (Transformation)


customers (Folder)                              <=
newTransformation (Transformation)              <=


/customers/BrowseCustomers (Screen)             !=   BrowseCustomers
BrowseCustomersAddress (Screen)                 !=   BrowseCustomersAddress
BrowseProposals (Screen)                        !=   BrowseProposals
/customers/CustomerDetail1 (Screen)             !=   CustomerDetail1
InsuranceMenu (Screen)                          !=   InsuranceMenu
MyLogin (Screen)                                !=   Login
NaturalMainMenu (Screen)                        !=   NaturalMainMenu
ProposalDetail1 (Screen)                        !=   ProposalDetail1
AllGroup (Screen Group)                         !=   AllGroup
BrowseCustomersAddress (Screen based table)     !=   BrowseCustomersAddress


Entities moved:
InstantDemo (on Local ApplinX server)                InstantDemo (on APX_Prod)
------------------                                   ------------------
/customers/BrowseCustomers (Screen)                  BrowseCustomers
/customers/CustomerDetail1 (Screen)                  CustomerDetail1
/customers/BrowseCustomers (Screen based table)      BrowseCustomers


Entities renamed:
InstantDemo (on Local ApplinX server)                InstantDemo (on APX_Prod)
------------------                                   ------------------
MyLogin (Screen)                                     Login
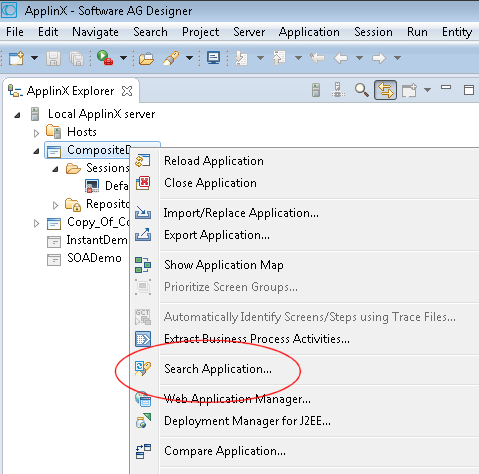
In addition to searching for entity names and referring entities, you can search within an individual entity, for example for screens and screen groups, path and flow procedures. This section covers the following topics:
To start the Designer search
In the ApplinX Explorer, select the application you want to search, and from the context menu choose .
Or:
From the File menu, choose > .
Open the tab and enter your search string. You can filter the search or use wildcards.

Results are shown in a view. A maximum of 100 hits is returned. You are prompted to refine your search if this number is exceeded.
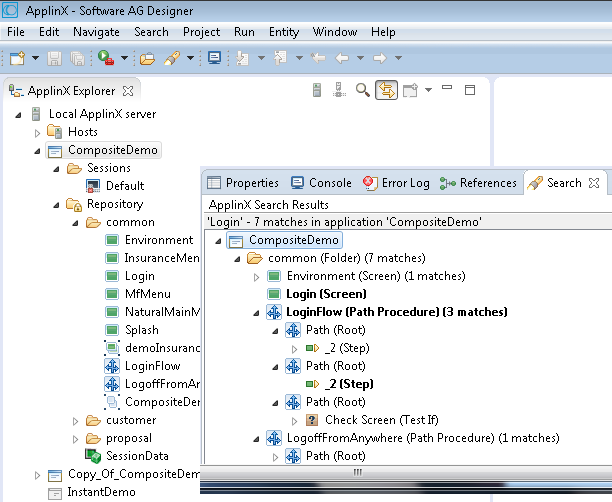
The following wildcard characters are supported to narrow your search:
| * | Asterisk. | Any number of characters. String "log*" returns "log", "logon", "logoff"... |
| ? | Question mark. | Single character. String "b?t" returns "bit", "bot"... |
| \ | Backslash. | Escape character. Must be used if you want to find any of these wildcard characters (*?/) in your string. Example: Enter "my\\string" to search for "my\string". |
Note:
By default the search behaves as if the string is prefixed and suffixed by an asterisk (any number of characters).
Example: String "log" will return "log", "autologOn", "logOff"...
You can filter your search by the following entity types:
Path procedure
Flow procedure
Session data
Data structure
Screen
Screen group
Filtering makes sense if your search returns more than 100 results.
The Trace File feature enables recording a file, which traces the connection communication (Web/SOA ApplinX user or Terminal Emulation Proxy) between the ApplinX server and the host, for each connection. It is possible to define whether a single trace file will be created, replacing the previously saved file or whether the data will be saved to a new file for every new user session. Identifying the separately saved files is possible by inserting identifying parameters in the file name (the session ID, creation time and/or connection ID). It is highly recommended to create a separate file for each session/connection or creation time. Note that trace files can be created from within the session definition overriding the application definition. This is recommended as it prevents conflict with other existing sessions.
The trace files can be also defined to be created in folders per Day Month and Year. This is recommended as it prevents conflict with other existing sessions.
Note:
Log and trace files can contain sensitive personal data (for example user ID, IP address, etc.).
We recommend you check the different trace opportunities provided by ApplinX and delete log and trace files if they are no
longer needed.
ApplinX will not delete these files automatically; this is your responsibility as user. Use the appropriate tools of the respective
operating system.
The trace files can be compressed to save space on the disc. This is particularly suitable when tracing a large number of files on a regular basis.
When required, you can select to encrypt the trace files.
To record a trace connection file
In the ApplinX Explorer, right-click on the relevant application and choose .
Click on the Host>Recording node.
Check Record terminal sessions (trace files).
Check the Compress (create files in zip format) check box to compress the file. Compressed files will have the suffix .zip.
Check the Encrypt (using server private key) check box to encypt the file. In order to encrypt files, you must first define the encryption key (In the Server properties, General tab). Encrypted files will have the suffix .gctx. A file which is both compressed and encrypted will have the suffix .gctx.zip.
Choose Suppress hidden fields to conceal passwords and hidden fields.
Note:
The "Suppress hidden fields" option is not supported when
recording using Terminal Emulation Proxy.
Provide a name for the file.
Check the relevant check box to determine that a new file will be created for each session/creation time or connection ID. It is possible to add the following parameters to the file name instead of using the check boxes: %u will insert the session ID. %t will insert the creation time stamp of the connection. %c will insert the connection ID.
Browse and select the location of the folder where the files will be stored. Determine whether sub folders will be created for each year/month/day.
Click to save your changes.
For further details regarding the application properties refer to the Application Reference section.
In order to develop, debug and reconstruct specific scenarios, it is possible to replay (GCT) files that have traced the emulation protocol for each user. See Defining a Trace Connections File. In order to replay such files, the application configuration definitions must indicate that instead of working online with the host, ApplinX must, when connecting, access and replay the specific file. Note that replay file can be defined from within the session definition overriding the application definition. This is recommended as it does not conflict with activities of other users.
Note:
Offline sessions support replaying encrypted and/or compressed files.
Refer to Recording Trace Files
for additional details
To define working with offline replay files
In the ApplinX Explorer, right-click on the relevant application and choose .
Expand the Host node and select the Offline node.
Check the Work offline check box.
Either enter or browse to select the file name including the full path.
ApplinX enables a session replayed by a GCT to simulate the host's communication delay or to predefine a time delay to wait before showing the information (this is because generally, the application is faster when replayed). This is determined in the Simulate host delay field. Available values: No delay, Simulate host, 500- 10000 ms (by default No delay is selected).
Click to save your changes.
For further details regarding the application properties refer to the Application Reference section.
To change the initialization mode of an application
In the ApplinX Explorer, right-click on the relevant application and choose .
Ensure that the General node is selected.
In the Initialization mode field, select the relevant initialization mode:
- When first accessed
Loaded when the code that initializes startup is called.
- Automatic
Loaded when the server is started.
Click to save your changes.
For further details regarding the application properties refer to the Application Reference section.
To set the time-out for idle users
In the ApplinX Explorer, right-click on the relevant application and choose .
Select the Host node.
Select whether the session time-out will be unlimited or disconnected after a specific number of seconds.
Click to save your changes.
For further details regarding the application properties refer to the Application Reference section.
It is necessary to use the Flickering of Host Sessions feature when one of the following happens:
In the browser, a blank screen is displayed when navigating between two host screens.
Note:
Refer to Blank Screen Timeout in
General Host
parameters for additional information on handling blank screens.
In the browser you are required to submit the [ENTER] key (or any other key) twice in order to navigate to the next host screen.
The initial need for Flicker arises when specific host screens are received 'split' between several buffers of data. Thus ApplinX Server needs to be informed to wait an additional amount of time for the complete screen to arrive. This additional amount of time is defined (in milliseconds) in the Flicker parameter in the Host node of the Application Properties dialog box. The flicker setting applies to the entire ApplinX application, meaning that if the flicker is set to 500ms, after each host transaction the flicker time will be added to the communication time. In other words, the entire application will be 'slowed down' by the flicker time. Therefore this value should only be set for the entire application according to the following guidelines:
As a rule of thumb, there is no reason to use the flicker setting in the application configuration for block mode hosts. Specific 'problematic' screens should be handled using wait conditions, both in navigation paths and in Web applications. For less specific cases (when a wait condition for a specific screen cannot be used), it is possible to set the flicker setting only for certain actions (using either the path dialog or the Base Object API in Web applications).
To define the flicker time
Click the relevant application in the ApplinX Explorer.
Right-click an application and choose Open. The Application dialog box is displayed.
In the Host tab enter a value in the Flicker field. Possible values are from 0 to 10000 ms.
Click Apply to save all changes, without closing the dialog box. Click OK to save changes and close the dialog box. You will be required to confirm the change.
For further details regarding the application properties refer to the Application Reference section.
The RPC connections pool is used for holding pre-connected RPC connections. When an RPC connection is required to execute a program, a connection from the pool is used, saving the connection time and executing the program immediately. This feature is available for AS/400 hosts only. This feature is available in SOA applications only.
To set the RPC pool connections settings
Open the Application Properties dialog box and click on the Host>RPC node.
Choose Use Connections Pool.
Configure the RPC connection parameters. Refer to RPC Connection Parameters for further details regarding the fields in this dialog box.
When required, configure the username and password needed to connect to the AS/400 programs. Refer to Host Configuration Parameters: RPC.
This feature (relevant only for Web enabling applications) allows you to define a common pattern for the host keys appearing in host screens (it is also possible to define more than one pattern, in cases where the host uses different formats for displaying screen keys). The defined pattern is used by ApplinX Server to automatically analyze the keys present in each screen, and display them in the Session Viewer (as buttons) or in Web application pages (both instant and generated pages), as buttons or hyperlinks. The developer can further customize the appearance of the keys and the way to handle the screen rows containing the original keys.
Use this option when the pattern of host keys in the host application matches one of the existing patterns, as is usually the case.
Open the Application Configuration dialog box (see Editing an Application's Configuration).
Click the Host Keys tab.
Click on the arrow next to Add Pattern to select a pattern from the list of exiting patterns and see its preview.
Note:
Adding the Natural pattern for PF keys will also identify the PA
keys pattern, if applicable.
Use this option only if the pattern of host keys in the host application does not match any of the predefined patterns.
Open the Application Configuration dialog box (see Editing an Application's Configuration).
Click the Host Keys tab.
Click Add Pattern to add a new pattern.
Assign a name for the new pattern in the pattern column.
Define the key, spaces, internal separator and key separator. As you define these parameters, the preview is updated and displayed in the preview pane.
This feature allows you to define:
Host keys that are not available using the standard PC keyboard, such as [help], [clear] or [reset].
Keys that need to be submitted when the cursor is positioned in a specific position on the host screen.
Combinations of keys and text to be sent to the host simultaneously.
Note:
In standard terminal emulations it is also possible to define
keyboard mappings of host keys to PC keyboard keys. To implement the same
functionality in ApplinX, define a button that sends the mapped host key. For
example, if in the terminal emulation, [clear] was mapped to the keyboard
combination CTRL-ESC, in ApplinX define a button that sends [clear].
To add customized Host Keys
Right-click on the relevant application, and choose Properties.
Click the Host Keys, Manual tab.
Click on the Add Host Key hyperlink.
Enter a caption for the host key.
Enter the host key in square brackets or select a host key from the list of standard host keys.
Select the position of the cursor on the screen once the host key has been sent.
By default, defined patterns will be searched, PF lines will be omitted and keys will be added as buttons or hyperlinks. Refer to Customizing the Host Keys.
By default, defined patterns will be searched, PF lines will be omitted and keys will be added as buttons or hyperlinks. These options can be controlled in the Generation dialog box, Host Key control.
It is possible to map specific keyboard keys to the Keyboard Mapping tab in the Application Properties dialog box.
To define Keyboard Mappings
Right-click on the relevant application and choose .
Focus on the Keyboard Mapping tab.
To map one of the existing mappings, locate it in the list of keyboard mappings and ensure that it is marked as Enabled. If it is not enabled, click on the Enable Key hyperlink.
To add a new keyboard mapping, click on the Add Keyboard Mapping hyperlink.
Enter the key combination in the Keyboard field.
Either select the host key from the standard list of host keys or enter a host key in the Host key field. Ensure you place square brackets around the key.
Note:
When using the keyboard keys within the web application, the
CTRL+N and CTRL+K keys are blocked by default as they cause multiple browser
windows to use the same session (this can be manually set in the
config/gx_keyboardMappings.xml file).
Relevant for VThosts only: Define a sequence of hexadecimal numbers to relevant keys.
Key combinations defined here may conflict with Eclipse key bindings. When such a conflict occurs, the key combination defined here will be ignored during runtime. To see the list of Eclipse key bindings, open the menu, expand the tab and choose . A key binding which appears in this list, and whose When field is set to "In Windows" or "In Dialogs and Windows" will cause a conflict.
When such a conflict occurs, either redefine the keyboard mapping in ApplinX, or change the Eclipse key binding. The Eclipse key binding can be changed either by choosing a different option in the When field (the key binding will be disabled and it will not be possible to enable it), or by editing the plugin.xml file of the ApplinX plug-in (add the new key binding in the org.eclipse.ui.bindings extension point with ApplinX scheme ID and empty commandId. This way, whenever the ApplinX key binding scheme is activated, the problematic key bindings will be disabled, but in other schemes the key bindings will be enabled.)
The Application Configuration>Language node enables you to define the language used in the application as well as direction settings, relevant mainly for right-to-left languages.
To configure RTL language settings
In the ApplinX Explorer, right-click on the relevant application and choose .
Select the Language node.
Select the application's language.
Note:
The following settings are relevant for right-to-left languages.
The option you select is the default setting for all the screens, but can be
changed for a specific screen in the relevant screen, in the Screen Direction
tab.
Set the Screen direction. Relevant for mainframe hosts only. The screen direction of right-to-left languages differs according to the original host settings, and when incorrectly set, can cause the screen to be illegible. In order to correct this, define the suitable screen direction.
Set the Typing direction. Right-to-left languages may display typed-in text in the Display Session View and HTML fields, aligned to the left of the field. In order to display the text aligned to the right, select the right-to-left option.
Set the Tab direction. When pressing the TAB button the cursor moves to the next consecutive field. The direction the cursor moves (moving to the next field to the left or moving to the next field to the right) must be correctly defined in order to preserve the screen logic.
The Application Map view enables viewing a navigation map between screens. Once the navigation option is selected, in the Application Properties, Navigation tab, the application map will record the navigation steps between the screens. See also Navigation Parameters and Application Map.
Refer to Working with the Printer Session.
The Application Process Tracing is used to provide a log of performance times of processes such as procedures, paths and programs. This can give a more specific indication (pinpoint the exact process) as to the cause of application performance problems. The application process tracing information can be saved as a txt and/or csv file. These files are located in the ApplinX>log directory.
Note:
The Host times that the tracing application process displays, are
only relevant for hosts that are not character mode hosts.
To enable the tracing feature
Open the Application Properties dialog box and click on the Process Tracing node.
Check the Enable process tracing check box.
Basic logging is selected by default, and logs data at the entity level (when a procedure, path or program started and when they were completed). To log more detailed data, at the step or node level, select In-depth logging.
Select Log each process from beginning to the end to log the entire process. Select Log the process summary only to log a summary of the process.
Select Only log processes completed in more than... to log only the processes that take longer than the amount of time defined in the milliseconds field.
Select the file type: Simple text file (txt) or Comma separated values (csv). The csv format is suitable when needing to access the data from an external database or from other applications such as Excel or Access.
Provide a name for the file.
Check the relevant check box to determine that a new file will be created for each creation time or process ID.
Once the application process tracing feature is enabled, trace files (txt and/or csv) are automatically created in ApplinX>log directory.
Note:
Host times are only relevant for hosts that are not character mode
hosts.
The TXT file includes:
Time and date when the event occurred.
Thread name.
Message type: DEBUG, INFO, WARN or ERROR.
Process ID: A unique ID of the process.
Node type: HOST-CON, PATH, STEP, FLOW, NODE, EXWEBSVC or PROGRAM.
Event type: STRT, FIN and ABRT.
Full node type name: Such as Host connection as oppose to HOST-CON. The full node type is indented according to the depth in the current process. This is determined by the process ID.
Application: The application name.
Node name: Full node name, including the relevant folder name.
Full event type name: Started, finished and aborted.
According to the event type and node type, additional data may be displayed:
All events that the event type is finished or aborted will display the total time.
Host connection events will display the user name.
Finished or aborted paths will display the total number of steps, total host time and total wait time (wait time is the time that ApplinX waited after the final response from the host, due to wait condition definitions). All these parameters include all inner path parameter details.
Finished or aborted steps will display total steps, total host time and total wait time.
The CSV file includes:
Time and date when the event occurred.
Process ID: A unique ID of the process.
Depth of node
Type of node: Host connection, Path, Step, Flow, Node, External Web Service or Program.
Application: The application name.
Node name: Full node name, including the relevant folder name.
Event type: Started, finished and aborted.
User name, Total time, Host time, Wait time and Number of steps in the completed path will be displayed (in the above order) in the following cases:
All events that the event type is finished or aborted will display the total time.
Host connection events will display the user name.
Finished or aborted paths will display the total number of steps, total host time and total wait time (wait time is the time that ApplinX waited after the final response from the host, due to wait condition definitions). All these parameters include all inner paths.
Finished or aborted steps will display total steps, total host time and total wait time.
The ApplinX repository is an internal database used to hold ApplinX entities (metadata) such as the Screens, Paths, Connection Pools, Programs and Procedures.
As an ApplinX user, you may like to divide applications into folders within your repository, according to the specified interests and needs, such as development teams, sub-applications etc. The same folder contains different types of entities and sub-folders varying according to each application. This allows you greater flexibility organizing your entities.
The repository can be read only. It is recommended to use a read-only repository for production.
To set up a read-only repository
Open the application.
Right-click on the repository node.
Choose Lock Repository (read only)
The Windows definitions are used to correctly identify screens and to open host windows as separate pop-up windows. In the Application Properties it is possible to define the Host Windows per the application.
When adding a window you are required to select the type of modal windows the host sends. There are two types: Reversed Video or Frame. For applications that have more than one level of windows (a window within a window), where each level is defined with a different Window Type, be sure to define the windows in the correct order.
Note:
When the host is a Natural UNIX host, this tab is disabled, as the
windows' definitions are included in the Natural-UNIX protocol and do not
require being defined via ApplinX.
To define windows
Right-click on the relevant application and choose Properties.
Add a Frame or Reversed Video
Configure the parameters as detailed in Application Configuration Parameters, Windows tab