
The upgrade process is similar to the installation process. Please refer to the SAG Installer documentation, which you can find at http://documentation.softwareag.com/. When selecting the installation directory, ensure not to select the directory where ApplinX is currently installed (the default path is C:\SoftwareAG).
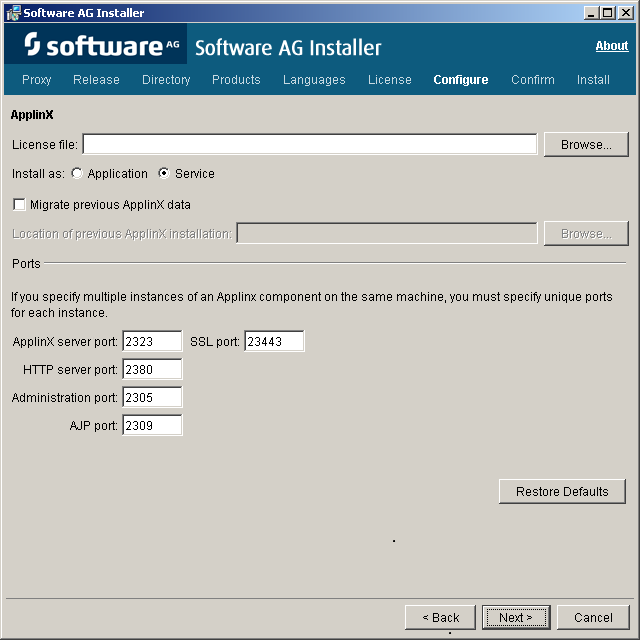
In the panel including the ApplinX specific parameters, browse and select the ApplinX license file.
When opening the Software AG Designer, the default workspace will point to a new location. If you use the new workspace location, check that the preferences suit your needs.
From version 8.2, the batch and shell commands used to start and stop the server, and to start the Administrator are located in the <ApplinX installation>/bin folder.
When using ApplinX web applications (JSP or .NET): Upgrade the web application using the ApplinX Web Application Manager in the Designer (refer to Framework Management in the Web Application Development documentation of ApplinX).
You may have made changes in your previous ApplinX version, in one of the following files. Backup copies of these files can be found (unless otherwise stated) in the ApplinX installation directory with the .bak suffix. To apply these changes to your current ApplinX version, you must copy the changes from within the backup files to the relevant file.
GXApplinXService.ini
bin/startup.bat
bin/startup.sh
bin/gxadmin.bat
bin/gxadmin.sh
config/gxadmin.prp
config/gxstartup.prp
ApplinX applications from previous ApplinX versions are able to run on the current ApplinX version once you have performed a number of migration activities. The migration process has been tested for supported versions. Migration can be performed when installing the new ApplinX server version or via batch files after the new server has been installed.
The following topics are covered below:
Back up the repository database.
Migration can be carried out as follows:
To migrate ApplinX applications during the installation process: In the screen where you select the ApplinX parameters, select the Migrate previous ApplinX data check box and specify the existing installation location.
To migrate all ApplinX applications after the installation has been completed: Run the <ApplinX root>\utilities\migrate_ApplinX_server.bat/sh file, enter the installation path of your previous installation, and then enter the new path of the current installation.
For example: migrate_ApplinX_server.bat "c:\ApplinX52"
"c:\SoftwareAG\ApplinX"
 To migrate a Single Applinx Application
Export the relevant GXAR file of the application (the GXAR file includes both the application and entities)
Import the GXAR to the new version. Refer to Importing an Application's Configuration or Entities in the Designing and Developing an Application documentation.
For ApplinX applications that use an external database (except JDBC-ODBC), the database type will be changed automatically to internal database. A message warns that there are applications containing a JDBC-ODBC database type that will not be migrated. You have two options:
Choose to continue with the installation. ApplinX will migrate all applications except for the JDBC-ODBC types. The names of these applications will be written to a log.
Choose to stop the installation, then modify those applications.
To modify JDBC-ODBC applications
Change the repository type to internal DB /gxz in the original ApplinX installation installed on your computer, and then restart the installation and migration.
The following is the outcome of the migration process and relates to migrating all ApplinX applications:
The entire old config folder (except for the http.xml file) is copied to the new installation location. The gxstartup.prp file from this folder is renamed to .bak, and the new gxstartup.prp file (from the new installation) is used.
The new config folder (from the new installation) is renamed to config.bak.
The entire host-applications folder is copied except for the demo applications. The demo applications from the new installation are used.
All database related jar/zip (classes*.zip, classes*.jar, *sql*, *db2*) are copied to the lib folder of the new installation. Note: any other DB driver should be copied manually to \ApplinX\applinx-web\WEB-INF\lib.
The batch and shell commands used to start and stop the server, and to start the Administrator are no longer located in the ApplinX installation folder. These files are now located in <ApplinX installation>/bin folder and are named startup.bat and shutdown.bat accordingly for the server, and gxadmin for the Administrator.
The start-gxserver.bat/sh and gxadmin.bat/sh files from the previous ApplinX installation are copied to <ApplinX Installation>\bin and the gxstartup.prp and GXApplinXService.ini files are copied to <ApplinX Installation>. These files are renamed to *.bak.
Notes:
The following actions occur when the server is started for the first time after the migration process has been completed:
Each application (configured in config/gxconfig.xml), will be created as a separate file and copied to host-application/<application name>/gxconfig.xml. The original file config/gxconfig.xml will hold from now on only ApplinX server configuration and host definitions which are not in use by any application.
Replay files are copied to host-applications/<application name>/records and new recorded files are saved in this location.
If a file based repository (GXZ or MDB) is configured for the application, the repository is copied to host-applications/<application name>/db .
A post-migration report is written to the <ApplinX root>/log/gxlog.txt.
Note:
If the application name includes space characters, these are
replaced by underscores, as space characters are not supported in versions from
8.0 and above. However, previous SOAP clients will be able to connect to old
addresses which include spaces.
When opening ApplinX Designer, enter the name of a workspace directory. When upgrading from ApplinX version 8.0 and above, define a new workspace directory in order to be able to work with both versions.
Ensure that you have:
SAG JDK
A supported web server (refer to ApplinX for JSP Web Application in the section Software Requirements).
It is recommended to import/copy the web applications from older Eclipse versions to the lastest version of the Software AG Designer, as this is the common Software AG development tool, used with other Software AG products such as ApplinX, EntireX, CentraSite and Integration Server.
Upgrade the web application using the ApplinX Web Application Manager in the Designer (refer to Framework Management in the Web Application Development documentation).
Compile the JSP project:
With IDE (from Eclipse or any other IDE)
Without IDE (make.bat)
Note:
When working with an application which included space characters in
the application name, you are required to manually change the application name
in the web application (e.g. in GXBasicWebForm.jsp file,
or in the Framework Configuration Editor, in the Application
name parameter).
It is recommended to convert from .NET project type "Web Project" to "Web Site" as from the current version ApplinX generates .NET web pages based on the "Web Site" format and file structure.
Upgrade the web application using the ApplinX Web Application Manager in the Designer (refer to Framework Management in the Web Application Development documentation).
Compile (relevant for .NET "Web Projects" type projects):
With IDE (from Visual studio)
Without IDE (make.bat)
Note:
When working with an application which included space characters in
the application name, you are required to manually change the application name
in the web application (e.g. in
GXBasicWebForm.cs/GXBasicWebForm.vb file, or in the
Framework Configuration Editor, in the Application name
parameter).
Fixes are available for UNIX and Windows on the Software AG Empower website. Follow the instructions below when downloading the fix from Empower.
Note that when applying a fix, you must make sure that the installed ApplinX version is of the same service pack as the fix version, i.e. that the first three digits are the same (e.g. 10.1.0).
To install a fix
The fix will install and add all the necessary new files to your existing ApplinX installation.
Before starting the fix installation, shut down the ApplinX Server service and close the Software AG Designer.
To start the fix installation process, extract the fix zip file to the existing ApplinX directory: For example: C:\SoftwareAG\ApplinX. A new directory is created: \hotfix-<hot fix version>.
To install the fix, just run install-hotfix.bat on Windows
platforms, or install-hotfix.sh on UNIX platforms. On Windows platforms:
Check that the ECLIPSE_PATH parameter is pointing to the desired Eclipse
installation location and that you have removed the rem remark indication.
Note:
Installing the fix also updates the Eclipse plug-in.
During the fix installation, a backup folder will be created containing the original files from before the update (backup-for-hotfix-<hot fix version>).
After the fix installation, a log is created with a list of all the copied files (install.hotfix.log).
Upgrade the web application using the ApplinX Web Application Manager in the Designer. Refer to Framework Management in the Web Application Development documentation.
Note:
It is possible to uninstall the fix. This will revert all updated
files to their original state. To uninstall the fix, just run
uninstall-hotfix.bat on Windows platforms, or uninstall-hotfix.sh on UNIX
platforms. After the fix uninstallation, a log is created with a list of
all copied files (uninstall.hotfix.log).
When upgrading the ApplinX server - for example when applying a fix or during migration - you will need also to upgrade the web application as well.
If the client and server versions do not match, you will get the following error message:
"Error 6002- Version mismatch.
The application version [<version>] does not match the server version [<version>]. Server version must be equal to the application
version.
Action: Upgrade the web application."
This section covers the following topics:
If you had trouble migrating from 5.2 or earlier version, you can also upgrade from 5.2 version by creating a new ApplinX Application (GXAR file) in the new environment and importing the GXZ file you have exported from the 5.2 version. In this case you can import all the entities directly to the new application's repository.
The new Path Procedures are much more powerful. We recommend you convert the old paths to Path Procedures. See Path Procedures in section Designing and Developing an Application.
Follow the instructions as described under Installing a Fix using Scripts. Make sure you unzipped the hotfix into the ApplinX installation directory, otherwise the upgrade process will not work.
After applying the hotfix on the ApplinX server and Designer you must also upgrade the web application as well, otherwise if the client and the server versions do not match, you will get the following error message: "Error 6002- Version mismatch. The application version [<version>] does not match the server version [<version>]. Server version must be equal to the application version. Action: Upgrade the web application".
See Framework Management in the Web Application Development documentation.
When upgrading to a new version it is important to also create and use a different workspace. After you have created a new workspace, you can use the workspace import wizard to import the old workspace configuration to the new one.
If you want to revert the changes made by the hotfix process and return to your original state, you can use the uninstall batch file utility to return to the old ApplinX server version and build; the Designer's plug-in must be uninstalled manually.
To return to original state
Close the ApplinX Server and use the uninstall batch file (in Linux it the .sh file) located in the hotfix directory to remove the fix installed.
Note:
If the user has multiple hotfixes, you will need to downgrade the last one first and then the older one.
Open the Designer and choose . Select the ApplinX plug-in and choose .
Reinstall the ApplinX plug-in. Open the Designer and choose .
Click and select the ApplinX plug-in installation file (located in <Installation directory>\Software\Designer\updates or <last
hotfix folder>\Designer). The file naming convention is:
com.softwareag.applinx.workbench-[version number][XX].[Y].
Select the ApplinX plug-in from the list on the Main screen and click .
Restart the Designer and open the ApplinX perspective.
After the fix has been uninstalled, a log is created with a list of all copied files (uninstall.hotfix.log).You also need to unzip the old web application file located in the previous version to the location of the web application folder.