
The Session View is especially useful when working with screens or path procedures, either offline (replay file) or online.
For further details regarding the Session View Toolbars refer to Session View reference.
The definitions configured here override application definitions and are relevant for a specific session.
 To create a display session
Open the relevant application, right-click on the Sessions node and select .
Enter a name and description for the session.
Select the connectivity type:
Use application configuration: Use the configuration set in the Application Properties.
Online: Connect online to the host, and enter the name of the device.
Offline (using trace files): Connect to the session using a trace file. Browse and select the required trace file.
Connection Pool: Select a connection pool from which to take the session.
Click to define the Session General Properties.
Enter the session ID and password.
Select whether or not to create a trace file and where and how it should be saved.
Click .
Duplicating a session will create a new session definition will be created using the same configuration as the original one. Session definitions can be duplicated by right-clicking on the original session and selecting .
Opening an HTTP session opens the session as an Instant Web Application. The session is displayed by default in the Editor area of Eclipse. It is possible to display the session in your system's browser by changing the Web browser definitions in Eclipse (). This is convenient for checking transformations. This is not available when you do not have a Web Enablement license.
To open an HTTP session
Right-click on the relevant session within the session node of the application or access the menu and select .
Screen Creation Definitions are a set of basic definitions which are used to create a new ApplinX screen. These definitions include the default screen name, initial identifiers and determine whether input fields will be created. Creating a new screen using screen creation definitions reduces the complexity and the time required to identify new screens.
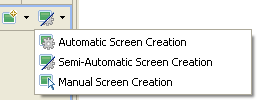
To use this feature, at least one set of Screen Creation Definitions must be created within a Screen Group (in the dedicated tab). When navigating within a session, and reaching an unidentified screen, ApplinX searches for Screen Groups which match the unidentified screens, and then creates a new screen based on the screen group's identifiers and on parameters defined in the creation definition configured in the Screen Group. This process can be initiated in three different modes:
Automatically: A screen will automatically be created for each unknown screen that matches a screen group. This screen will include basic screen definitions, which are defined in the screen group.
Semi-automatically: The New Screen Wizard will automatically be displayed for each unknown screen that suits a screen group. This screen will include basic screen definitions, which are defined in the screen group.
Manually: The New Screen Wizard is displayed when clicking on the Identify New Screen icon.
The desired mode is determined by clicking on the Change Screen Definition Mode icon in the Session View.
An unidentified screen can be identified as a screen/screen group by clicking on the New Screen icon in the Session Toolbar. The Create New Screen wizard is displayed. Refer to Creating a New Screen or Creating a New Screen Group for further details.
The screen image of a screen can sometimes change and no longer suit the relevant screen entity. In the Session View there is a Update Screen Image icon, which enables updating the screen image. Click on the arrow next to the icon to view all the relevant screens/screen groups and select the desired one.
A Path Procedure can be created either via the Session view or by creating a New Path Procedure entity (Refer to Creating a Path Procedure for further details). When creating the Path procedure in the Session, use the Path toolbar to record the path and then you can edit the path in the Path procedure dialog box.
To create a Path procedure from the Session
Navigate to the first screen from which you want the recording to commence.
Click on the Path toolbar icon to display the Path toolbar.
Click on the Record icon.
Navigate to the various screens to record the relevant path.
Click on the Define Inputs icon to mark all the unprotected input fields in purple. Click on one of the marked fields to define it as an input. The field will be marked orange.
Click on Define Procedure Outputs to mark all the protected and unprotected fields. Click on a field to define it as an output in the Path procedure. The field will be marked blue.
If you want to record a step that repeats again and again until a certain condition is reached, click the loop icon, and follow the instructions in the wizard. This kind of definition can be applicable for collecting data of a host table.
To end a recording click the Stop icon. The New Path Procedure wizard is displayed where you are required to enter a name for the path procedure. Once you click Finish, the Path Procedure is opened in the Editor area where you can add/change the procedure as required.
A Path Procedure can be run/debugged in the session viewer, by selecting a path procedure from the list and then clicking on the run/debug icon.
When running a path procedure, you will be required to insert inputs as necessary.
When debugging a path procedure, the Debug perspective will open.
The screen navigation defined in the Application Map can be tested to ensure that the navigation behavior is as expected. This is done in the Session View, using the Application Map toolbar. The toolbar enables selecting a screen to which you expect to be able to navigate to from the current screen and then attempting to navigate to this screen. If the Application Map is correctly defined, then ApplinX will successfully navigate to the selected screen. If the Application Map does not have the relevant steps defined to reach the screen you selected or if these steps are not "Approved" steps, a pop-up message will inform you of this.
Note:
The Application Map toolbar is not available when working offline.
Refer to Application Map Toolbar.
Character mode (VT) host screens consist of unprotected fields only. Therefore the regular working mode of navigating through screens - typing data in input fields and pressing a key in order to send data to the host, cannot be implemented for VT hosts. There are two alternatives to working with VT applications: working in Character mode or working in Block mode.
Character mode: Simulates the host behavior where each key stroke is submitted to the host.
Block mode: Simulates ApplinX behavior, where the whole screen is sent to the host when clicking the Enter key at the end.
In the application development process, Character mode should be used in the early process of development, mainly for screen navigation. In advanced stages of development, Block mode should be used in order to resemble SOA working mode (which is, by definition, Block mode).
The desired mode is determined by clicking on the Block mode/Character mode icon in the Session View.
For further information regarding character mode hosts refer to Character Mode Hosts (VT Protocol).
Within a session, you can navigate online, interacting directly with the host, or to replay a previously recorded navigation session. When working directly with the host, you can create a trace file that records the navigation between the screens. This can later be used and replayed, enabling you to work offline (in replay mode).
Online session navigation using the session view is similar to regular host navigation:
Use the keyboard to enter any alphanumerical input.
Use the Enter key to send Enter to the host.
Use the function keys (F1-F12) or the PF buttons toolbar to send corresponding PF1-PF12 keys to the host.
Use the SHIFT key combined with the function keys to send PF13-PF-24 keys to the host (Shift+PF1=PF13, Shift+PF2=PF14 and so on).
Use the Customize Host Keys to define and send any other host key.
When working online, you can use the Trace file feature to record a file, and trace the connection communication (connection pool or user) between the ApplinX server and the host, for each connection. Details for setting the default trace file parameters can be found in Recording Trace Files. You can override the application settings and define settings per session either when creating a new session connection or in the session properties of an existing session.
In order to debug or reconstruct specific scenarios, you can replay (GCT) files that have traced the steps of these scenarios. In order to replay such files, the application configuration definitions must indicate that instead of working online with the host, ApplinX must, when connecting, access and replay the specific file. The default trace file used is defined in the Application Properties dialog box (refer to Working with Offline Sessions for further details). To override these settings, define the relevant settings per session either when creating a new session connection or in the session properties of an existing session.
When replaying a file, you may want to navigate to a specific screen. The replay navigator enables this, simply and efficiently, using the Replay Navigator slider. Note: In the replay mode, any function keystroke (such as [ENTER], PF keys etc.) displays the following screen, according to the screen order in the recorded GCT file, therefore, key selection is meaningless. This feature is not available when connecting to a host connection pool (online or offline).
In the ApplinX web applications, you can navigate directly to a specific screen in the replay file, according to its serial number in the file: this number can be found from the session properties dialog, or by hovering above the Session View status bar, in the section displaying the name of the replay file. For example, in order to navigate to screen number 53 in the replay file, type ">53" (no quotes) in any input field on the screen. Relative navigation is also possible: going to the previous screen is done by typing ">-1" in any input field.
When connecting to a session which has been defined as working offline, in replay mode, (refer to Working with Offline Sessions for further details) the Replay Navigator slider is displayed.

This toolbar is displayed by default and can be hidden by clicking on the toolbar icon.
To navigate to the different screens either drag the slider's indicator along until reaching the relevant screen number (the screen number is indicated by a ToolTip), or enter the number in the box to the right of the slider and click the Go arrow or select a screen from the list and click the Go arrow. The slider indicator as well as the number in the box on the right will change according to the present screen number.
You can search for screens associated with a specific screen group, by selecting the screen group from the list of screens/screen groups. Clicking on Go will search for the first screen encountered, which is associated with the selected screen group. Clicking Go additional times will search for additional screens associated with this screen group.
Click on the Show user input icon (the last button) to display the input that the user entered while the GCT was recorded (when the button is not clicked the screen is displayed as it was before the changes were made). When the button is clicked, the contents of the input fields that were changed appear in red, a string representation of the host key sent appears in the toolbar and the cursor is positioned in the position it was in when the screen was sent to the host.
Note:
When replaying a file that has a Connection Pool, the Replay
Navigator slider is not available for the Natural UNIX protocol.
Select the destination screen from the drop down list of screens, then click on the Navigate to screen icon. Refer to Application Map Toolbar.
Note:
The Application Map toolbar is not displayed when working offline.
Switch between these modes by changing the connection type in the Session Properties, or by editing the file _inc_applconf.asp.
When there is a window within a screen, you can define that
the screen area outside the window will be grayed out or displayed in regular
colors. This is done by clicking on the Window icon on the session toolbar
![]() .
.
Note that it is not possible to navigate outside the window.