
Using the ApplinX REST API you can create and disconnect a session, get a screen and update a screen. Four authentication modes are provided to call the API: ApplinX, LDAP, OpenID Connect and Host Authentication. This document covers the following topics:
You can get the API description (based on the OpenAPI Specification) of the REST API by sending a GET request to the following URL:
http://{host}:{port}/applinx/rest/swagger.json
Example:
http://localhost:2380/applinx/rest/swagger.json
We recommended you paste the response output in the Swagger Editor in the following URL:
https://editor.swagger.io/
This gives you all the information about the operations and models of the API, as well as generating an out-of-the-box new client (in your favorite language) that consumes the API.
The ApplinX REST API contains a configuration file rest-api-config.json in folder WEB-INF\config. Use this file to define the configuration parameters:
| Parameter | Description |
|---|---|
serverURL |
ApplinX server URL. |
applications |
Names of applications that the sessions can be connected to. |
security |
|
auth |
Four authentication modes are supported. These are described in more detail below.
Note: |
groups |
Defines groups for different user types. |
admins_group |
|
developers_group |
|
users_group |
This section covers the following topics:
 To create a session (connection)
Send a POST request to the following URL:
http://{host}:{port}/{basePath}/rest/session
For example:
http://localhost:2380/applinx/rest/session
Request Body:
{
"applicationName": "string", (name of application that the session will be connected to)
"connectionPool": "string", (Optional)
"sessionDescription": "string"(Optional)
 "naturalUsername": "string", (required for Natural hosts).
 "naturalPassword": "string", (required for Natural hosts).
"naturalNewPassword": "string", (fill this if you'd like to change the host password).
"failOnWarning": boolean, (don't connect session if getting a warning when trying)
 "options": {  (Optional GXBaseObjectConstants)
   "additionalProp1": "string",
   "additionalProp2": "string",
                          },
                        }
Notes:
naturalUsername and naturalPassword are required only if you configured hostAuth as your authentication mode. See Host Authentication.
Authorization Header:
If you are using ApplinX's Administrator or LDAP authentication, add Basic Auth schema to the Authorization header.
Example:
"Basic lfhsdadkankdnaadacxzczca"
The second word in the string is you username/password encoded in Base64. For example, in JavaScript use
var auth = 'Basic ' + btoa(username + ':' + password);
and add the auth string to the Authorization header of the request.
Response Body:
{
 "token": "string",
 "keyboardMapping": [
   {
     "keyCode": 0,
     "additionalKey": 0,
     "targetFunction": "string"
   }
 ],
 "message": "string",
 "redirectUri": "string"
}
Note:"redirect_uri" will be returned only if using OpenID Connect authentication. See OpenID Connect Authentication.
Important:
The response body contains a variable called 'token'.
This token represents your session and will be used in all subsequent requests.
The token should be added to the authorization header using bearer token schema.
Example:
var auth = "Bearer <token>"
Replace <token> with your token value and add the auth string to the Authorization header of all subsequent requests.
To disconnect a session
Send a DELETE request to the following URL:
http://{host}:{port}/applinx/rest/sessionWhen a connection is established, using the create session request, you can get the current screen, as well as update the screen and navigate to the next.
To get the current screen
Send a POST request to the following URL:
http://{host}:{port}/applinx/rest/screen
Request Body:
options are optional key-value pairs, for example:
{
  "options": {
    "GX_VAR_TRIM_FIELDS": "none",
    "GX_VAR_TRIM_MODE": "bothSides"
  }
}
Note:
See Important Note on adding the token in the authentication header under Creating a Session
To update the current screen and navigate to the next
Send PUT request to the following URL:
http://{host}:{port}/applinx/rest/screen
Request body (required):
{
  "fields": [
    {
      "name": "string", // name is interchangeable with position (see below).
      "value": "string", (required)
      "index": 0, (Only for multiple field)
      "position": { // if the field has name, position is interchangeable with name.
        "column": 0,
        "row": 0
      }
    }
  ],
  "sendKey": "string",
  "cursor": {
    "fieldName": "string", (optional, interchangeable with position).
    "position": {
      "column": 0,
      "row": 0
    }
  }
}
Example 1:
{
  "fields": [
    {
      "value": "Hello World!",
      "position": {
        "column": 15,
        "row": 21
      }
    }
  ],
  "sendKey": "[enter]",
  "cursor": {
    "position": {
      "column": 11,
      "row": 3
    }
  }
}
Example 2:
{
  "fields": [
    {
      "name": "FIELD02",
      "value": "Hello world!",
    }
  ],
  "sendKey": "[enter]",
  "cursor": {
    "fieldName": "FIELD03"
  }
}
Request header:
Screen ID (required)
The current screen ID obtained in a get screen response.
To get information on whether there is a session connected and the authentication mode defined in the configuration file
Send a GET request to the following URL: http://{host}:{port}/applinx/rest/info.
Note:
See Important Note on adding the token in the authentication header under Creating a Session
One of the REST API purposes is to be used by a web application. Sometimes, complex web applications need to monitor the front-end application and the web pages on the server-side because web browsers cannot directly log messages to a file on a local machine. The REST API exposes an endpoint that enables web applications to send logs from the browser to file under ApplinX installation folder through an HTTP call. The log file, javascript_log.txt, is placed in the installation folder SoftwareAG/ApplinX/log.
To log a message
Send a POST request to the following URL:
http://localhost:2323/applinx/rest/logger
Request body:
{
   "timestamp": "string",
   "level": 0,
   "fileName": "string",
   "lineNumber": "string",
   "message": "string"
   "additional": [
     "string"
   ],
}
The fileName and lineNumber parameters correspond to the JavaScript file after compilation.
You can send any additional data with the additionalData parameter. The additional data will be aggregated and shown in the log output.
Sample output in javascript_log.txt:
Date and time of event        level     filename:line   username         session ID                                                              message         additional data
|-------------------------||------||------------||--------------||-----------------------------------------|-----------||-------------------------------|
2021-03-24T09:45:30,883 FATAL [main.js:3608][administrator][398FD26A58C9774CEBD6EE9A0CC059DF] hello world data1, data2, data3, data4 ........
The ApplinX REST API supports the following authentication modes:
To configure ApplinX authentication
In the the configuration file rest-api-config.json configuration file, set security parameter auth to "applinx". Example:
{
  "serverURL": "applinx://localhost:2323",
  "applicationName": "InstantDemo",
  "security" : {
      "auth" : "applinx",
      "groups" : {
          "admins_group" : "Supervisors",
          "developers_group" : "Developers",
          "users_group" : "Everyone",
      }
  }
}
Note:
Authentication of type applinx uses the users and groups from the ApplinX Administrator tool.
This authentication mode uses a third-party LDAP server.
To configure LDAP authentication
In the the configuration file rest-api-config.json configuration file,
set security parameter auth to "ldap"
and provide the LDAP environment variables. Example:
{
    "serverURL": "applinx://localhost:2323",
    "applicationName": "InstantDemo",
    "security": {
        "auth": "ldap",
        "groups": {
            "admins_group": "APX_Admins",
            "developers_group": "APX_Developers",
            "users_group": "APX_Users"
        },
        "ldap": {
            "url": "ldap://localhost:123",
            "dn": "cn=admin,dc=test,dc=apx,dc=eur,dc=ad,dc=sag",
            "password": "passwordExample",
            "authentication": "simple",
            "filter_user": "(uid={})",
            "filter_admins_group": "(&(cn=APX_Admins)(memberUid={}))",
            "filter_developers_group": "(&(cn=APX_Developers)(memberUid={}))",
            "filter_users_group": "(&(cn=APX_Users)(memberUid={}))",
            "context_users": "dc=test,dc=apx,dc=eur,dc=ad,dc=sag",
            "context_groups": "dc=test,dc=apx,dc=eur,dc=ad,dc=sag"
        }
    }
}
| LDAP Environment Variable | Description |
|---|---|
url |
The LDAP server's address. |
dn |
The DN of read-only account, if not anonymous. |
password |
The password of read-only account, if not anonymous. |
authentication |
Either "simple" if a read-only search account is required, or "none" if anonymous.
|
filter_user |
Filter to find user's record; note that {} is replaced by the user-supplied ID. |
filter_admins_group, filter_developers_group, filter_users_group |
These are filters for our three application roles... You might have to use 'member' instead of 'memberUid'. |
context_users |
Optional path to start the user search somewhere more specific than the root. |
context_groups |
Optional path to start the group search somewhere more specific than the root. |
This is the LDAP server we connected to in the above example, showing the context of the groups and users:
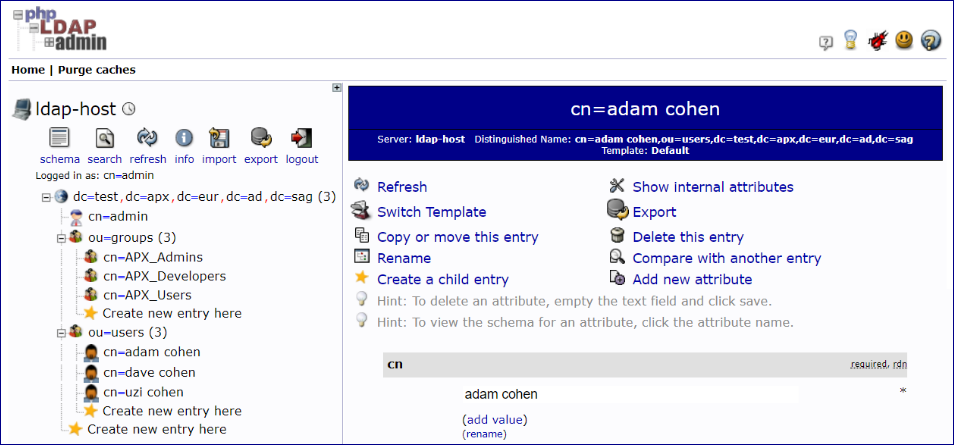
After everything has been configured in the configuration file, the end users log in by sending their username
(which in this example is the uid we configured inside the filter_user parameter) and password.
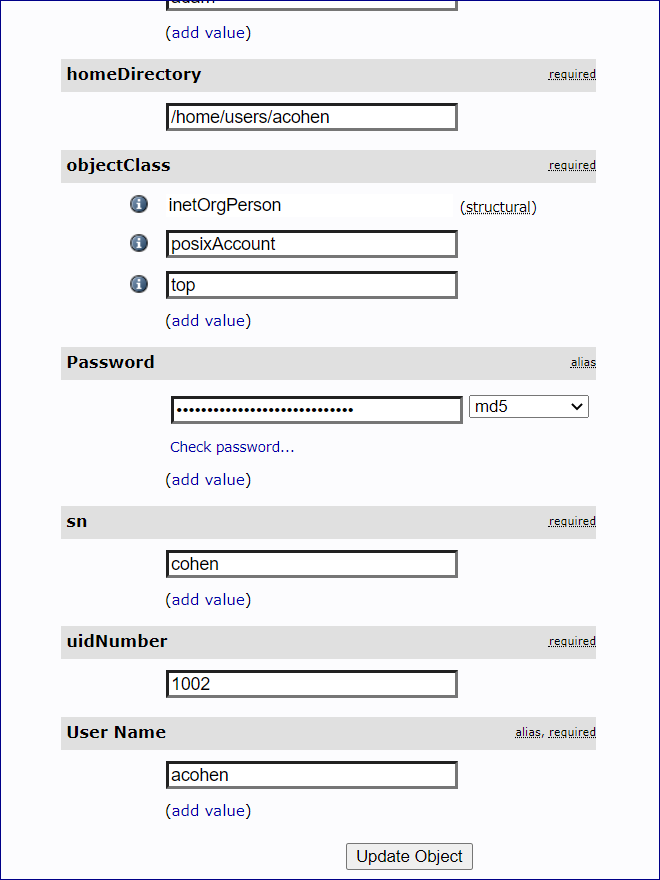
In this example we have a user with User Name "acohen". To log this user in, send acohen:pass.
Send the username:password in the Authorization Header of the create session request.
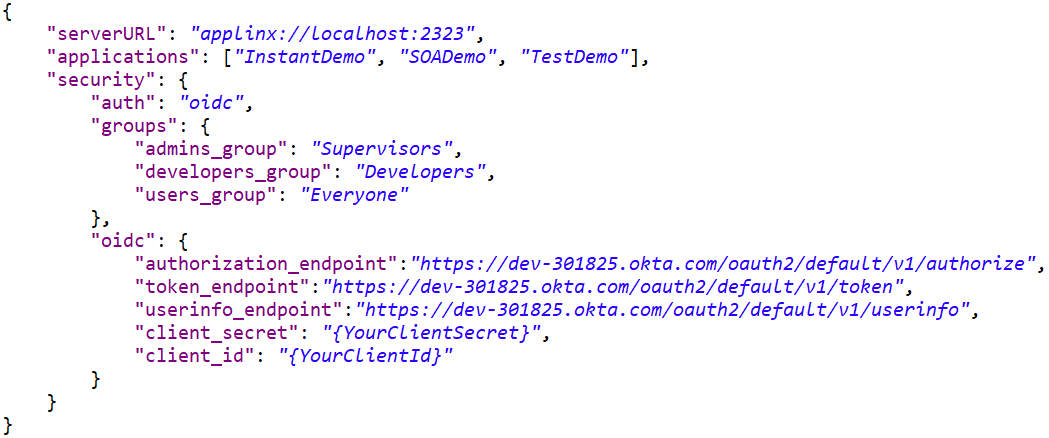
To configure OpenID Connect authentication
In the the configuration file rest-api-config.json configuration file,
set security parameter auth to "oidc"
and provide the OpenID Connect environment variables.
| OpenID Connect Environment Variable |
Description |
|---|---|
authorization_endpoint |
The client sends the end-user's browser here to request the user's authentication and consent. This endpoint is used in the code and implicit OAuth 2.0 flows that require end-user interaction. |
token_endpoint |
Post an OAuth 2.0 grant (code, refresh token, resource owner password credentials, client credentials) to obtain an ID and/or access token. |
userinfo_endpoint |
Retrieve profile information and other attributes for a logged-in end-user. |
client_secret |
The client secret, which you get from your OpenID Connect provider. |
client_id |
The client ID, which you get from your OpenID Connect provider. |
redirect_uri |
Optional. The redirect_uri specified in your ID provider configuration.
|
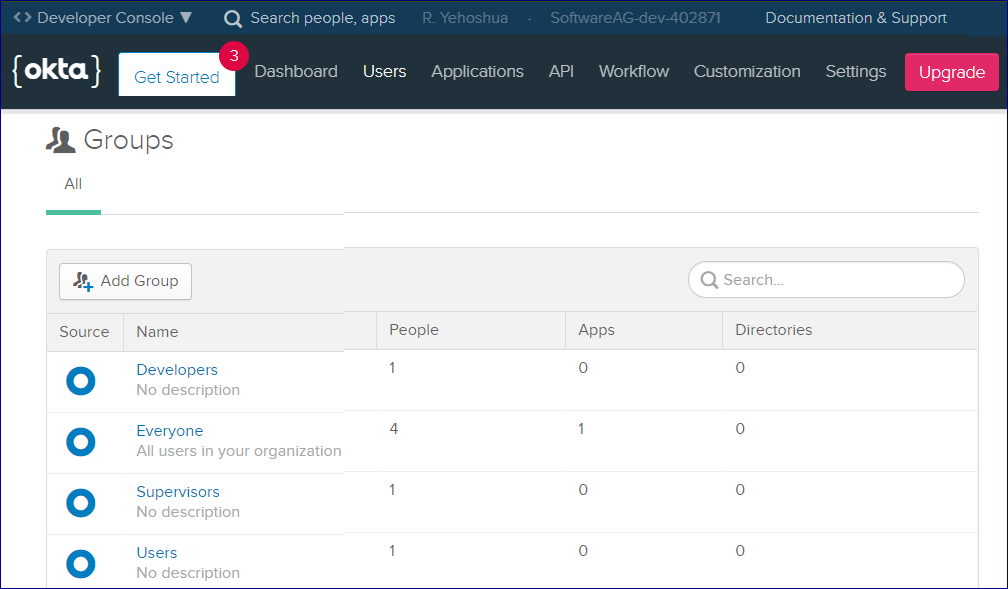
For this example, three groups (Supervisors, Developers, Users) were created in Okta. The Everyone group is available out-of-the-box.
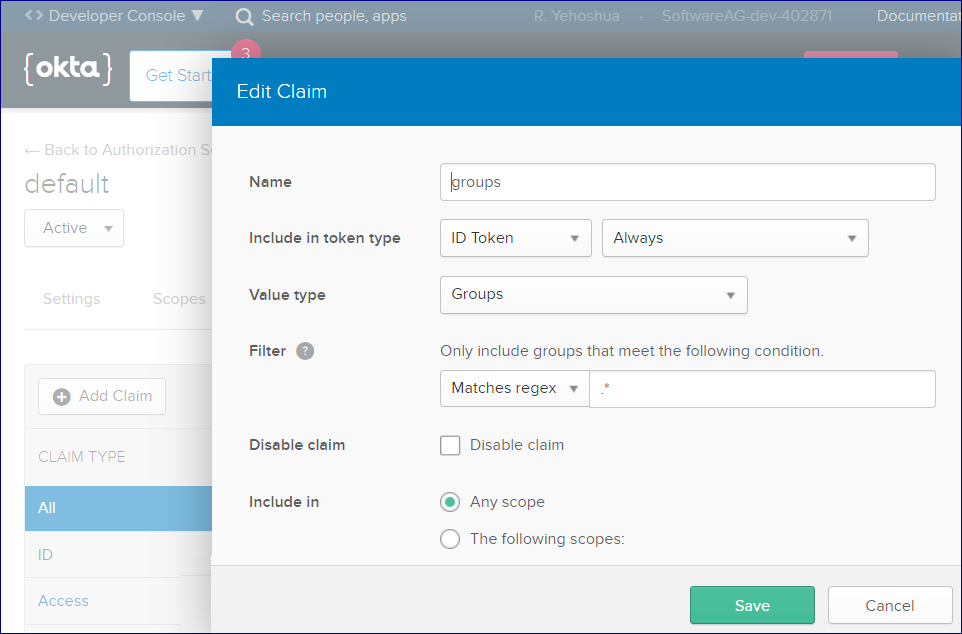
For this example, a custom group claim was also created. This will be returned in the ID token.
This means that the REST API will know which group the user (who is trying to authenticate) belongs to.
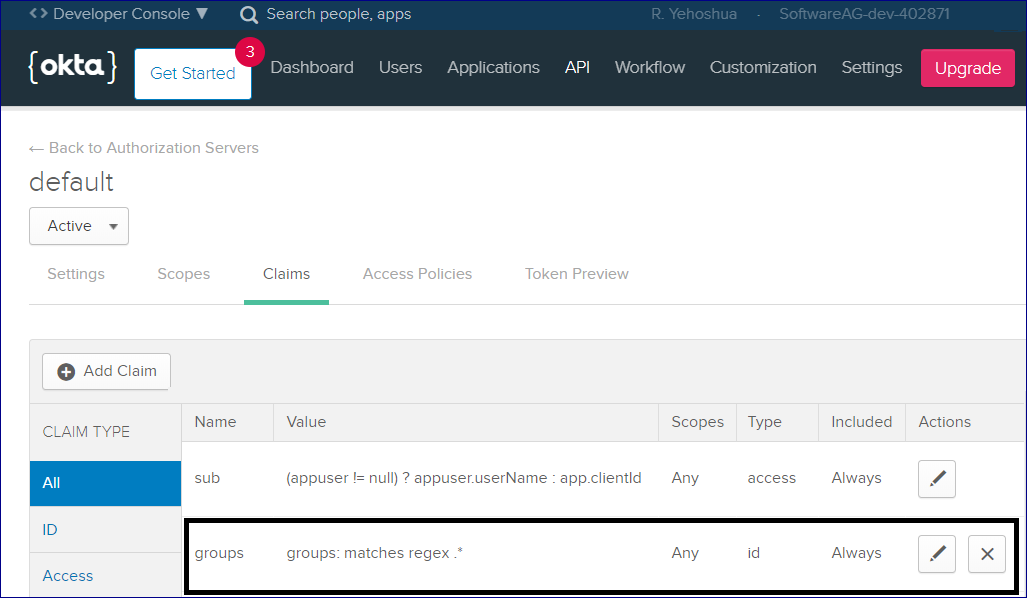
Here is the configuration of the group claim:
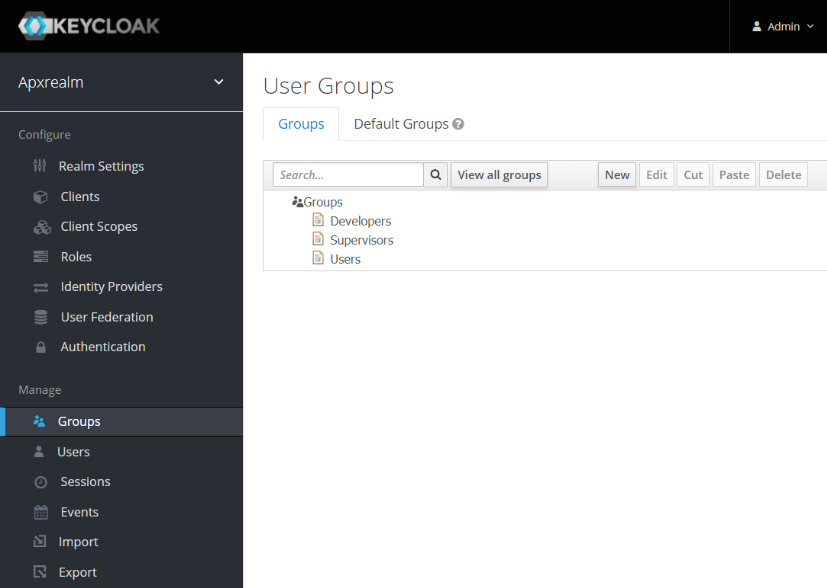
This second example uses an account created on Keycloak. In Keycloak we get the groups out-of-the-box, so there is no need
to create a custom groups claim we did in the first example. Keycloak configuration:
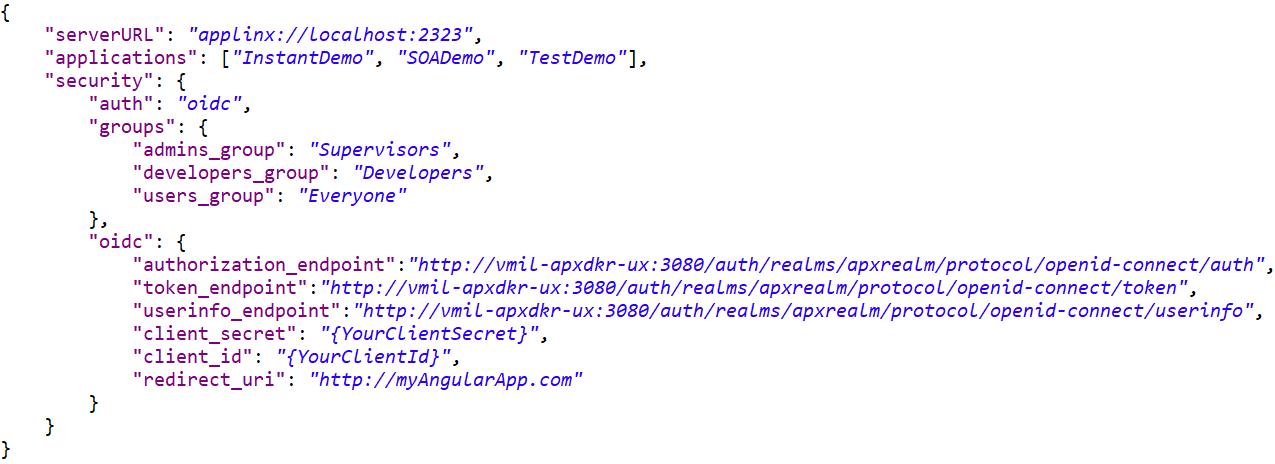
Like the first example, we created three groups here as well:
The flow of a Create Session Request when using OpenID Connect authentication is somewhat different.
To create a session
Send a regular POST request to the session endpoint, for example
http://{host}:{port}/applinx/rest/sessionYou will receive a JSON response containing the variable redirect_uri. For example:

This link will send you to authenticate against your OIDC provider.
Enter your credentials and confirm to create a new session, for example:
If your credentials are valid, you will be redirected from the login page to your 'redirect_uri' with a one-time code, which will placed as a query parameter.
Send a request to the REST API connect session endpoint with the code as a query parameter and a new session will be connected. You should also send request body that contains the application name to connect to. See Creating a Session.
This authentication mode is used for hosts such as Natural-Linux that already have an authentication step.
To configure Host Authentication
In the the rest-api-config.json configuration file, set security parameter auth to "hostAuth".
In the request body, send the host credentials in order to connect a session:
"naturalUsername": "string",
"naturalPassword": "string",
This authentication mode (no authentication) is used for hosts that have a screen containing an authentication step. This mode means you can disable the additional third-party authenticator. This setting is also useful if you do not want authentication before creating a session.
To disable authentication
In the the rest-api-config.json configuration file, set security parameter auth to "disabled".
This section covers the following topics:
For information on procedure entities and procedure groups, see Procedures
With the REST API you can publish procedures as REST endpoints and then execute the procedures, using an HTTP call with JSON request body containing the Procedure inputs, and a JSON response body representing the Procedure outputs. The procedure I/O outputs are defined in the Designer when you create a procedure.
To publish a procedure as a REST API endpoint
Assign the procedure to a Procedure Group. See Designing and Developing an Application > ApplinX Entities > Procedure Groups (used as Service Providers) > Assigning a Procedure to a Procedure Group.
Configure the application that contains the procedure group in the REST API configuration file (rest-api-config.json) as application in the 'applications' array.
Restart the ApplinX server. We recommend you add all your procedures at the same time so you only need to restart to restart your server once.
When a Procedure is published as a REST API endpoint, the OpenAPI documentation of the REST API will contain all the information about the procedure endpoint (Request and response body schema, Authentication schema, HTTP method). See Getting Started
Path Procedures expose two types of endpoints:
A stateful endpoint has the suffix '/Stateful'; a stateless endpoint does not have a special suffix. Other procedure types (Flow, Web, Program) exposing only one endpoint (stateless). Your Open API documentation will contain documentation about the two endpoints.
A stateless procedure execution does not require a session. You can send a procedure call through the REST endpoint, get the output and no session remains open.
To execute a stateless Procedure
Add your authentication credentials to the request (unless configured with OpenID Connect.
Note:
The basic ApplinX and LDAP authentication methods require simple username and password that is sent from the end user to the
ApplinX REST API.
In OIDC, however, end users do not send their credentials directly to ApplinX. Instead, a third-party ID provider ((Okta,
Keycloak, etc...)
is used for authentication. A code is sent and then verified in the ApplinX REST API.
If verification is successful, the REST API returns a session token that will be used by the user in all subsequent requests.
This token represents a session within the REST API. So when you want to execute a stateless procedure with OpenID Connect
you need to connect a session, receive a session token and send the token in the subsequent procedure call request.
Stateful procedure execution requires an established session context, the procedure is executed on the session and the session remains connected after the procedure run is finished.
To execute a stateful procedure
Add the authorization token you received within the response of the HTTP call to the endpoint of connect session service.
When a Procedure is assigned to a Procedure Group, it is deployed dynamically as a REST service. The endpoint of the REST service is structured according to the name of the application, procedure group and procedure in this exact order. See sample URL:
http://localhost:2380/applinx/rest/procedures/myAppName/myProcedureGroupName/myprocedureNameIf the Procedure is of type 'Path Procedure', an additional endpoint is created with suffix '/Stateful'. See sample URL:
http://localhost:2380/applinx/rest/procedures/myAppName/myProcedureGroupName/myprocedureName/StatefulThe following is an example of two published endpoints for Path Procedure in the Swagger Editor:
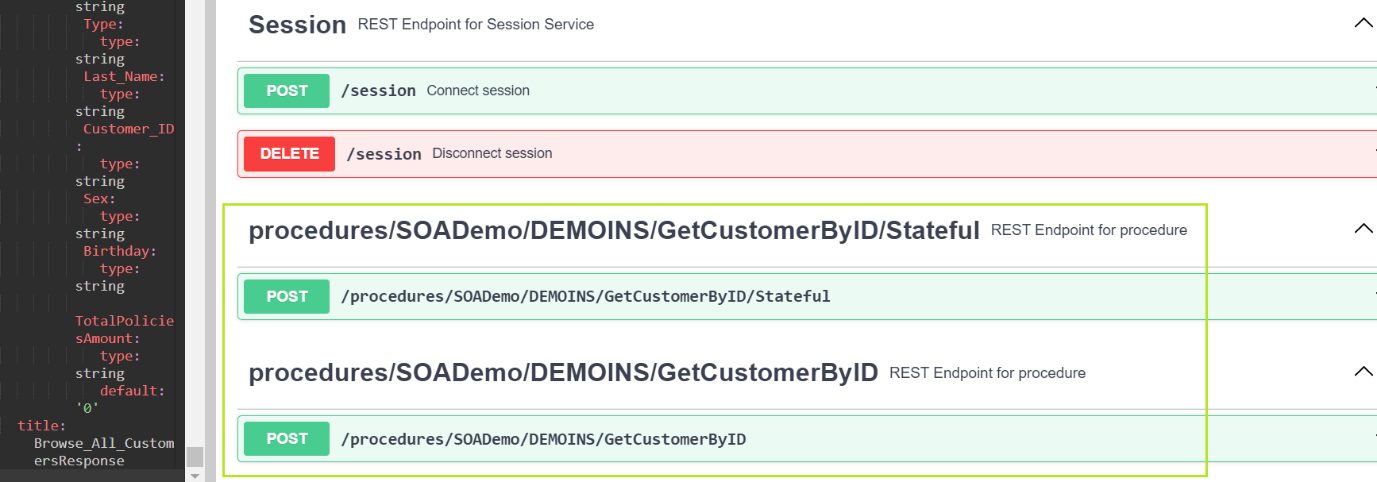
Notes:
GetCustomerByID' within Procedure Group 'DEMOINS' inside application 'SOADemo'.
/procedures'.