
The Application Map view displays thumbnails of the application screens which the user navigated through, while working with the application. ApplinX saves the navigation through these screens including the steps between each screen such as the action key pressed and the fields sent. The application map can be used in Path Procedures and from the Base Object/Web framework, to navigate to a specific screen, using the NavigateTo method.
This section details:
Steps can be created automatically from within the Session View when working online or offline, and also via a wizard, using a number of trace files. Steps can also be added manually in the Steps tab of the Screen editor. To automatically add steps as you navigate, you must first enable recording the navigation steps. To perform the identification of steps based on a trace file, use the Automatically Identifying Application Map Steps wizard, and all the steps in the trace file will be identified. Each of these tasks are detailed below.
Note:
Steps can only be added to identified screens.
Note:
When working with an online session, the steps (i.e action keys
pressed) between each screen, are the actual keys you press. When working with
a trace file, the steps (i.e action keys pressed) between each screen, are the
steps recorded within the trace
file.
 To Record Navigation Steps
Recording navigation steps is enabled by default. To change this setting, right-click on an application and select .
In the Navigation tab, select the check box which enables/disables recording the navigation steps.
Connect to a session and start navigating. ApplinX will automatically add the new steps.
Note:
When running an offline session, you can just navigate by pressing
the ENTER key. The actual steps which were recorded are added.
Automatically identify steps by running the Automatically Identify Screens/Steps using Trace Files wizard.
Note:
This wizard, is also used to automatically identify screens. If
your application includes unknown screens which you would like to be displayed
in the map, you must identify these screens either manually, or automatically
(using this wizard), after first creating a Screen Creation Definition within a
Screen Group.
To automatically identify steps using trace files:
Right-click on the relevant application, and select. The wizard is displayed.
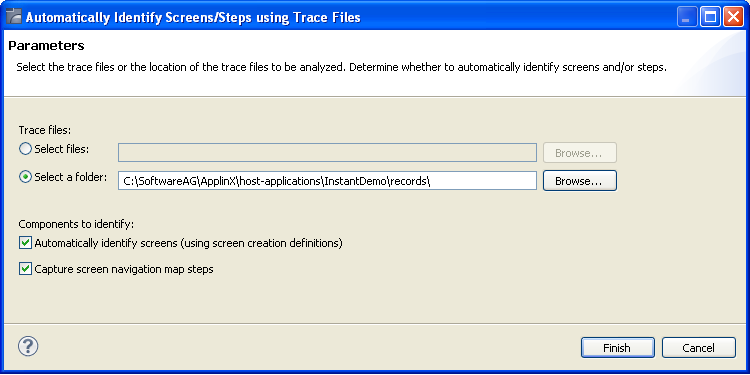
Select whether to analyze files or a folder. Locate the files/folder.
Select the Capture screen navigation map steps check box.
You can automatically identify screens using this wizard by selecting Automatically identify screens. Refer to Automatically Identify Screens using Trace Files (GCT) for further details.
Click .
The Console area in the Designer displays the outcome of the process.
In the Steps tab of the Screen editor, it is possible to manually define additional steps between screens that already exist in the application map. The steps should be defined in the source screen and determine the destination screen of the step. It is possible to add a simple step between screens or to add an inner path step which executes a path. When you add a simple step, determine the target screen, the key to be sent, and the relevant inputs. When defining an inner path, select the path. Change the status of the step using the links (Approve, Set to Pending, Set to Not Approved). Once you save the new steps, you can check these navigation definitions in the Session View using the Application Map toolbar. Simply select the screen you want to navigate to and click on the Go icon to attempt to navigate to that screen.
Within the Application Map view, you can perform a number of actions:
Display a tooltip with the step information including the key pressed and the information sent. Just hover over the arrow and the tooltip is displayed.
Change the zoom level of the view. Right click anywhere within the map and select the view zoom.
When moving the mouse over a specific screen image (and the current display is not 100%), the screen image will be enlarged.
The Application Map view displays the steps in different colors to indicate the status of each step: green indicates approved, yellow - pending and red - not approved.
Clicking on the Approved, Pending and Not Approved icons in the toolbar, it is possible to display only the steps of the selected status.
Right click on the desired step/arrow and select a status to make changes to the step's status. Using the Control key, select a number of steps/arrows and make status changes to all of these steps.
The Application Map can either display the whole application map or
focus on the entity selected in the Explorer tree and only display the screens
related to the selected entity. The radius of related screens can be determined
by scrolling to the relevant number in the toolbar. Enable this feature by
clicking on the Link with Entity icon ![]() , and then selecting the radius of screens to be
displayed by clicking on the arrows, or entering a number
, and then selecting the radius of screens to be
displayed by clicking on the arrows, or entering a number
![]() .
.
The view displaying the map can be set to change dynamically, as events
occur, (e.g., newly created screens are displayed in the map view) or it can be
set to preserve the current view (Lock icon
![]() on the session toolbar).
on the session toolbar).
In the Session view, navigate through the screens. In the Application Map view, thumbnails are created for all the identified screens through which you have navigated. Arrows between the screens indicate the direction of the navigation. These arrows are, by default, in "Pending" status (colored in yellow). This is because, you do not always want users to enable users to navigate to all the screens (i.e. you do not want users to be able to navigate to the login page where usernames and passwords appear). In order to use the application map with a Path Procedure, the status of the navigation route must be set to "Approved" (green).You can choose to display or hide all screens that have steps of a certain status (pending, approved or not approved) by clicking on the appropriate icons in the map view.
To manually add additional steps between screens, edit the source screen in the Editor. In the Map Steps tab manually add steps. Refer to Creating a Screen.
To approve a number of pending steps, right-click on one of the screens and select, or use the Control key to select a number of steps.
You can select to set a screen as the first screen.
The screen navigation defined in the Application Map can be tested to ensure that the navigation behavior is as expected. This is done in the Session View (online), using the Application Map toolbar. The toolbar enables selecting a screen to which you expect to be able to navigate to from the current screen and then attempting to navigate to this screen. If the Application Map is correctly defined, then ApplinX will successfully navigate to the selected screen. If the Application Map does not have the relevant steps defined to reach the screen you selected, a pop-up message will inform you of this.
An individual screen thumbnail within the Application Map can indicate problems or incompatibility between the defined identifiers and the screen image attached to the screen. Such problems are indicated by a red frame around the specific screen.
Possible problems:
Incompatibility between the defined identifiers and the screen image attached to the screen. This can happen as a result of creating a screen and then manually changing an identifier.
The screen suits the screen image, but there is a screen which is more suitable or identical to the screen image. Look at the name of the screen which is on the screen image and check that it suits the current screen. Note that the name which is on the screen image indicates how the server identified this screen image given all current screen definitions.