
This document covers the following topics:
When you invoke the Control Editor, a dialog appears which shows a list of all editor extensions. These are the XML files with the prefix "editor_" which are stored in the central directory <your-webapplication>/cis/config and in the subdirectories cisconfig of your user interface components. A single editor extension may contain multiple controls. Ajax Developer comes along with a set of predefined editor extensions.
If you start the Control Editor for the first time, cancel the dialog and create a new editor extension. See Creating an Editor Extension.
Important:
Never touch an editor extension file you do not own.
Develop your controls within your own extension.
 To invoke the Control Editor
In the ProjectExplorer view, select the project for which you want to invoke the Control Editor.
Invoke the context menu and from the menu, choose .
A dialog appears, listing all available editor extensions.
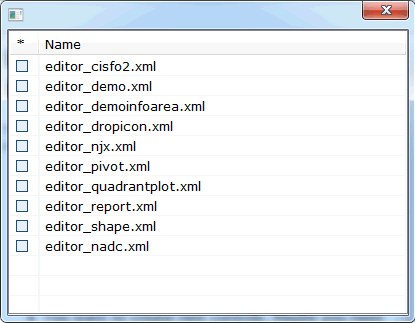
Choose the editor extension that you want to open.
The contents of the editor extension are loaded into the Control Editor. Example:
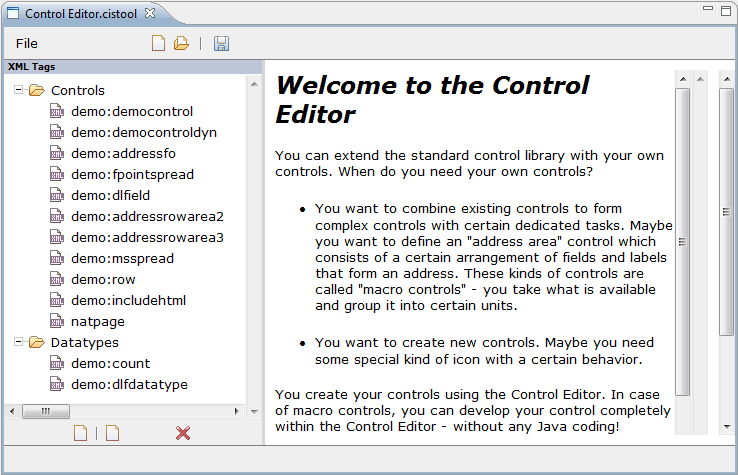
You can now edit your editor extension as described in the remainder of this section.
Note:
You can also open an editor extension as described in
Opening an Editor
Extension.
When you create a new editor extension, you can choose whether to stored it in the central directory <your-webapplication>/cis/config/ or in the subdirectory cisconfig of your user interface component.
To create an editor extension
From the menu of the Control Editor, choose .
Or:
Choose the following button from the toolbar of the Control
Editor.
![]()
The following dialog appears.
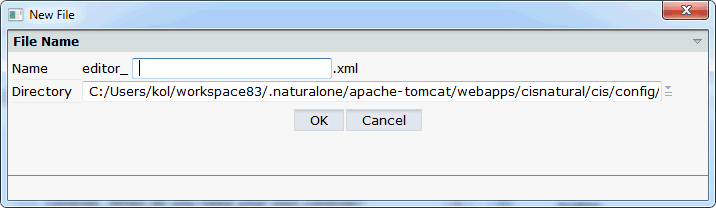
Enter the name of your editor extension (for example, "mycontrols").
From the Directory drop-down list box, select the directory in which the new editor extension is to be stored.
The drop-down list box shows the full path names. The names of your user interface components are shown in the path names.
Choose the button.
The name of your new editor extension is composed of the prefix "editor_" and the name you have specified (for example, editor_mycontrols.xml). The extension is always xml.
The following empty nodes are now shown.
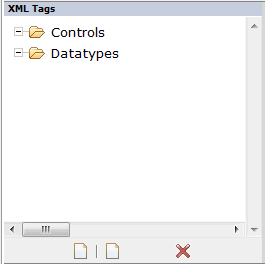
You can now add controls and data types as described below.
A control consists of the control's definition (attributes and positioning) and its corresponding tag handler (Java class).
When defining macro controls, you do not have to write your own tag handler class. You can define the inner structure directly within XML (XML/protocol extension).
When defining completely new controls which implement their own HTML/JavaScript, you must also implement a corresponding tag handler in order to generate your own HTML/JavaScript code.
To add a control
Choose the first button which is shown below the tree of XML tags (when you move the mouse over this button, the tooltip "New Control" appears):
![]()
The following dialog appears.
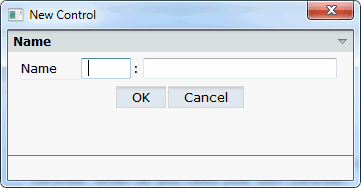
Enter a name for the new control.
The name of a control must be unique within your control library. Therefore, you have to prefix the control name with the name of the control library: "<control-library-name>:<control-name>". See also Library Concept in Custom Controls.
Choose the button.
The new control is inserted in the Controls node. If the Controls node already contains controls, each new control is automatically inserted at the bottom of the list.
Select the new control in the tree.
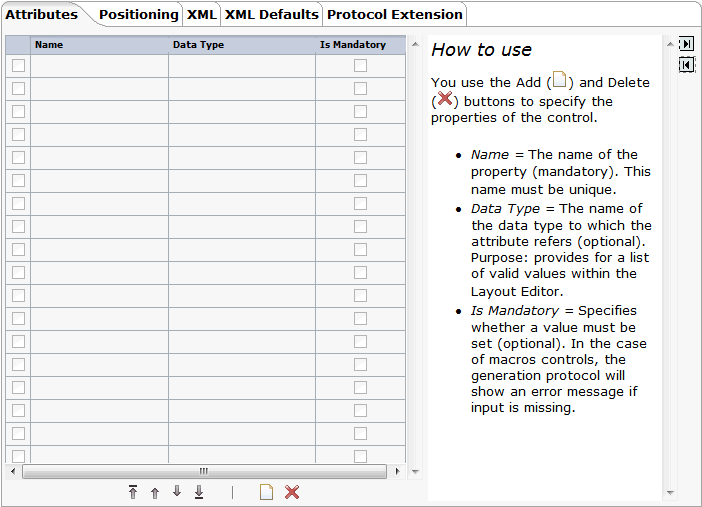
The following information is shown.
Using the buttons
![]() and
and
![]() you can hide and show the help information in this
dialog.
you can hide and show the help information in this
dialog.
Specify all required information on the different tabs. See Defining a Control for detailed information on these tabs.
See also Examples.
A data type defines a list of valid values. The properties of your controls can have data types. This is optional.
A set of predefined data types (such as align or
boolean) is provided. You can use them within your control's
definition. They are defined in the editor configuration file
editor.xml. If there is no appropriate data type for your
purpose, you can create your own data type.
To add a data type
Choose the second button which is shown below the tree of XML tags (when you move the mouse over this button, the tooltip "New Datatype" appears):
![]()
The following dialog appears.
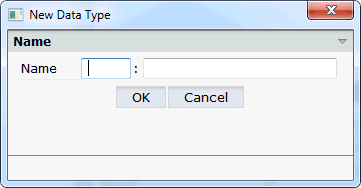
Enter a name for the new data type.
The name of a data type must be unique within your control library. Therefore, you have to prefix the data type name with the name of the control library: "<control-library-name>:<data-type-name>".
Choose the button.
The new data type is inserted in the Datatypes node. If the Datatypes node already contains data types, each new data type is automatically inserted at the bottom of the list.
Select the new data type in the tree.
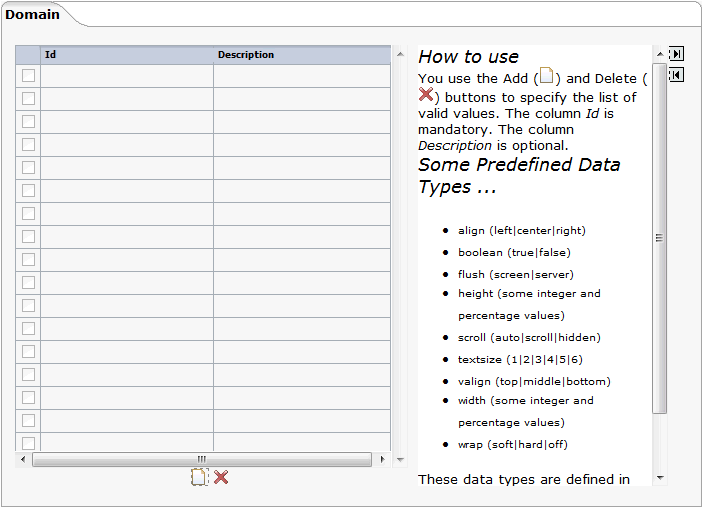
The following information is shown.
Using the buttons
![]() and
and
![]() you can hide and show the help information in this
dialog.
you can hide and show the help information in this
dialog.
The following buttons are provided on this tab:
| Button | Description |
|---|---|
| Adds an empty line in which you can specify a data type. | |
| Deletes the selected data type(s). |
Use the
![]() button to add one or more empty lines and specify the
following:
button to add one or more empty lines and specify the
following:
- Id
The name of the data type.
- Description
Optional. A short description of your data type.
See also Examples.
You can delete any controls or data types that are shown in the tree of XML tags.
To delete a control or data type
In the tree of XML tags, select the control or data type that you want to delete.
Choose the following button which is shown below the tree of XML tags:
![]()
You are not asked to confirm the deletion.
When you save an editor extension, all of your changes in the Control Editor are saved. This includes all controls and data types that you have added or changed.
To save an editor extension
From the menu of the Control Editor, choose .
Or:
Choose the following button from the toolbar of the Control
Editor.
![]()
The status bar of the Control Editor shows the name of the file (including the path) to which the information has been written.
Tip:
If the path is longer than can be shown in the status bar,
click on the status bar. You can then find out the complete path and file name
in a separate dialog.
You can open any editor extension that is stored in the central directory <your-webapplication>/cis/config/ or in the subdirectories cisconfig of your user interface components.
To open an editor extension
From the menu of the Control Editor, choose .
Or:
Choose the following button from the toolbar of the Control
Editor.
![]()
Note:
When your latest changes in the Control Editor have not
yet been saved, you are asked whether you want to save them.
The Open File dialog appears.
Choose the editor extension that you want to open.
The contents of the editor extension are loaded into the Control Editor.