
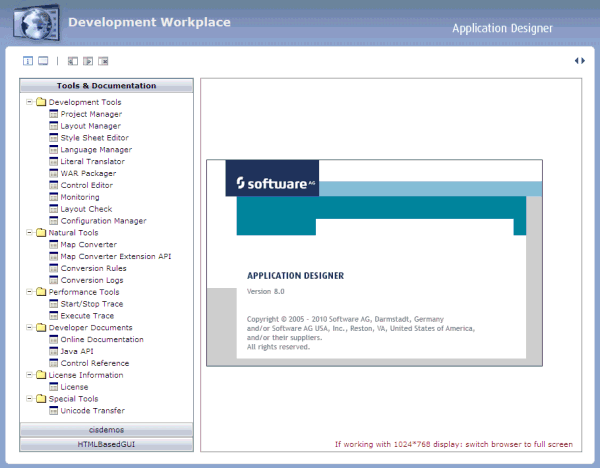
When you start the development workplace, the following page appears in your browser:
Notes:
This document covers the following topics:
The following icons are provided at the top of the page:
| Icon | Description |
|---|---|
| Displays information about Application Designer. | |
| Starts the monitoring tool. | |
| Closes the navigation frame on the left side of the development workplace. | |
| Reopens the navigation frame on the left side of the development workplace. | |
| Closes all open windows in the development workplace. |
Over time, you may open a lot of windows (for example, for different layouts). A link for each open window is shown at the top of the development workplace. You can switch between these windows by choosing the corresponding link.
![]()
If the number of open windows exceeds the available horizontal
space, you can use the following icons at the top right corner to scroll the
list of windows to the right or left:
![]() .
.
 To close a window
Choose the standard close icon at the top right corner of the window.
To close all windows
Choose the following icon at the top left of the development workplace.
![]()
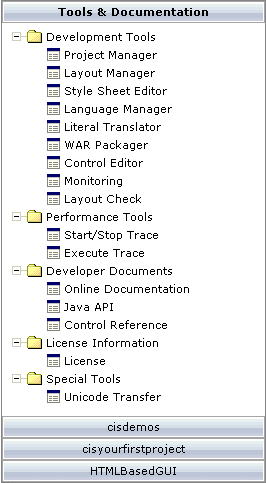
The navigation frame contains several buttons. When you choose the button, a tree is shown from which you can start several tools, invoke documentation or view the license information. Each of these items is then shown in a window which appears in the area to the right of the navigation frame. These items are described in detail in the remainder of this documentation.
The other buttons in the navigation frame represent projects. The following projects are delivered with Application Designer:
cisdemos
This project contains demo pages/applications that you can
reach from the demo workplace.
HTMLBasedGUI
This project (together with the configuration directory
cis) contains the Application Designer resources.
Important:
Do not put your development resources into one of the
projects above - create your own project(s) instead. Thus, your resource files
will not be touched when you install a new Application Designer build.
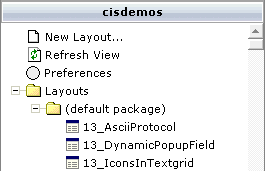
Your own projects, which you create using the Project Manager, are also shown as buttons (for example, a project with the name "cisyourfirstproject"; see also First Steps).
When you choose a button which represents a project, you can manage the layouts for this project. For example:
To close the navigation frame
Choose the following icon at the top left of the development workplace.
![]()
To reopen the navigation frame
Choose the following icon at the top left of the development workplace.
![]()
The following commands are available in the navigation frame:
A layout is defined using the Layout Painter. See Creating a Layout for detailed information on this command.
Note:
When you create a new layout, it is first shown directly
below the Layouts node. When you refresh the view or
restart Application Designer, it is automatically sorted according to your
preferences (see
below).
When you have added a layout directly in the file system or in a second browser window, you can refresh the view so that the latest changes to the current project are shown in the navigation frame.
To refresh the view
In the navigation frame, choose the button for the project that you want to refresh.
Choose the Refresh View command in the navigation frame.
For each project, you can define that the layouts in the Layouts node are grouped into folders.
To set the preferences for a project
In the navigation frame, choose the button for the project that you want to refresh.
Choose the Preferences command in the navigation frame.
The following dialog appears.
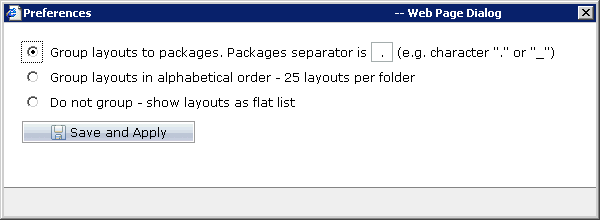
Select one of the following options:
- Group layouts to packages
The layouts are grouped into folders, according to the specified separator character.
For example, when you define an underscore (_) as the separator character, all layouts starting with "My_ " are sorted into a folder with the name "My", and all layouts starting with "xyz_" are sorted into another folder with the name "xyz".
When the name of a layout does not contain the specified character and the layout can therefore not be sorted into a special folder, this layout is sorted into a folder with the name "(default package)".
- Group layouts in alphabetical order
The layouts are sorted into folders where each folder contains a maximum of 25 layouts.
For example, you have 30 layouts and the name of the first layout in the alphabetically sorted list is "helloworld". In this case, the folder receives the name of the first layout ("helloworld") and the first 25 layouts are sorted into this folder. The next folder receives the name of your 26th layout and the remaining layouts are sorted into this folder.
- Do not group
The layouts are not grouped into folders. They are shown as a flat list directly below the Layouts node.
Choose the button.
The content frame is the area to the right of the navigation frame. It displays information for the entry you have chosen in the navigation frame. For example, when you choose Project Manager in the navigation frame, a window pertaining to the Project Manager is shown in the content frame. Or, when you choose Java API in the navigation frame, a window containing the Java API documentation is shown in the content frame.