
Microsoft Silverlight is a plug-in which allows to specify sophisticated graphics, such as animations. It is positioned as competitive plug-in to Adobe's Macromedia Flash control. Silverlight runs within Microsoft-based and Apple-OS-based systems. As browsers, the Internet Explorer, Mozilla and Safari are supported.
This document assumes that you already know how to deal with Silverlight. Read the documentation that comes with the Silverlight SDK when downloading from Microsoft.
The integration of Silverlight is simple and straight forward. Silverlight has direct access to JavaScript processing - this is where AJAX and Silverlight meet.
Using Application Designer's control concept, the Silverlight part of a page can be nicely integrated, allowing the AJAX page to pass data ("net data") to the Silverlight control and allowing the Silverlight processing to set data and raise events within the AJAX processing.
Notes:
This document covers the following topics:
The following page contains three special controls: two buttons and an image area.
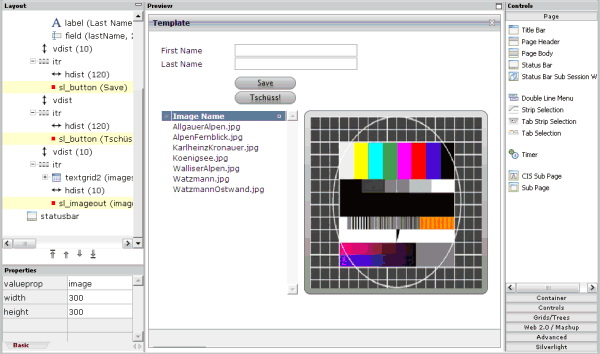
As you can see in the layout tree, the names of the corresponding control tags are SL_BUTTON and SL_IMAGEOUT. These controls are animated:
When pressing a button, it rotates one time.
When loading images into the image area, the images fly in and out.
From the layout perspective, the controls are just normal controls. The button is bound to a server-side method, the image output area is bound to a server-side property. The control's complexity is completely hidden from of the application developer who just uses controls by dropping them into a page and putting server-side logic behind them.
The layout of the above sample page is defined in the following way:
<page model="SL_Test1Adapter">
    <sl_silverlight>
    </sl_silverlight>
    <titlebar name="Template">
    </titlebar>
    <pagebody paddingleft="20" paddingright="20" paddingtop="20" paddingbottom="20">
        <itr>
            <label name="First Name" width="120">
            </label>
            <field valueprop="firstName" width="200">
            </field>
        </itr>
        <itr>
            <label name="Last Name" width="120">
            </label>
            <field valueprop="lastName" width="200">
            </field>
        </itr>
        <vdist height="10">
        </vdist>
        <itr>
            <hdist width="120">
            </hdist>
            <sl_button name="Save" method="onSave">
            </sl_button>
        </itr>
        <vdist>
        </vdist>
        <itr>
            <hdist width="120">
            </hdist>
            <sl_button name="Tschüss!" method="onBye">
            </sl_button>
        </itr>
        <vdist height="10">
        </vdist>
        <itr takefullwidth="true">
            <textgrid2 griddataprop="images" width="100%" height="100%" selectprop="selected" singleselect="true" onclickmethod="onSelectImage">
                <column name="Image Name" property="imageName" width="100%">
                </column>
            </textgrid2>
            <hdist width="10">
            </hdist>
            <sl_imageout valueprop="image" width="300" height="300">
            </sl_imageout>
        </itr>
    </pagebody>
    <statusbar withdistance="false">
    </statusbar>
</page>
In the above layout, the following types of tags are used that are specific to Silverlight. These are custom controls.
SL_SILVERLIGHT
A tag that puts some Silverlight initialization code into the
page. This control has no visible representation in the page; it just adds some
functions which are required for the visible Silverlight controls.
SL_BUTTON
The button tag.
SL_IMAGEOUT
The image output tag.
The adapter implementation looks as follows:
// This class is a generated one.

import java.util.*;

import com.softwareag.cis.file.FileManager;
import com.softwareag.cis.server.*;
import com.softwareag.cis.server.util.*;
import com.softwareag.cis.util.*;

public class SL_Test1Adapter
    extends Adapter
{
    String m_firstName;
    public String getFirstName() { return m_firstName; }
    public void setFirstName(String value) { m_firstName = value; }

    String m_lastName;
    public String getLastName() { return m_lastName; }
    public void setLastName(String value) { m_lastName = value; }

    String m_image;
    public String getImage() { return m_image; }
    public void setImage(String value) { m_image = value; }

    public class ImagesItem
    {
        // property >imageName<
        String m_imageName;
        public String getImageName() { return m_imageName; }
        public void setImageName(String value) { m_imageName = value; }

        // property >selected<
        boolean m_selected;
        public boolean getSelected() { return m_selected; }
        public void setSelected(boolean value) { m_selected = value; }
    }

    TEXTGRIDCollection m_images = new TEXTGRIDCollection();
    public TEXTGRIDCollection getImages() { return m_images; }

    public void init()
    {
        String dirName = Params.getApplicationDirectoryName("playground") + "images/";
        String[] images = FileManager.getFileNamesOfDiretory(dirName,".jpg");
        for (int i=0; i<images.length; i++)
        {
            ImagesItem ii = new ImagesItem();
            ii.setImageName(images[i]);
            m_images.add(ii);
        }
    }

    public void onSelectImage()
    {
        ImagesItem ii = (ImagesItem)m_images.findLastSelectedItem();
        m_image = "../playground/images/"+ii.getImageName();
    }

    public void onBye()
    {
        outputMessage(MT_SUCCESS,"Bye was pressed!");
    }

    public void onSave()
    {
        outputMessage(MT_SUCCESS,"Save was pressed!");
    }
}
The adapter code does not contain any items which are specific to Silverlight. The important items in the code are:
The text grid is loaded in the init()
method. A certain directory is scanned for JPG files and a table row is created
for each item.
Once the user selects a text grid item, the
onSelect() method takes care of transferring the name
of the selected image into the property m_image.
This is the property which is referenced by the SL_IMAGEOUT control.
The descriptions below are based on the following structure:
/HTMLBasedGUI/
             /silverlight/
                         /createSilverlight.js
                         /Silverlight.js
                         /SL_BUTTON.xaml
                         /SL_IMAGEOUT.xaml
There is an /HTMLBasedGUI/silverlight directory in which the following files are kept:
createSilverlight.js
This file contains JavaScript that generated the HTML elements
(for example, an OBJECT tag) that are holding a Silverlight plug-in. This file
was taken from the Silverlight SDK without any change.
Silverlight.js
This file contains binding code between the JavaScript processing
of the page and the Silverlight plug-ins.
*.xaml
The *.xaml files
(SL_BUTTON.xaml and SL_IMAGEOUT.xaml)
hold the XAML rendering definition for the Silverlight controls.
This example introduces new control handlers for the SL_* controls .
Note:
The selection of the HTMLBasedGUI directory
for keeping the silverlight directory was done because
HTMLBasedGUI is can be considered as Software AG's
"home directory" within a web application. When doing your own
implementation, you can choose any directory of your choice that is part of the
web application's directory.
The custom controls are described below:
Let us first have a look at the editor extension file that defines the control's integration into the Layout Painter.
<?xml version="1.0" encoding="UTF-8"?>

<!--
Dynamic extension of editor.xml file.
-->

<controllibrary>
  <editor>

  <!--
  ********************************************************************
  * TAGs
  ********************************************************************
  -->

  <!--SILVERLIGHT -->
  <tag name="silverlight">
  </tag>
  <tagsubnodeextension control="page" newsubnode="silverlight"/>

  </editor>
</controllibrary>
The definition is pretty simple. The tag will appear in the controls palette of the Layout Painter, as a new section with the name "Silverlight". The control does not have any properties.
The control adds some JavaScript statements into the generated HTML of a page. Have a look at the implementation for the control handler:
package com.softwareag.cis.gui.generate;

import org.xml.sax.AttributeList;

import com.softwareag.cis.gui.protocol.ProtocolItem;

public class SL_SILVERLIGHTHandler
    implements ITagHandler
{
    // ------------------------------------------------------------------------
    // public usage
    // ------------------------------------------------------------------------

    public void generateHTMLForStartTag(int id,
                                        String tagName,
                                        AttributeList attrlist,
                                        ITagHandler[] handlersAbove,
                                        StringBuffer sb,
                                        ProtocolItem protocolItem)
    {
        sb.append("<!-- SILVERLIGHT begin -->\n");
        sb.append("<script type=\"text/javascript\" src=\"../HTMLBasedGUI/silverlight/Silverlight.js\"></script>\n");
        sb.append("<script type=\"text/javascript\" src=\"../HTMLBasedGUI/silverlight/createSilverlight.js\"></script>\n");
    }

    public void generateHTMLForEndTag(String tagName, StringBuffer sb)
    {
        sb.append("<!-- SILVERLIGHT end  -->\n");
    }

    public void generateJavaScriptForInit(int id,
                                          String tagName,
                                          StringBuffer sb)
    {
    }

}
This implementation only contains the integration of the .js files which are stored in the /HTMLBasedGUI/silverlight directory.
The handling of the button is done in several parts.
Let us first have a look at the editor extension file that defines the control's integration in the Layout Painter.
<?xml version="1.0" encoding="UTF-8"?>

<!--
Dynamic extension of editor.xml file.
-->

<controllibrary>
  <editor>

  <!--
  ********************************************************************
  * TAGs
  ********************************************************************
  -->

  <!-- SL_BUTTON -->
  <tag name="sl_button">
    <attribute name="name"/>
    <attribute name="method"/>
    <attribute name="width" datatype="width"/>
    <attribute name="height" datatype="height"/>
  </tag>
  <tagsubnodeextension control="itr" newsubnode="sl_button"/>
  <tagsubnodeextension control="tr" newsubnode="sl_button"/>
  <taggroupsubnodeextension group="Silverlight" newsubnode="sl_button"/>

  </editor>
</controllibrary>
The control has four attributes.
name, width and
height are used to specify the button's
rendering. method defines the binding to an
adapter method.
In the controls palette of the Layout Painter, the control will appear within the section . It can be placed below ITR and TR row containers.
The SL_BUTTON tag handler class is responsible for generating the HTML:
package com.softwareag.cis.gui.generate;

import org.xml.sax.AttributeList;

import com.softwareag.cis.gui.protocol.Message;
import com.softwareag.cis.gui.protocol.ProtocolItem;

public class SL_BUTTONHandler
    implements ITagHandler
{
    // ------------------------------------------------------------------------
    // members
    // ------------------------------------------------------------------------

    String m_name = "";
    String m_method;
    String m_width = "100";
    String m_height= "21";

    // ------------------------------------------------------------------------
    // public usage
    // ------------------------------------------------------------------------

    public void generateHTMLForStartTag(int id,
                                        String tagName,
                                        AttributeList attrlist,
                                        ITagHandler[] handlersAbove,
                                        StringBuffer sb,
                                        ProtocolItem protocolItem)
    {
        readAttributes(attrlist);
        fillProtocol(protocolItem);
        generateXSD(protocolItem);
        // create HTML
        sb.append("<!-- SL_BUTTON begin -->\n");
        sb.append("<td width='"+m_width+"'><div id='C"+id+"'"+
                  " style='width:"+m_width+"; height:"+m_height+"'/></td>\n");
        sb.append("<script>function onButtonPressed"+id+"()"+
                  " { C.invokeMethodInModel('"+m_method+"'); }</script>");
    }

    public void generateHTMLForEndTag(String tagName, StringBuffer sb)
    {
        sb.append("<!-- SL_BUTTON end -->\n");
    }

    public void generateJavaScriptForInit(int id,
                                          String tagName,
                                          StringBuffer sb)
    {
        sb.append("if (firstusage) C_"+id+" = document.getElementById('C"+id+"');\n");
        sb.append("if (firstusage) createMySilverlightControl('../HTMLBasedGUI/silverlight/SL_BUTTON.xaml',C_"+id+",'"+id+"','"+m_width+"','"+m_height+"');\n");
        sb.append("if (firstusage) C_"+id+".CASA_width='"+m_width+"';\n");
        sb.append("if (firstusage) C_"+id+".CASA_method='"+m_method+"';\n");
        sb.append("if (firstusage) C_"+id+".CASA_name='"+m_name+"';\n");
    }

    // ------------------------------------------------------------------------
    // private usage
    // ------------------------------------------------------------------------

    /** */
    private void readAttributes(AttributeList attrlist)
    {
        for (int i=0; i<attrlist.getLength(); i++)
        {
            if (attrlist.getName(i).equals("name")) m_name = attrlist.getValue(i);
            if (attrlist.getName(i).equals("method")) m_method = attrlist.getValue(i);
            if (attrlist.getName(i).equals("width")) m_width = attrlist.getValue(i);
            if (attrlist.getName(i).equals("height")) m_height = attrlist.getValue(i);
        }
    }

    /** */
    private void fillProtocol(ProtocolItem pi)
    {
        pi.addMethod(m_method);
    }

    /** */
    private void generateXSD(ProtocolItem pi)
    {
        XSDGenerationAddon xga = (XSDGenerationAddon)pi.findGenerationAddon(XSDGenerationAddon.class);
        if (xga != null)
        {
            xga.addMethod(pi,m_method);
        }
    }

}
The above code does the following:
Some td and
div elements are created. This is where the
Silverlight object is placed in. The div receives a
certain ID ("Cxxx") which will be referenced later.
In addition, there is a JavaScript function
onButtonPressedxxx() that will later be called by the
Silverlight control.
In the JavaScript initialization, the variable reference
"C_xxx" is defined, which points to the
div. The actual generation of the Silverlight object
is then done by using the function createMySilverlightControl.
Some parameters are transferred, for example, the name of the XAML file to
render. The createMySilverlightControl function is part of the
createSilverlight.js file and internally wraps the
creation of the Silverlight control:
function createMySilverlightControl(pXaml,pDiv,pId,pWidth,pHeight)
{
    Sys.Silverlight.createObject(
        pXaml,
        pDiv,
        "SL_" + pId,
        {
            width:pWidth,
            height:pHeight,
            inplaceInstallPrompt:false,
            background:'#FFFFFF',
            isWindowless:'false',
            framerate:'24',
            version:'0.9'
        },
        {
            onError:null,
            onLoad:null
        },
         pId);
}
This may look complex. However, when you look at the Silverlight
SDK documentation, you see that this is just a normal Silverlight
implementation. The Sys.Silverlight.createObject function checks
whether Silverlight is installed and creates a corresponding
object tag into the surrounding
div element that is passed as parameter.
Finally you see that the C_xxx
variable gets some attributes which take over definitions such as width and
height to be used later on.
The control is rendered and Silverlight is invoked.
Let us now have a look at the XAML file that is passed as parameter. The XAML file is the XML definition which defines the layout of what is rendered inside the Silverlight control:
<Canvas
   xmlns="http://schemas.microsoft.com/client/2007"
   xmlns:x="http://schemas.microsoft.com/winfx/2006/xaml">

<Canvas Canvas.Top="0"
        Canvas.Left="0"
        Width="100"
        Height="21"
        Loaded="onLoadedBUTTON">
    <Canvas Canvas.Top="0"
          Canvas.Left="0"
          Width="100"
          Height="21"
          x:Name="lllll"
          MouseLeftButtonDown="onMouseLeftButtonDownBUTTON">
        <Canvas.Resources>
            <Storyboard x:Name="button_flip">
                <DoubleAnimation
                    Storyboard.TargetName="lllllscale"
                    Storyboard.TargetProperty="ScaleY"
                    From="1.0" To="-1.0" Duration="0:0:0.400" AutoReverse="True"/>
            </Storyboard>
        </Canvas.Resources>
        <!-- Content Begin -->
        <Rectangle Canvas.Top="0"
                   Canvas.Left="0"
                   Width="100"
                   Height="21"
                   Stroke="#808080"
                   StrokeThickness="1"
                   RadiusX="10"
                   RadiusY="10"
                   Cursor="Hand">
            <Rectangle.Fill>
                <LinearGradientBrush StartPoint="0,0" EndPoint="0,1">
                    <GradientStop Color="#E0E0E0" Offset="0.0" />
                    <GradientStop Color="#A0A0A0" Offset="1.0" />
                </LinearGradientBrush>
            </Rectangle.Fill>
        </Rectangle>
        <TextBlock Text=""
                   FontSize="12"
                   Canvas.Top="1"
                   Canvas.Left="10"
                   Cursor="Hand"
                   x:Name="text1"/>
        <TextBlock Text=""
                   FontSize="12"
                   Canvas.Top="22"
                   Canvas.Left="10"
                   Height="5"
                   Cursor="Hand"
                   x:Name="text2">
            <TextBlock.Foreground>
                <LinearGradientBrush StartPoint="0,0" EndPoint="0,1">
                    <GradientStop Color="#B0B0B0" Offset="0.0" />
                    <GradientStop Color="#606060" Offset="1.0" />
                </LinearGradientBrush>
            </TextBlock.Foreground>
            <TextBlock.RenderTransform>
                <ScaleTransform ScaleX="1" ScaleY="-0.6"/>
            </TextBlock.RenderTransform>
        </TextBlock>
        <!-- Content End -->
        <Canvas.RenderTransform>
            <ScaleTransform x:Name="lllllscale" ScaleX="1" ScaleY="1" CenterY="10"/>
        </Canvas.RenderTransform>
    </Canvas>
</Canvas>

</Canvas>
If this is the first XAML definition that you see, it may look confusing. But in the end, it is quite simple what happens:
There is a set of Canvas definitions,
each one representing a drawing zone of its own.
There is a rectangle with rounded edges (that is: the button) with a brush definition.
There are two text block definitions holding a text which will later be passed by JavaScript. One text block is the "main text", the other one is a "mirrored text" (the button's text is mirrored in a light gray color).
There is a ScaleTransform at the very
end.
And there is a Storyboard definition
in the resources section, which is used to scale the transformation of the Y
coordinates from 1 to -1 in 400ms, and back. This is what happens when the user
chooses the button: the button flips vertically and goes back to its original
position.
Finally, there is some JavaScript that plays a role: one canvas
contains an event handler MouseLeftButtonDown which calls a method
onMouseLeftButtonDownBUTTON. The implementation of
this method is done in the file creatSilverlight.js. This
is the file from which the control was created.
function onMouseLeftButtonDownBUTTON(sender,eventArgs)
{
    var control = sender.getHost();
    var params = control.initParams;
    // animation
    var flippig = control.content.findName("button_flip");
    flippig.begin();
    // invoke button function
    var methodName = "onButtonPressed"+params;
    var method = window[methodName];
    method();
}
The following happens:
The flipping is started by referencing the corresponding ID "button_flip" from the XAML file and calling the corresponding function.
The method onButtonPressedxxx is
started inside the HTML pages. This is the one that is generated by the control
handler. The method itself is calling a server-side function. It uses the
JavaScript API that is available for Application Designer controls.
There is one thing left which was not mentioned yet: the setting of the button's text. This is done through the following JavaScript implementation:
function onLoadedBUTTON(sender,eventArgs)
{
   var control = sender.getHost();
   var params = control.initParams;
   var cc = window["C_"+params];
    var text1 = control.content.findName("text1");
    text1.text = cc.CASA_name;
    var text2 = control.content.findName("text2");
    text2.text = cc.CASA_name;
    var taw = text1.actualWidth;
    var centeredX = 50 - taw/2;
    text1["Canvas.Left"] = centeredX;
    text2["Canvas.Left"] = centeredX;
}
This is called when the button is loaded inside the Silverlight control. It picks the method name and passes it to the text blocks within the XAML definition.
The implementation of SL_IMAGEOUT is similar to that of SL_BUTTON.
This is the control's editor extension file:
<?xml version="1.0" encoding="UTF-8"?>

<!--
Dynamic extension of editor.xml file.
-->

<controllibrary>
  <editor>

  <!--
  ********************************************************************
  * TAGs
  ********************************************************************
  -->

  <!-- SL_SLIMAGEOUT -->
  <tag name="sl_imageout">
    <attribute name="valueprop"/>
    <attribute name="width" datatype="width"/>
    <attribute name="height" datatype="height"/>
    <taginstance/>
    <protocolitem/>
  </tag>
  <tagsubnodeextension control="itr" newsubnode="sl_imageout"/>
  <tagsubnodeextension control="tr" newsubnode="sl_imageout"/>
  <taggroupsubnodeextension group="Silverlight" newsubnode="sl_imageout"/>

  </editor>
</controllibrary>
The control defines three attributes.
width and height
are used to set the image dimension. valueprop
is used to bind the image's URL to an adapter property.
In the controls palette of the Layout Painter, the control will appear within the section . It can be placed below ITR and TR row containers.
This is the tag handler implementation:
package com.softwareag.cis.gui.generate;

import org.xml.sax.AttributeList;

import com.softwareag.cis.gui.protocol.ProtocolItem;

public class SL_IMAGEOUTHandler implements ITagHandler
{
    String m_valueprop;
    String m_width = "300";
    String m_height= "300";

    // ------------------------------------------------------------------------
    // public usage
    // ------------------------------------------------------------------------

    public void generateHTMLForStartTag(int id,
                                        String tagName,
                                        AttributeList attrlist,
                                        ITagHandler[] handlersAbove,
                                        StringBuffer sb,
                                        ProtocolItem protocolItem)
    {
        readAttributes(attrlist);
        fillProtocol(protocolItem);
        generateXSD(protocolItem);
        // create HTML
        sb.append("<!-- SL_IMAGEOUT begin -->\n");
        sb.append("<td width='"+m_width+"'><div id='C"+id+"' style='width:"+m_width+"; height:"+m_height+"'/></td>\n");
        sb.append("<script>\n");
        sb.append("var s_vv"+id+" = 'inittini';\n");
        sb.append("function romu"+id+"()\n");
        sb.append("{\n");
        sb.append(  "var vv = C.getPropertyValue('"+m_valueprop+"');\n");
        sb.append(  "if (vv == s_vv"+id+") return;\n");
        sb.append(  "s_vv"+id+" = vv;\n");
        sb.append(  "displayImageIMAGEOUT(C"+id+",vv);\n");
        sb.append("}\n");
        sb.append("</script>\n");
    }

    public void generateHTMLForEndTag(String tagName, StringBuffer sb)
    {
        sb.append("<!-- SL_IMAGEOUT end -->\n");
    }

    public void generateJavaScriptForInit(int id,
                                          String tagName,
                                          StringBuffer sb)
    {
        sb.append("if (firstusage) C_"+id+" = document.getElementById('C"+id+"');\n");
        sb.append("if (firstusage) C_"+id+".CASA_width='"+m_width+"';\n");
        sb.append("if (firstusage) C_"+id+".CASA_valueprop='"+m_valueprop+"';\n");
        sb.append("if (firstusage) C_"+id+".CASA_width='"+m_width+"';\n");
        sb.append("if (firstusage) C_"+id+".CASA_height='"+m_height+"';\n");
        sb.append("if (firstusage) createMySilverlightControl('../HTMLBasedGUI/silverlight/SL_IMAGEOUT.xaml',C_"+id+",'"+id+"','"+m_width+"','"+m_height+"');\n");
        sb.append("if (firstusage) C.registerListener(romu"+id+");\n");
    }

    // ------------------------------------------------------------------------
    // private usage
    // ------------------------------------------------------------------------

    /** */
    private void readAttributes(AttributeList attrlist)
    {
        for (int i=0; i<attrlist.getLength(); i++)
        {
            if (attrlist.getName(i).equals("valueprop")) m_valueprop = attrlist.getValue(i);
            if (attrlist.getName(i).equals("width")) m_width = attrlist.getValue(i);
            if (attrlist.getName(i).equals("height")) m_height = attrlist.getValue(i);
        }
    }

    /** */
    private void fillProtocol(ProtocolItem pi)
    {
        pi.addProperty(m_valueprop);
    }

    /** */
    private void generateXSD(ProtocolItem pi)
    {
        XSDGenerationAddon xga = (XSDGenerationAddon)pi.findGenerationAddon(XSDGenerationAddon.class);
        if (xga != null)
        {
            xga.addSimpleData(pi,m_valueprop);
        }
    }

}
This is similar to SL_BUTTON. However, there is a
romuxxx function generated and registered via
C.registerListener(). This function is called every
time a response is processed within the client. Inside the method, the data
that was updated by the response is checked whether it contains a new image to
be displayed in the control.
Now, let us have a look at the XAML implementation:
<Canvas
   xmlns="http://schemas.microsoft.com/client/2007"
   xmlns:x="http://schemas.microsoft.com/winfx/2006/xaml"
   Loaded="loadedIMAGEOUT">

        <Canvas.Resources>
            <Storyboard x:Name="thestoryboard1"
                        Completed="completedIMAGEOUT">
                <DoubleAnimation
                    Storyboard.TargetName="tr"
                    Storyboard.TargetProperty="Angle"
                    From="0.0" To="45" Duration="0:0:0.400" AutoReverse="False"/>
                <DoubleAnimation
                    Storyboard.TargetName="ts"
                    Storyboard.TargetProperty="ScaleX"
                    From="1" To="0" Duration="0:0:0.400" AutoReverse="False"/>
                <DoubleAnimation
                    Storyboard.TargetName="ts"
                    Storyboard.TargetProperty="ScaleY"
                    From="1" To="0" Duration="0:0:0.400" AutoReverse="False"/>
                <DoubleAnimation
                    Storyboard.TargetName="ts"
                    Storyboard.TargetProperty="CenterY"
                    From="0" To="500" Duration="0:0:0.400" AutoReverse="False"/>
                <DoubleAnimation
                    Storyboard.TargetName="ts"
                    Storyboard.TargetProperty="CenterX"
                    From="0" To="500" Duration="0:0:0.400" AutoReverse="False"/>
            </Storyboard>
            <Storyboard x:Name="thestoryboard2">
                <DoubleAnimation
                    Storyboard.TargetName="tr"
                    Storyboard.TargetProperty="Angle"
                    From="45" To="0" Duration="0:0:0.400" AutoReverse="False"/>
                <DoubleAnimation
                    Storyboard.TargetName="ts"
                    Storyboard.TargetProperty="ScaleX"
                    From="0" To="1" Duration="0:0:0.400" AutoReverse="False"/>
                <DoubleAnimation
                    Storyboard.TargetName="ts"
                    Storyboard.TargetProperty="ScaleY"
                    From="0" To="1" Duration="0:0:0.400" AutoReverse="False"/>
                <DoubleAnimation
                    Storyboard.TargetName="ts"
                    Storyboard.TargetProperty="CenterY"
                    From="500" To="0" Duration="0:0:0.400" AutoReverse="False"/>
                <DoubleAnimation
                    Storyboard.TargetName="ts"
                    Storyboard.TargetProperty="CenterX"
                    From="500" To="0" Duration="0:0:0.400" AutoReverse="False"/>
            </Storyboard>
        </Canvas.Resources>

        <Rectangle Canvas.Top="0"
                   Canvas.Left="0"
                   Width="300"
                   Height="300"
                   Stroke="#606060"
                   StrokeThickness="1"
                   RadiusX="10"
                   RadiusY="10">
            <Rectangle.Fill>
                <LinearGradientBrush StartPoint="0,0" EndPoint="0,1">
                    <GradientStop Color="#E0E0E0" Offset="0.0" />
                    <GradientStop Color="#909090" Offset="1.0" />
                </LinearGradientBrush>
            </Rectangle.Fill>
        </Rectangle>


        <Canvas Canvas.Top="10"
                Canvas.Left="10"
                Width="280"
                Height="280">
            <Rectangle Canvas.Top="0"
                       Canvas.Left="0"
                       Width="280"
                       Height="280"
                       Cursor="Hand">
                <Rectangle.Fill>
                    <LinearGradientBrush StartPoint="0,0" EndPoint="0,1">
                        <GradientStop Color="#808080" Offset="0.0" />
                        <GradientStop Color="#000000" Offset="1.0" />
                    </LinearGradientBrush>
                </Rectangle.Fill>
            </Rectangle>
            <Canvas Canvas.Top="0"
                    Canvas.Left="0"
                    Width="280"
                    Height="280">
                <Canvas.Background>
                    <ImageBrush x:Name="imagebrush" ImageSource="../HTMLBasedGUI/silverlight/SL_IMAGEOUT_empty.jpg" />
                </Canvas.Background>
                <Canvas.RenderTransform>
                    <TransformGroup>
                    <ScaleTransform x:Name="ts" ScaleX="1" ScaleY="1" CenterY="0"/>
                    <RotateTransform x:Name="tr" Angle="0"/>
                    </TransformGroup>
                </Canvas.RenderTransform>
            </Canvas>
        </Canvas>

</Canvas>
There is a set of canvas definitions (see the screenshot at the very beginning of this document: the image is embedded in some kind of frame). The most important one is located at the bottom: it uses an "ImageBrush" in order to paint its content (this means: an image appears in the content).
There is a set of animations (two storyboards) which define that the image rolls out and in by doing a scale transformation and a rotate transformation simultaneously.
The following is the JavaScript code which does the binding from JavaScript to Silverlight:
function displayImageIMAGEOUT(cc,imageName)
{
	if (imageName == null || imageName == "")
	{
		return;
	}
	cc.CASA_imageName = imageName;
	if (cc.CASA_control == undefined) // not yet initialized
	{
		return;
	}
	var control = cc.CASA_control;
	// start the hide storyboard
    var tsb = control.content.findName("thestoryboard1");
    tsb.begin();
}

function loadedIMAGEOUT(sender,args)
{
    var control = sender.getHost();
	var params = control.initParams;
	var cc = window["C_"+params];
	cc.CASA_control = control;
	if (cc.CASA_imageName != null)
		displayImageIMAGEOUT(cc,cc.CASA_imageName);
}

function completedIMAGEOUT(sender,args)
{
    var control = sender.getHost();
	var params = control.initParams;
	var cc = window["C_"+params];
    var ib = control.content.findName("imagebrush");
    ib.imageSource = cc.CASA_imageName;
    var tsb = control.content.findName("thestoryboard2");
    tsb.begin();
}
When a new image needs to be displayed, the
displayImageIMAGEOUT method is called. This is the one
which is referenced by the romuxxx method which itself
is called when a response is processed on the client side.
The displayImageIMAGEOUT method triggers
the animation thestoryboard1. This animation takes the current
image out (that is: it rotates and shrinks it). At the end of the animation, an
event is raised which then calls the function completedIMAGEOUT.
In the completedIMAGEOUT method, the new image is
defined in the brush, and the animation is started to roll the new image
in.