
This document covers the following topics:
Application Designer follows the commonly accepted paradigm of separating the layout (view) as much as possible from the application logic (model). You design the layout using the WYSIWYG Layout Painter. The result is kept in an XML layout description file. The HTML page is generated out of the XML layout description. On the one hand, the XML layout contains the used controls of a page; on the other hand, it keeps information about how these controls are bound to properties and methods of a server-side Java adapter. The class does not provide a large amount of logic - but connects to existing application logic. You generate the necessary property and method code inside the adapter class with the Code Assistant (which is part of the Layout Painter).
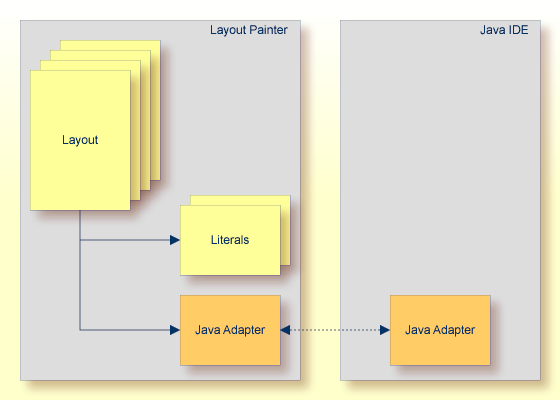
In addition, the XML layout may optionally contain so called "literals". Literals are text identifiers (text IDs) that are replaced at runtime with language-specific texts. For each language you want to support, there must be a comma-separated value (CSV) file that contains the language-specific text per literal. You maintain these translation files using the Literal Assistant (which is also part of the Layout Painter).
You can create a layout in different ways:
When the Layout Painter is not yet active, you can create a layout from the navigation frame.
When you create a layout in this way, a new instance of the Layout Painter is invoked. This has the advantage that more than one layout can be active in the development workplace at the same time. When you create a layout directly from the Layout Painter, the previously active layout is closed.
When the Layout Painter is already active, you can create a layout directly from the Layout Painter.
You can create a layout from the Layout Manager. See Invoking the Layout Painter in the section Layout Manager.
 To create a layout from the navigation frame
In the navigation frame, choose the button for the project that is to contain the new layout.
Choose the New Layout command in the navigation frame.
The following dialog appears, providing several tabs from which you can select a layout template. A default file name for your new layout is automatically provided.
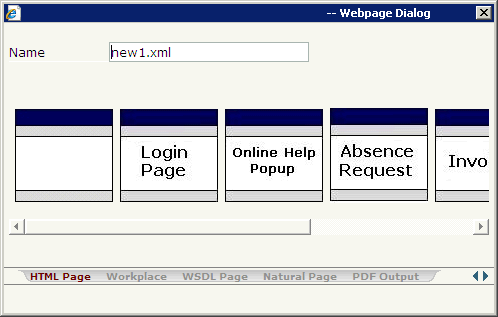
In the Name text box, enter the name of the file that is to contain your layout definition. The name must end with ".xml".
Select the layout template that you want to use.
When you move the mouse pointer over a template, a tool tip appears indicating the type of template (for example, "HTML Page"). See also Layout Templates.
The Layout Painter appears (see below).
To create a layout directly from the Layout Painter
From the tab of the Layout Painter, choose .
If your latest changes to your current layout have not yet been saved, a message box appears and you can decide whether to save your data, lose your data, or to go back to the unsaved layout.
When you decide to save or lose data in the above mentioned message box, or when this message box does not appear since all data have already been saved, the dialog appears in which you have to enter the name of the file that is to contain your layout definition (see above).
Enter a file name and select the template that you want to use.
When you create a layout, you have to select a layout template. The following types of layout templates are available:
HTML Page
Different templates are available which have the PAGE control
as the top node. See Typical Page
Layout in the Layout Elements
documentation for further information.
For information on the Online Help Pop-up template, see Customizing the Online Help Pop-up in Online Help Management.
Workplace
These templates are used for arranging Application Designer pages in a
frameset. They have the MFPAGE control as the top node. See
Multi Frame
Pages in the Working with Pages
documentation for further information.
Natural Page
These templates are used to create pages for Natural for Ajax.
They have the NATPAGE control as the top node. See the Natural for Ajax
documentation for further information.
PDF Output
This template is used for integrating a PDF document into an
Application Designer page. It has the CISFO:FOPPAGE2 control as the top node. See the
PDF and FOP
Services documentation for further information.
You can open an existing layout in different ways:
When the Layout Painter is not yet active, you can open a layout from the navigation frame.
When you open a layout in this way, a new instance of the Layout Painter is invoked. This has the advantage that more than one layout can be active in the development workplace at the same time. When you open a layout directly from the Layout Painter, the previously active layout is closed.
When the Layout Painter is already active and you want to open another layout, you can open it directly from the Layout Painter.
You can open a layout from the Layout Manager. See Invoking the Layout Painter in the section Layout Manager.
To open a layout from the navigation frame
In the navigation frame, choose the button for the project which contains your layout.
The existing layouts are contained in the Layouts node.
If the layouts are grouped into folders, open the folder which contains your layout. See also Preferences.
Select the name of your layout.
The Layout Painter appears (see below).
To open another layout in the Layout Painter
From the tab of the Layout Painter, choose .
If your latest changes to your current layout have not yet been saved, a message box appears and you can decide whether to save your data, lose your data, or to go back to the unsaved layout.
When you decide to save or lose data in the above mentioned message box, or when this message box does not appear since all data have already been saved, the dialog appears listing a layouts that have been defined for the current project.
Choose the layout that you want to open.
The Layout Painter appears when you create a new layout or when you modify an existing layout. The following is an example for the template type "HTML Page":

The Layout Painter is subdivided into several areas:
The layout tree is located on the left side of the Layout Painter. It contains the controls that represent the XML layout definition. You drag these controls from the controls palette into the layout tree. Each node in the layout tree represents an XML tag.
Using the button which is located to the right of the layout tree's title bar, you can hide the layout tree and the properties area. This enlarges the preview area. To redisplay the layout tree and property area, choose the small arrow which is shown in the left of the preview area's title bar.
The properties area is located below the layout tree. In this area, you specify the properties for the control which is currently selected in the layout tree.
The preview area is located in the middle of the Layout Painter. The following can be shown in the preview area:
| HTML Preview | Shows the page which is created using the controls in the layout area. This page is refreshed when you choose the preview button. See Defining the XML Layout for further information. |
|---|---|
| Code Assistant | Helps you to write the adapter code.
You can generate set/get
methods and event-reaction methods based on your layout definitions. See
Using the Code
Assistant for further information.
|
| Literal Assistant | Helps you to prepare your layout for multiple languages. You can maintain texts of different languages for the literals that are referenced within the XML layout. See Using the Literal Assistant for further information. |
| XML Binding | Helps you if you want to use XML files in order to access property values. See Using the XML Binding Tool for further information. |
Using the toggle button which is located to the right of the preview area's title bar, you can
enlarge the preview area so that it takes up the space of the layout tree, property area and controls palette, and
reduce the enlarged preview area so that the layout tree, property area and controls palette are shown again.
The controls palette is located on the right side of the Layout Painter. It contains icons which represent the Application Designer controls. The controls palette is structured into sections (for example, and ), where each section represents a certain type of control.
The sections that are shown in the controls palette and the content of a section depend on the layout template that has been used for the current layout.
A tool tip is provided which appears when you move the mouse pointer over a control. This tool tip also displays the XML tag which will be used in the XML layout.