
The Code Assistant is part of the Layout Painter. You can use it to speed up the development of your Java adapter classes: you can generate code for the properties and methods that are referenced within the XML layout. The compilation of the adapter class is later done within your Java development environment.
The following topics are covered below:
Before you open the Code Assistant, make sure that the
model property of the page contains the correct
adapter class. The default entry for this property is
"DummyAdapter".
The Code Assistant looks in the source directory for the adapter class
you have set with the model property. If the class
cannot be found, the Code Assistant loads a code template. The template is
stored in the Application Designer configuration directory
<your-webapplication>/cis/config and it has the name
adapterTemplate.java. You can change this template
according to your needs.
In order to read and write source code, the Code Assistant needs to know where the Java sources are kept. This information has to be specified for each project.
When you open the Code Assistant for the first time, a message appears in the status bar indicating that the Code Assistant is not available and that the Java source directory has not been set. In this case, you have to proceed as described under Preferences in the section Configuration, Log and Status Information.
![]() To open the Code Assistant
To open the Code Assistant
From the tab of the Layout Painter, choose .
When the Java source directory can be found, the Code Assistant is shown in the preview area. For example:
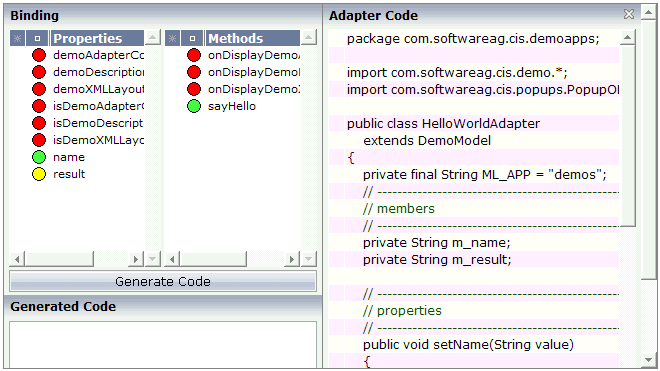
The binding area at the top left of the Code Assistant lists all properties and methods that are used in the XML layout. Colored dots are shown in front of each property and method. The color of the dot indicates whether the Code Assistant could find the corresponding coding within your source code.
Introspection is done by reading and interpreting the code. Comments that highlight properties or methods are not necessary.
Possible dot colors for properties:
| Green | The property's get and
set methods are available.
|
|---|---|
| Yellow | The set method is
required but could not be located. The get method is
fine.
|
| Red | The get method could
not be found.
|
Possible dot colors for methods:
| Green | The method is available. |
|---|---|
| Red | The method could not be found. |
When you select a property or method in the binding area, the corresponding node is automatically selected in the layout tree and the properties for this node are shown in the properties area.
In addition, when code has already been generated for the selected property or method (see below), the corresponding line is automatically selected in the adapter code which is shown at the right of the Code Assistant.
The properties and methods which cannot be found in the adapter code are indicated by red dots.
When you generate code, a framework for the property or method is generated in the adapter code.
![]() To generate code
To generate code
Select the property or method for which you want to generate code.
You can also use the SHIFT or CTRL key to select multiple entries.
Choose the button.
The generated code appears in the area below this button.
Check whether you really want to insert these statements into your source code. You can modify or delete the code. Any code that you manually enter here will be taken over.
Optional. Choose the or button to add or remove a tab at the beginning of the code. This applies to all code which is currently shown in the Generated Code area.
Note:
The number of spaces per tab is determined by the corresponding
option in the Configuration
dialog.
In the Adapter Code area on the right, select the line below which you want to insert the code.
Choose the button to insert the code below the selected line.
The color of the dot changes from red to green. This indicates that the corresponding methods are now available in the adapter code.
Save your changes.
Note:
It is recommended that you save your changes each time you switch
from the Code Assistant to another tool which may be shown in the preview area,
and vice versa.
You can invoke a context menu in the Adapter Code area. When you choose a command from this context menu, it is applied to the current selection. Using CRTL or SHIFT, you can select more than one line. Each selected line is indicated by an arrow which is shown at the beginning of the line.
The context menu provides the following commands:
| Command | Description |
|---|---|
| Removes a tab from the beginning of the selected line(s). | |
| Adds a tab to the beginning of the selected line(s). | |
| Cuts the selected line(s). | |
| Copies the selected line(s). | |
| Only available after a cut or copy operation. Pastes the cut or copied line(s) below the currently selected line. | |
| Removes the selected line(s). |
Note:
The number of spaces per tab is determined by the corresponding
option in the Configuration
dialog.
You save the adapter code by choosing the save button. On such an event, the Code Assistant checks whether there are unsaved changes. If yes, the adapter code is written back to the file system - otherwise, the file is not touched.
Each time you choose the preview button, the Code Assistant checks whether the file has changed on the file system. Therefore, the file attribute "last modified" is examined (not the file content). If the Code Assistant notices a file change, it checks whether it is holding own unsaved changes. If not, the class code is reloaded from the file system. If you have done changes in parallel (within your Java development environment and the Code Assistant) a dialog appears. Choose either to reload the file from disk (and lose the changes you have done within the Code Assistant) or to keep the Code Assistant changes (and lose the outside changes on the next save).
Note:
You have to take care that the following case never occurs: the file
has changed on file system and the Code Assistant has its own unsaved changes.
Of course, it is reasonable to open the class both in your Java development
environment and in the Code Assistant. It is recommended that you save or
discard changes before you switch from the Code Assistant to your Java
development environment (or vice versa). Otherwise, you will lose one of your
changes.