
This document covers the following topics:
These examples assume that you expect the label of an input field not at the left of the field but above the field (two separate rows). Furthermore, you want to have several such fields within a single row (inline control).
For these examples, you will proceed as follows:
You create your own editor extension with the name editor_test.xml.
Important:
Do not use the Application Designer editor extensions for your own
controls. Place your own controls within your own extension file. Thus, there
will be no conflicts when upgrading your installation to a newer
build.
You build a control named DLFIELD (double line field) which will be available in the control library "test". Therefore, you have to name your control "test:dlfield". See also Library Concept in Custom Controls.
You define a macro control which determines that the control consists of two rows, one for the label and another for the field. The rows themselves are placed into a column container.
The composition of controls looks roughly like this:
COLTABLE0
  TR
    LABEL
  TR
    FIELD
The definition of a control with a corresponding tag handler is quite simple. It consists of
the name of the control,
the list of attributes, and
the list of embedding container controls.
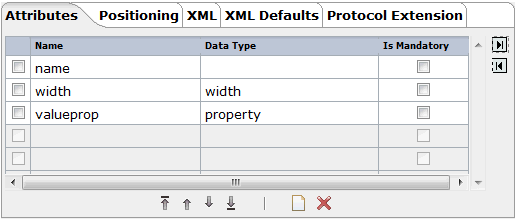
You will now define a control with the following properties:
name (label name),
width (width of column container) and
valueprop (name of the adapter property to which
the field is bound). The control will be available within the row containers TR
and ITR.
Note:
For further information on the tag handler, see
Control
Concept in Custom Controls.
![]() To define a new control
To define a new control
Invoke the Control Editor.
Create your own editor extension with the name editor_test.xml
Add a new control with the name "test:dlfield".
Note:
The editor extension editor_demo.xml
contains a control with the name "demo:dlfield".
When you have completed the example, your new
"test:dlfield" extension should be similar to
"demo:dlfield".
Select your new control in the tree.
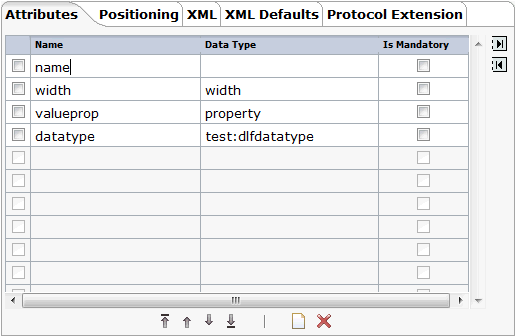
To create the list of attributes, specify the following information on the Attributes tab:
Specify the following information on the Positioning tab:
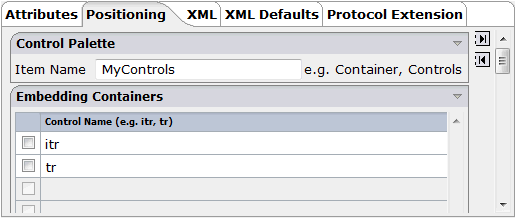
This determines that your control can be selected from the section of the controls palette and that it can be inserted into the row containers TR and ITR.
Save your changes.
Have a look at the generated XML file (editor_test.xml). It should look as follows:
<?xml version="1.0" encoding="UTF-8"?>

<!--
Dynamic extension of editor.xml file.
-->

<controllibrary>
  <editor>

  <!--
  *****************************************************************************
  * DATATYPEs
  *****************************************************************************
  -->


  <!--
  *****************************************************************************
  * TAGs
  *****************************************************************************
  -->

  <!-- TEST:DLFIELD -->
  <tag name="test:dlfield">
    <attribute name="name"/>
    <attribute name="width" datatype="width"/>
    <attribute name="valueprop" datatype="property"/>
    <taginstance>
    </taginstance>
    <protocolitem>
    </protocolitem>
  </tag>
  <tagsubnodeextension control="itr" newsubnode="test:dlfield"/>
  <tagsubnodeextension control="tr" newsubnode="test:dlfield"/>

  <taggroupsubnodeextension group="MyControls" newsubnode="test:dlfield"/>

  </editor>
</controllibrary>
You can define a macro control as XML without any additional coding. The basic specification for a macro control defined as XML is the same as the specification for a control to which also a tag handler is applied. It consists of:
the name of the control,
the list of attributes, and
the list of embedding container controls.
In addition, you define the following:
the XML for the control,
additional properties and methods (optional), and
additional JavaScript libraries (optional).
With the definition of a macro control, you describe how the control is composed out of other controls. An attribute of the macro control can be referenced by enclosing the attribute name in "$" characters (for example, "$myattribute$").
With a simple macro control, no further information is required.
Additional data (additional properties, methods, libraries) is only required if you want to bind the control to a so-called "server-side representative". The control's properties and methods are bound to a dedicated Java class. Within this class, you typically encapsulate certain tasks/functionality used by the control.
The following topics are covered below:
You will now continue with the "test:dlfield" control from the previous example.
You will add an XML definition to the "test:dlfield" control which defines the following:
The control consists of a row for the label and a second row for the field.
The rows themselves are placed into a column container.
The property width is delegated
to the column container. The label and field have a width of 100%.
The property name is delegated
to the corresponding property of the label.
The property valueprop is
delegated to the corresponding property of the field.
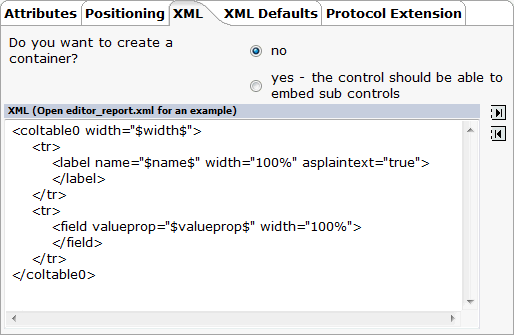
The XML for the macro control looks like this:
<coltable0 width="$width$">
    <tr>
        <label name="$name$" width="100%" asplaintext="true">
        </label>
    </tr>
    <tr>
        <field valueprop="$valueprop$" width="100%">
        </field>
    </tr>
</coltable0>
![]() To define the XML of the macro control
To define the XML of the macro control
Specify the above XML on the XML tab of the "test:dlfield" control.
The tab should now look as follows:
Save your changes.
Have a look at the generated XML file (editor_test.xml). It should now look as follows:
<?xml version="1.0" encoding="UTF-8"?>

<!--
Dynamic extension of editor.xml file.
-->

<controllibrary>
  <editor>

  <!--
  *****************************************************************************
  * DATATYPEs
  *****************************************************************************
  -->


  <!--
  *****************************************************************************
  * TAGs
  *****************************************************************************
  -->

  <!-- TEST:DLFIELD -->
  <tag name="test:dlfield">
    <attribute name="name"/>
    <attribute name="width" datatype="width"/>
    <attribute name="valueprop" datatype="property"/>
    <taginstance>
        <coltable0 width="$width$">
        <tr>
        <label name="$name$" width="100%" asplaintext="true">
        </label>
        </tr>
        <tr>
        <field valueprop="$valueprop$" width="100%">
        </field>
        </tr>
        </coltable0>
    </taginstance>
    <protocolitem>
    </protocolitem>
  </tag>
  <tagsubnodeextension control="itr" newsubnode="test:dlfield"/>
  <tagsubnodeextension control="tr" newsubnode="test:dlfield"/>

  <taggroupsubnodeextension group="MyControls" newsubnode="test:dlfield"/>

  </editor>
</controllibrary>
The control is now ready for use. The Layout Painter will offer the control for the containers ITR and TR.
This example demonstrates how to build a macro control that refers to a server-side representative.
The server-side representative class
DLFIELDInfo described below is specific for custom
controls used within PAGE layouts. In addition, the Code Assistant support
described below is only available in PAGE layouts.
For NATPAGE layouts, you can also implement server-side representative classes. These are the so-called "binding classes" (see also Binding Concept in the Custom Controls documentation which is part of the NaturalONE documentation).
It is important that the server-side representative classes for controls in PAGE layouts are different from the binding classes of custom controls in NATPAGE layouts. For binding classes of custom controls used within NATPAGE layouts, see the examples in the Natural for Ajax demos.
You will now extend the "test:dlfield" control from the previous example as follows:
If the field is used to enter a country or language, it provides a value help.
For reuse, the computation of valid values is encapsulated
within a server-side representative (Java class
DLFIELDInfo).
The field (i.e. the properties
valueprop and
popupprop) is bound to properties of class
DLFIELDInfo.
Thus, the page adapter just has to provide for a
DLFIELDInfo object; it does not have to compute the
value help by itself.
![]() To define a macro control with a server-side
representative
To define a macro control with a server-side
representative
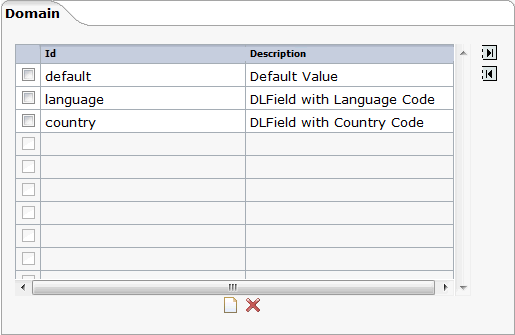
Add a new data type with the name "test:dlfdatatype".
Select the new data type in the tree.
Specify the following values on the Domain tab:
Select the control "test:dlfield" in the tree.
On the Attributes tab, add the
attribute datatype and define
"test:dlfdatatype" as the data type.
Until now, you have used the attribute
valueprop to bind the field's input value to an
adapter property.
Using the server-side representative concept, the adapter
now provides a property (referenced by the property
valueprop) that returns an instance of such a
representative (DLFIELDInfo). The field value and the
value help are handled within that class. The following shows the coding of the
class DLFIELDInfo:
package com.softwareag.cis.test35;

import com.softwareag.cis.server.util.ValidValueLine;
import java.util.*;
import com.softwareag.cis.server.*;
import com.softwareag.cis.server.util.*;
import com.softwareag.cis.util.*;

public class DLFIELDInfo
{
	private final static String ML_APP = "release35";
	private Adapter m_adapter;

	//Constructor

	public DLFIELDInfo(Adapter adapter)
	{
		m_adapter = adapter;
	}

    // ------------------------------------------------------------------------
    // properties
    // ------------------------------------------------------------------------

    // property >fieldValue<
    String m_fieldValue;
    public String getFieldValue() { return m_fieldValue; }
    public void setFieldValue(String value) { m_fieldValue = value; }

    // property >hasPopupHelp<
    public boolean getHasPopupHelp()
    {
        return m_fieldDatatype != null &&
               m_fieldDatatype.length() != 0;
    }

    // property >fieldDatatype<
    String m_fieldDatatype;
    public String getFieldDatatype() { return m_fieldDatatype; }
    public void setFieldDatatype(String value) { m_fieldDatatype = value; }

    // ------------------------------------------------------------------------
    // methods
    // ------------------------------------------------------------------------

    /** */
    public ValidValueLine[] findValidValuesForFieldValue()
    {
    	String text1 = m_adapter.replaceLiteral(ML_APP, "dlfi_code_1");
    	String text2 = m_adapter.replaceLiteral(ML_APP, "dlfi_code_2");
    	String text3 = m_adapter.replaceLiteral(ML_APP, "dlfi_code_3");
    	String text4 = m_adapter.replaceLiteral(ML_APP, "dlfi_code_4");
    	String text5 = m_adapter.replaceLiteral(ML_APP, "dlfi_code_5");
    	String text6 = m_adapter.replaceLiteral(ML_APP, "dlfi_code_6");
    	String text7 = m_adapter.replaceLiteral(ML_APP, "dlfi_code_7");
    	String text8 = m_adapter.replaceLiteral(ML_APP, "dlfi_code_8");
    	String text9 = m_adapter.replaceLiteral(ML_APP, "dlfi_code_9");
    	String text10 = m_adapter.replaceLiteral(ML_APP, "dlfi_code_10");

        if (m_fieldDatatype != null &&
            m_fieldDatatype.equalsIgnoreCase(text1))
        {
            return new ValidValueLine[]
            {
                  new ValidValueLine(text2, text3),
                  new ValidValueLine(text4, text5)
            };
        }
        if (m_fieldDatatype != null &&
                m_fieldDatatype.equalsIgnoreCase(text6))
        {
            return new ValidValueLine[]
            {
                  new ValidValueLine(text2, text7),
                  new ValidValueLine(text8, text9)
            };
        }
        throw new Error(text10);
    }
}
Select the XML tab and change the existing macro as follows:
<coltable0 width="$width$">
    <tr>
        <label name="$name$" width="100%" asplaintext="true">
        </label>
    </tr>
    <tr>
        <field valueprop="$valueprop$.fieldValue" popupmethod="openIdValueCombo" popupprop="$valueprop$.hasPopupHelp" width="100%">
        </field>
    </tr>
</coltable0>
Add the used properties to the Protocol Extension tab so that it looks as follows.
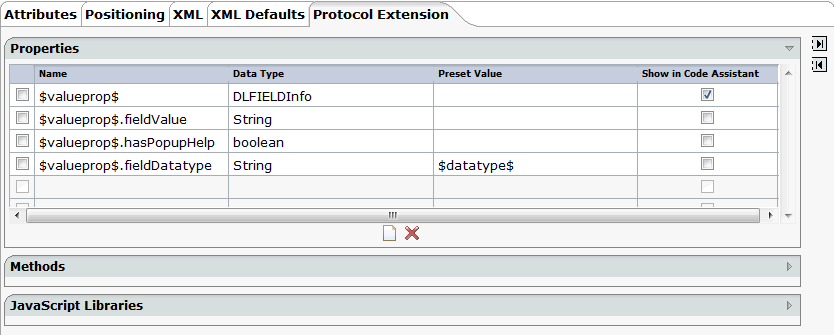
The properties $valueprop$,
$valueprop$.fieldValue and
$valueprop$.hasPopupHelp will be included in the
access path of the layout.
You can specify whether a property is to be shown within
the Code Assistant of the Layout Painter. Select only the properties that must be
provided by the adapter itself (in this example, this is property
$valueprop$). Do not select the properties that
are provided by the control representative. This class is written once and used
multiple times within your adapters.
The property
$valueprop$.fieldDatatype is used to pass the
value of the attribute datatype from the control
to the class DLFIELDInfo. The value is set once when the
page is loaded. With this, the DLFIELDInfo class
determines whether pop-up help is available and computes the list of valid
values for the pop-up help.
Save your changes.
Have a look at the generated XML file (editor_test.xml). It should now look as follows:
<?xml version="1.0" encoding="UTF-8"?>

<!--
Dynamic extension of editor.xml file.
-->

<controllibrary>
  <editor>

  <!--
  *****************************************************************************
  * DATATYPEs
  *****************************************************************************
  -->

  <!-- TEST:DLFDATATYPE -->
  <datatype name="test:dlfdatatype">
    <value id="default" name="Default Value."/>
    <value id="language" name="DLFIELD with Language Code."/>
    <value id="country" name="DLFIELD with Country Code."/>
  </datatype>


  <!--
  *****************************************************************************
  * TAGs
  *****************************************************************************
  -->

  <!-- TEST:DLFIELD -->
  <tag name="test:dlfield">
    <attribute name="name"/>
    <attribute name="width" datatype="width"/>
    <attribute name="valueprop" datatype="property"/>
    <attribute name="datatype" datatype="test:dlfdatatype"/>
    <taginstance>
        <coltable0 width="$width$">
        <tr>
        <label name="$name$" width="100%" asplaintext="true">
        </label>
        </tr>
        <tr>
        <field valueprop="$valueprop$.fieldValue" popupmethod="openIdValueCombo" popupprop="$valueprop$.hasPopupHelp" width="100%">
        </field>
        </tr>
        </coltable0>
    </taginstance>
    <protocolitem>
        <addproperty name="$valueprop$" datatype="DLFIELDInfo" useincodegenerator="true"/>
        <addproperty name="$valueprop$.fieldValue" datatype="String"/>
        <addproperty name="$valueprop$.hasPopupHelp" datatype="boolean"/>
        <addproperty name="$valueprop$.fieldDatatype" datatype="String" presetvalue="$datatype$"/>
    </protocolitem>
  </tag>
  <tagsubnodeextension control="itr" newsubnode="test:dlfield"/>
  <tagsubnodeextension control="tr" newsubnode="test:dlfield"/>

  <taggroupsubnodeextension group="MyControls" newsubnode="test:dlfield"/>

  </editor>
</controllibrary>
The control is now ready for use. The Layout Painter will offer the control for the containers ITR and TR.
If you are working with NaturalONE, see the macro control examples of the Natural for Ajax demos.
If you have also installed the standalone version of Natural for Ajax, you can find the sources of the above described DLFIELD example in the cisdemos:
<your-webapplication>/cisdemos/xml/35_dlfield.xml
<your-webapplication>/cisdemos/src/com/softwareag/cis/test35/DLFIELDAdapter.java
<your-webapplication>/cisdemos/src/com/softwareag/cis/test35/DLFIELDInfo.java