Before you start coding, you have to make specific definitions in Application Designer and in your development environment for Java.
This document contains the following exercises:
You have to define the source directory into which the adapter classes for your project are to be written. This directory will be used by the Code Assistant that you will use later in this tutorial.
![]() To set up Application Designer
To set up Application Designer
Create a new directory with the name "src" in the directory that has been created for your project; that is: go to the directory <installdir>/tomcat/webapps/cis/cisyourfirstproject and create the directory /src.
From the tab of the Layout Painter, choose .
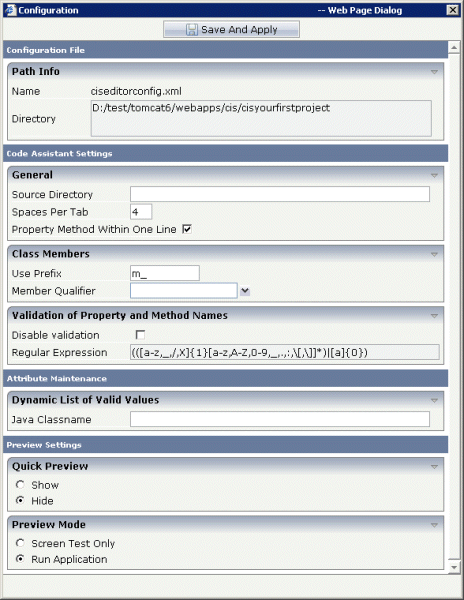
The following dialog appears:

In the Source Directory field, specify the path to the src directory you have just created.
Note:
By default, the prefix "m_" is defined
in this dialog. This prefix is used for all properties in the adapter
class.
Choose the button.
Typically, development environments provide project management to define project settings.
![]() To set up your development environment for Java
To set up your development environment for Java
Create a new Java project.
It is recommended that you use the same project name as in your Application Designer project. For this tutorial, you should therefore create a Java project with the name "cisyourfirstproject".
Include the file cis.jar in the required libraries of your project. You find this file in the following Application Designer directory:
<installdir>/tomcat/webapps/cis/WEB-INF/lib
Include the file servlet-api.jar in the required libraries of your project. You find this file in the following Application Designer directory:
<installdir>/tomcat/common/lib
Set up the output path (i.e. the path where the compiled classes will be located) so that it points to the following directory:
<installdir>/tomcat/webapps/cis/cisyourfirstproject/appclasses/classes
You can now proceed with the next exercise: Writing the Adapter Code.