This document provides a brief tutorial in which you get to know all important steps for creating a PDF document that is rendered inside the browser. The tutorial describes how to do this using the development workplace. It is required that you have a basic understanding of Application Designer.
The following topics are covered:
The following steps are required to create a PDF document:
Create the XML form.
Create the Java class that provides the data objects for the XML form.
Call the APIs to generate PDF.
Integrate the PDF into an Application Designer page.
The result of this tutorial will be the following document:
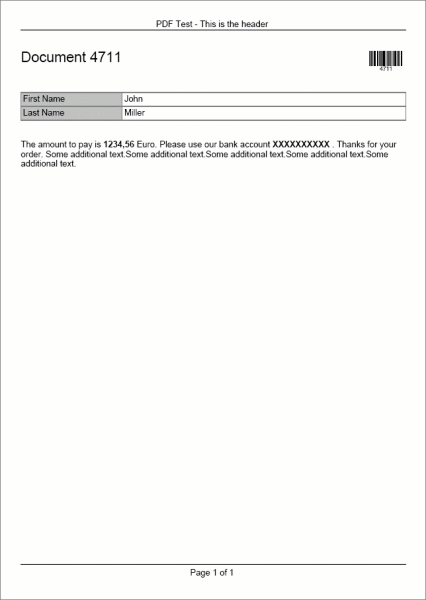
The document contains the following:
Header, footer, body.
Differently formatted texts.
Barcode.
Table of data.
Some flat text containing dynamic data.
Start the Application Designer development workplace (http://localhost:51000/cis/HTMLBasedGUI/workplace/ide.html) and open a project in the navigation frame (this tutorial uses the project "cisyourfirstproject").
Create a new layout. In the resulting dialog, enter a name (for example, "pdftest.xml") for the XML form definition and select the layout template for the PDF output. A new layout will be opened and preloaded with template information.
The Layout Painter is now used in the same way as you normally use it for creating Application Designer HTML pages. When you preview the layout in the Layout Painter, Adobe Reader is opened in the preview area, displaying the current XML form definition.
By adding controls into the template's control structure, you can modify the rendering result accordingly. Use the editor functions to create the following XML form definition:
<cisfo:foppage2 objectclass="PDFDataObject" pageheight="29.7cm" pagewidth="21cm" margintop="1cm" marginbottom="0.5cm" marginleft="1cm" marginright="1cm" headerheight="1.5cm" footerheight="1.3cm">
    <cisfo:styleclasses2>
        <cisfo:style2 stylename="THICK" fontsize="20pt" fontstyle="normal">
        </cisfo:style2>
        <cisfo:style2 stylename="LABEL" backgroundcolor="#C0C0C0" bordercolor="#808080" borderstyle="solid" borderwidth="0.1mm" padding="1mm">
        </cisfo:style2>
        <cisfo:style2 stylename="DEFAULTOUT" bordercolor="#808080" borderstyle="solid" borderwidth="0.1mm" padding="1mm">
        </cisfo:style2>
    </cisfo:styleclasses2>
    <cisfo:header2>
        <cisfo:rowtextblock2 text="PDF Test - This is the header" textalign="center">
        </cisfo:rowtextblock2>
        <cisfo:hline2>
        </cisfo:hline2>
    </cisfo:header2>
    <cisfo:footer2>
        <cisfo:hline2>
        </cisfo:hline2>
        <cisfo:vdist2 height="2mm">
        </cisfo:vdist2>
        <cisfo:rowtextblock2 text="Page" textalign="center">
            <cisfo:pagenumber2 separator=" of ">
            </cisfo:pagenumber2>
        </cisfo:rowtextblock2>
    </cisfo:footer2>
    <cisfo:body2>
        <cisfo:rowtable2 columnwidths="17cm; 2cm">
            <cisfo:row2>
                <cisfo:replace2 valueprop="docNumberText" stylename="THICK">
                </cisfo:replace2>
                <cisfo:barcode2 valueprop="docNumber" barcodetype="CODE39" height="10">
                </cisfo:barcode2>
            </cisfo:row2>
        </cisfo:rowtable2>
        <cisfo:vdist2 height="10mm">
        </cisfo:vdist2>
        <cisfo:rowtable2 columnwidths="5cm; 14cm">
            <cisfo:row2>
                <cisfo:celltext2 text="First Name" stylename="LABEL">
                </cisfo:celltext2>
                <cisfo:replace2 valueprop="firstName" stylename="DEFAULTOUT">
                </cisfo:replace2>
            </cisfo:row2>
            <cisfo:row2>
                <cisfo:celltext2 text="Last Name" stylename="LABEL">
                </cisfo:celltext2>
                <cisfo:replace2 valueprop="lastName" stylename="DEFAULTOUT">
                </cisfo:replace2>
            </cisfo:row2>
        </cisfo:rowtable2>
        <cisfo:vdist2 height="10mm">
        </cisfo:vdist2>
        <cisfo:rowtextblock2>
            <cisfo:text2 text="The amount to pay is ">
            </cisfo:text2>
            <cisfo:textreplace2 valueprop="amount" fontweight="bold">
            </cisfo:textreplace2>
            <cisfo:text2 text=" Euro. Please use our bank account ">
            </cisfo:text2>
            <cisfo:textreplace2 valueprop="account" fontweight="bold">
            </cisfo:textreplace2>
            <cisfo:text2 text=". Thanks for your order. Some additional text.Some additional text.Some additional text.Some additional text.Some additional text.">
            </cisfo:text2>
        </cisfo:rowtextblock2>
    </cisfo:body2>
</cisfo:foppage2>
After having entered all this (you can also cut and paste the XML from this documentation into your XML document) and when previewing the page, the top of the page should look as follows:
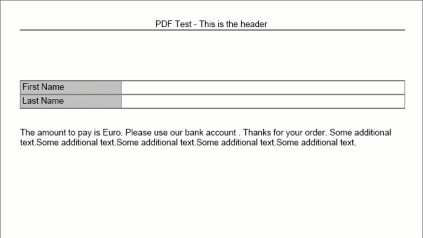
The document structure is already visible, but some data is still missing - the data that is provided by a corresponding data object.
In the first tag of the XML form (CISFO:FOPPAGE2) there is a property
objectclass. This is the class that provides the
data that will be mixed into the document. In the example, the name of this
class is PDFDataObject.
In order to create the class, you may use the Code Assistant which is part of the Layout Painter:
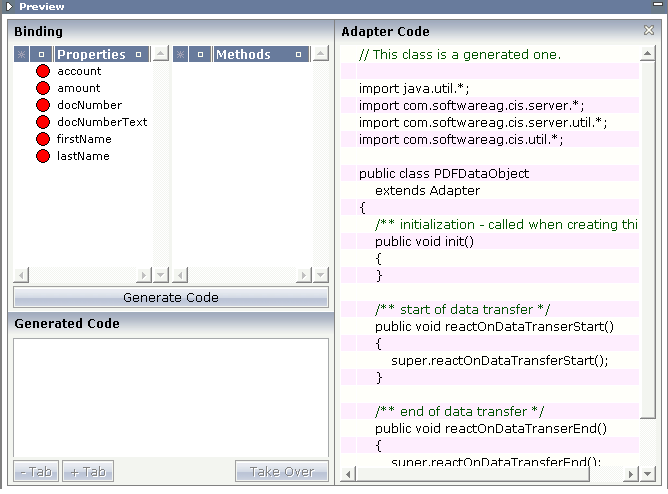
You should create some Java code that looks as follows:
import java.util.*;

import com.softwareag.cis.context.SessionContext;
import com.softwareag.cis.print.fop.*;
import com.softwareag.cis.server.util.*;
import com.softwareag.cis.util.*;

// class for PDF creation with CISFO2 tags

public class PDFDataObject
    implements IFOPDataObject
{
    // ------------------------------------------------------------------------
    // constructor
    // ------------------------------------------------------------------------

    // default constructor
    public PDFDataObject()
    {
    }

    // Called if the corresponding print form is previewed within the Layout Painter
    public PDFDataObject(PDFFOPPreviewOnly previewObject)
    {
        m_docNumber = "4711";
        m_firstName = "John";
        m_lastName = "Miller";
        m_account = "XXXXXXXXXX";
        m_amount = "1234,56";
    }

    // ------------------------------------------------------------------------
    // property access
    // ------------------------------------------------------------------------

    // property >account<
    String m_account;
    public String getAccount() { return m_account; }
    public void setAccount(String value) { m_account = value; }

    // property >amount<
    String m_amount;
    public String getAmount() { return m_amount; }
    public void setAmount(String value) { m_amount = value; }

    // property >firstName<
    String m_firstName;
    public String getFirstName() { return m_firstName; }
    public void setFirstName(String value) { m_firstName = value; }

    // property >lastName<
    String m_lastName;
    public String getLastName() { return m_lastName; }
    public void setLastName(String value) { m_lastName = value; }

    // property >docNumberText<
    public String getDocNumberText() { return "Document " + m_docNumber; }

    // property >docNumber<
    String m_docNumber;
    public String getDocNumber() { return m_docNumber; }
    public void setDocNumber(String value) { m_docNumber = value; }

    // ------------------------------------------------------------------------
    // Internationalization for this data object
    // ------------------------------------------------------------------------

    String m_dateFormat = SessionContext.DATE_MMSDDSYYYY;
    public String getDateFormat() { return m_dateFormat; }

    String m_dayTimeFormat = SessionContext.TIME_HHCMMCSS;
    public String getDayTimeFormat() { return m_dayTimeFormat; }

    String m_decimalSeparator = SessionContext.DEC_SEPARATOR_POINT;
    public String getDecimalSeparator() { return m_decimalSeparator; }

    String m_language = "E";
    public String getLanguage() { return m_language; }

    String m_timeStampFormat = SessionContext.DATE_MMSDDSYYYY;
    public String getTimeStampFormat() { return m_timeStampFormat; }


}
Compile this code so that the generated class is available in the directory …/cisyourfirstproject/appclasses/classes.
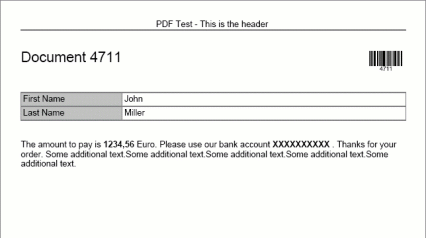
When now previewing the page, the top of the page should look as follows:
Let us have a closer look at the code:
It implements an interface
com.softwareag.cis.print.fop.IFOPDataObject. This
interface provides some methods that the Application Designer PDF/FOP framework requires in
order to provide internationalisation support.
It provides the properties that are required by the page.
It provides a special constructor by which the properties are filled with some dummy data.
The special constructor is used by Application Designer when previewing the form in the Layout Manager. (Later on you will - as part of your programs - fill the data object inside your application and pass it to the PDF/FOP processing together with the form.)
In the previous steps you created:
an XML form (stored in an XML file within a certain Application Designer project),
a Java class representing the net data behind the XML form.
Creating a PDF file now is quite simple: you just have to load the XML form and create an instance of the data object, and pass both to the PDF/FOP processor framework. The code might look like:
String xmlForm = WebResourceReader.readTextFileIntoStringWithLinebreak
      (findServletContext(),"/cisyourfirstproject/xml/pdftest.xml");
 PDFDataObject pdo = new PDFDataObject();
 pdo.setDocNumber("4711");
 pdo.setAccount("1234567890");
 pdo.setFirstName(m_firstName);
 pdo.setLastName(m_lastName);
 pdo.setAmount(m_amount);
 IPDFFOPService pdffop = PDFFOPServiceFactory.createPDFFOPService(xmlForm,pdo);
 byte[] pdf = pdffop.generatePDF();
In the code, the XML file is read by using a
WebResourceReader class which is part of the Application Designer
runtime environment. This class uses the servlet context's mechanism to access
files that are part of your web application. As a consequence, the file is
accessed in such a way that is compatible to any cluster structures of the
application server you might use. Of course, you can also read the XML form in
any other way. Maybe you store your forms inside a database and read the data
from there.
The data object is simply created and filled with certain data. Part of the data are passed as fixed literals, other parts are dynamically passed by corresponding member variables.
The PDF processor is created by calling the
PDFFOPServiceFactory class and requesting an instance.
Finally, the instance is invoked and PDF is passed back as a byte array.
It is important to note that in principle the creation of PDF is completely independent from the normal GUI adapter processing inside the Application Designer; i.e. you can use it within your application at any point - not only inside Application Designer adapter objects that represent Application Designer HTML pages.
Now, let us build an Application Designer HTML page that looks as follows:
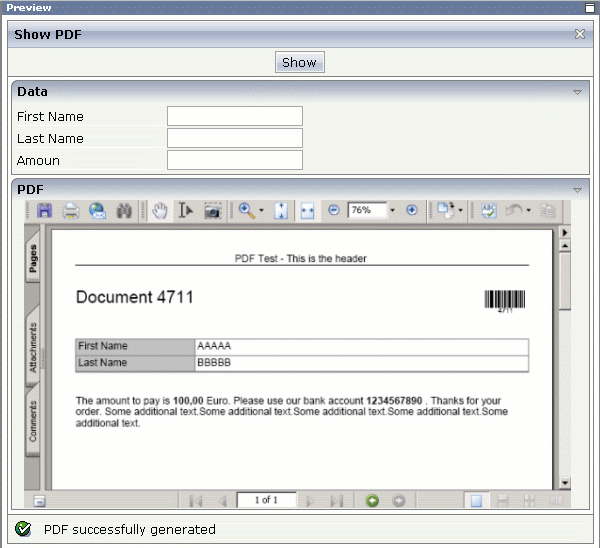
You can enter some parameters and choose the button. As a result, the corresponding PDF page will be displayed as part of the page.
The layout of the page looks as follows:
<page model="ShowPDFAdapter">
    <titlebar name="Show PDF">
    </titlebar>
    <header withdistance="false">
        <button name="Show" method="onShow">
        </button>
    </header>
    <pagebody takefullheight="true">
        <rowarea name="Data">
            <itr>
                <label name="First Name" width="120">
                </label>
                <field valueprop="firstName" width="200">
                </field>
            </itr>
            <itr>
                <label name="Last Name" width="120">
                </label>
                <field valueprop="lastName" width="200">
                </field>
            </itr>
            <itr>
                <label name="Amount" width="120">
                </label>
                <field valueprop="amount" width="200">
                </field>
            </itr>
        </rowarea>
        <rowarea name="PDF" height="100%">
            <itr width="100%" height="100%" fixlayout="true">
                <subpage valueprop="pdfURL" height="100%" width="100%">
                </subpage>
            </itr>
        </rowarea>
        <vdist>
        </vdist>
    </pagebody>
    <statusbar withdistance="false">
    </statusbar>
</page>
There are three fields to do the input and there is one SUBPAGE control
which renders a URL that is dynamically passed by the property
pdfURL.
Let us have a look at the corresponding adapter class code:
// This class is a generated one.

import java.util.*;

import com.softwareag.cis.print.fop.IPDFFOPService;
import com.softwareag.cis.print.fop.PDFFOPServiceFactory;
import com.softwareag.cis.server.*;
import com.softwareag.cis.server.util.*;
import com.softwareag.cis.util.*;

public class ShowPDFAdapter
    extends Model
{
    // ------------------------------------------------------------------------
    // property access
    // ------------------------------------------------------------------------

    // property >amount<
    String m_amount;
    public String getAmount() { return m_amount; }
    public void setAmount(String value) { m_amount = value; }

    // property >firstName<
    String m_firstName;
    public String getFirstName() { return m_firstName; }
    public void setFirstName(String value) { m_firstName = value; }

    // property >lastName<
    String m_lastName;
    public String getLastName() { return m_lastName; }
    public void setLastName(String value) { m_lastName = value; }

    // property >pdfURL<
    String m_pdfURL = "about:blank";
    public String getPdfURL() { return m_pdfURL; }
    public void setPdfURL(String value) { m_pdfURL = value; }

    // ------------------------------------------------------------------------
    // public adapter methods
    // ------------------------------------------------------------------------

    public void onShow()
    {
    	try
	{
    		// build pdf
		String xmlForm = WebResourceReader.readTextFileIntoStringWithLinebreak
		                 (findServletContext(),"/cisyourfirstproject/xml/pdftest.xml");
		PDFDataObject pdo = new PDFDataObject();
		pdo.setDocNumber("4711");
		pdo.setAccount("1234567890");
		pdo.setFirstName(m_firstName);
		pdo.setLastName(m_lastName);
		pdo.setAmount(m_amount);
		IPDFFOPService pdffop = PDFFOPServiceFactory.createPDFFOPService(xmlForm,pdo);
		byte[] pdf = pdffop.generatePDF();
		// build dynamic URL
		m_pdfURL = findCISSessionContext().getSessionBuffer().addPDF("test" + (new Date()).getTime(),pdf);
		outputMessage(MT_SUCCESS,"PDF successfully generated");
	}
    	catch (Throwable e)
	{
    		outputMessage(MT_ERROR,e.toString());
	}
    }
}
The critical method is the onShow method that
is invoked when the user chooses the button. In the
method, the API is called and a PDF byte array is created as mentioned in the
previous section.
The result is not stored in the file system but is passed to a so-called "session buffer" that is made available by Application Designer. The session buffer is a transient store for temporary data that is made available to the browser via a URL. The data you pass to the session store is passed by using an API; in the API, you specify a certain name for the data. The URL that is passed back to the application can be used inside the browser to access the transient data. Internally, the URL is a link to certain servlet provided by Application Designer that accesses the transient data.
As a consequence, the PDF bytes are not stored in the file system in order to be displayed inside the browser. This particularly means that your application is able to be operated in a clustered environment.
Note:
Of course, there may be different scenarios in your environment:
maybe you have one central file server which also serves as a web server, and
you park all your PDF documents on this server. In this case, you do not need
the session buffer.
The session buffer is automatically removed when the user's session ends. If you have long-lasting user sessions, make sure that the information in the session buffer is removed when it is not required anymore. Removing is done by using the session buffer's Java API.