The Eclipse Platform is a very flexible open source development platform for tool integration. It provides a framework for building an integrated development environment from plug-in software components. More and more products nowadays are Eclipse-based, so that it is becoming increasingly important for developers and users to know what Eclipse is and what it offers.
The information in this document gives you a short overview of the basic Eclipse architecture, its components and standard user interfaces, as well as an introduction to what an Eclipse-based product may look like. This will help you understand Software AG products that are based on Eclipse.
The following topics are covered:
The benefit of Eclipse is that it offers a single integrated platform for all development tasks. Plug-ins provide a feature of the Eclipse development environment and lead to the final Eclipse-based product. Plug-ins can be de-installed without impacting the Eclipse installation as such. Eclipse supports collaboration of development teams and is freely available from www.eclipse.org.
As shown in the following graphic, the basic Eclipse installation consists of three parts: the Workbench (which is further subdivided into the Standard Widget Toolkit and the JFace), the Workspace and the Platform Runtime.

The Workbench is the user interface of Eclipse. The Standard Widget Toolkit (SWT) holds a set of widgets and graphics for building graphical user interfaces, such as buttons, menus, tree lists etc. With JFace, these elements are grouped into bigger, task-oriented units.
The Workspace is the connection to the file system. It is used to create and manage project resources (such as files and folders).
The Platform Runtime is the kernel that starts and runs the different components and takes care of the correct loading of plug-ins.
In addition to the basic Eclipse installation, the plug-ins extend the functionality of the Eclipse platform or other plug-ins. Plug-ins can be bundled as installable units. These installable units are called features. Each plug-in is connected to Eclipse via extension points, or to another plug-in, or both. Extension points are used to connect to plug-ins outside the Eclipse platform, but they also exist within Eclipse, as Eclipse itself is made of plug-ins.
When you start the Eclipse Software Development Kit (SDK) for the first time, the workbench user interface and its components are displayed (after having closed the Welcome page), without any user-defined plug-ins. The Eclipse workbench is a platform for development tools. It provides the user interface structure for Eclipse and facilitates seamless integration of tools. The workbench consists of a collection of windows with menu bars, toolbars, shortcut bars and so-called perspectives. The name of the active perspective is shown in the title of the window. The following graphic shows an example of such a "bare" Eclipse workbench, using the Java perspective:
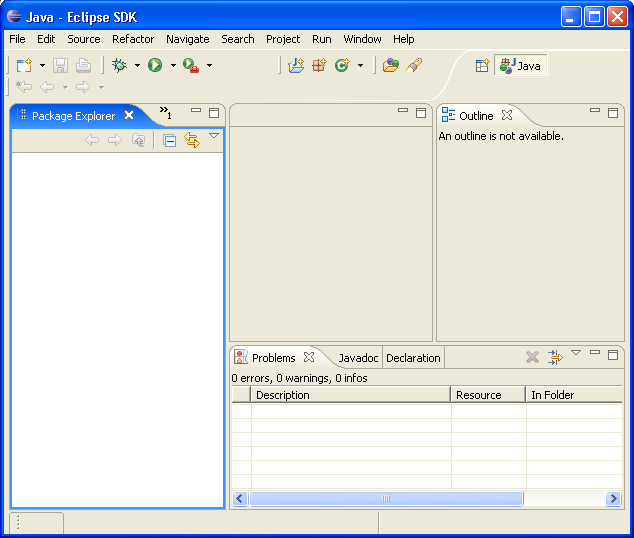
The workbench usually contains the following menus: , , , , , and . Other menus are plug-in dependent, or context-specific, based on the current perspective, editor or view. If you are a developer of plug-ins, you can develop and add new menus, editors, views or wizards.
In the following, the different components of the workbench are briefly introduced:
As mentioned before, the workspace is the place in the file system where the different resources are stored. It consists of one or more projects. A project is a directory with several files and folders and has methods to build dependent resources.
Resources are items in the workspace, i.e. projects, folders, files and other dependent resources. These are all objects that will be or have been created with Eclipse. They are stored as normal files within the Eclipse workspace. A project holds several folders with files.
In Eclipse, most data is created using wizards. A wizard is an assistant that guides you step-by-step through a process, for example creating new resources or importing and exporting them.
Examples of wizards are:
the New Project wizard;
the New Class wizard;
the New Package wizard;
the Checkout wizard.
A view is a visual component of the workbench that shows information, usually in a table or tree. It is used to navigate within a hierarchy of information, to open an editor or to display properties for the active editor. You choose to open the view with which you want to work. Several views can be stacked in a so-called tabbed notebook. To activate a view, you select its tab. Views also have their own context menus, which can be opened by right-clicking on the tab. Each view has a pull-down menu, which can be opened by selecting the down arrow to the right of the toolbar, below the tab. It contains functionality like sorting and filtering, which applies to the entire content of the view.
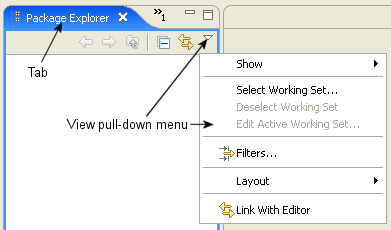
Examples of views are:
Navigator;
Package Explorer;
Outline;
Problems;
Properties;
Error Log.
An editor is another visual component of a workbench page. It is used to edit a document, to keep changes until the document is saved, or for browsing. Multiple editors may exist even for one document. There are content assistants, simple page and multiple page editors, and syntax highlighters. Menus, toolbars and options in an editor are context-sensitive and change according to the environment. Eclipse has a list of registered editors, which are consulted first when you open a resource that needs an editor. If none of the editors in the list is suitable for the file type, the workbench checks automatically if any other editor from the underlying operating system is available (external editor). If an external editor is located, it will be launched.
Examples of editors are:
Java source editor;
XML editor;
Ant editor;
Text editor;
Plug-in editor.
A perspective can be described as a container that holds several views and editors, bundled for a specific task. Views and editors can be dragged and dropped to other places in the workbench so that the environment fits your needs and you have your personal working perspective. Only one perspective is visible at any time. A perspective can be managed with the commands available in the menu:
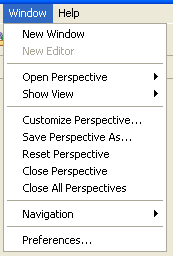
Examples are:
Resource perspective;
Java perspective;
Debug perspective;
Team synchronizing perspective.
The Preferences dialog box sets the global preferences for various topics. It is available in the menu.
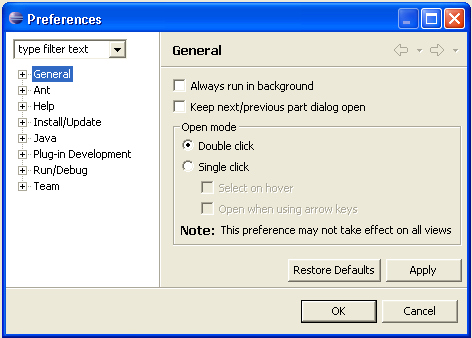
Examples of preferences are:
Editor settings;
Java compiler settings;
Team settings.
The Preferences dialog box has a search facility (see the field type filter text in the graphic) and a history to navigate backwards and forwards through the pages.
The Properties dialog box shows and changes the properties of a resource or some other object in the active editor or view. The command is available in the menu or as the last command in the context menu of a resource.
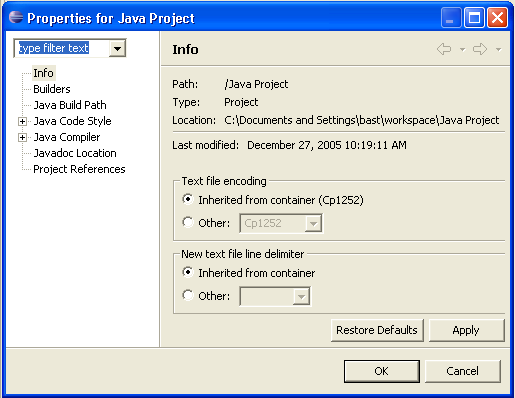
Examples of properties are:
the properties of a file;
the properties of a project.
The Properties dialog box has a search facility (see the field type filter text in the graphic) and a history to navigate backwards and forwards through the pages.
Developing plug-ins with Eclipse is one task, using Eclipse-based products is another one. For a user of Eclipse-based products, it is generally not necessary to have an in-depth knowledge of the Eclipse user interface, but it is helpful to have an idea of the main concepts, terms and components (as described above), as they keep reappearing in the user interface of the products. Here are some tips and tricks that apply to Software AG's Eclipse-based products.
In most Eclipse-based products, navigation is done with the help of the Navigator view. It is usually displayed on the left side of a perspective and shows the available resources (projects, folders, files etc.) of the product. If you select a resource in the Navigator view and open the context menu, the available commands (for example, for copying, pasting, deleting etc.) are displayed.
To accomplish certain tasks like creating or editing resources, you select an item in the Navigator view, open the context menu and choose the desired command. The corresponding views and editors will usually open in a view on the right side of a perspective. You use them to interact with your product, for example, to enter, edit or add data. If your tasks require a step-by-step process, it is very probable that a wizard will open automatically and guide you through the process (for example, when importing or exporting resources). You just follow the instructions in the dialog boxes.
Information about what you are doing is normally available in information and log views at the bottom of your perspective, e.g. error logs, status information, etc.
Products are integrated seamlessly into the Eclipse workbench. This means that you do not see where the standard Eclipse workbench ends and where the product-specific user interface starts. Eclipse-based products make use of standard Eclipse menus and commands, and they add their own functionality. So an Eclipse-based product usually still has the Eclipse "flavor", but also its own components. As a consequence, product documentation describes only product functionality, and not the standard Eclipse functionality. The latter can be found in the standard Eclipse online help. If you miss the description of some functionality in the product documentation, it is thus very likely that you will find it in the Eclipse documentation (see the Eclipse help at http://www.eclipse.org/documentation/).
Once you have established a working environment of views, editors and information windows, it is a good idea to save this environment as a customized perspective. To do so, you choose . You can re-open this perspective any time and thus do not have to create it again and again. This saves time and effort. If you want to restore the workbench to its default settings, you choose .
If you are a new to Eclipse, this set of links will help you:
The generally accepted Eclipse User Interface Guidelines can be found at the following location: http://wiki.eclipse.org/User_Interface_Guidelines.
The very useful Eclipse online help is available at: http://www.eclipse.org/documentation/.
Further information can be found in the following books:
"The Java Developer's Guide to Eclipse" from Shavor, D'Anjou, Fairbrother, Kehn, Kellerman and McCarthy (Addison-Wesley)
"Eclipse - Building Commercial Quality Plug-ins" from Clyberg and Rubel (Addison-Wesley)
Note:
It is possible to use the Eclipse user interface using the keyboard
only. See the Eclipse online help for detailed
information.