This document covers the following topics:
Normally, the status bar is located at the bottom of a page. It is a grey area (if using the standard style sheet) where status information can be seen. The status information is derived dynamically from properties of the adapter class. The information consists of three parts:
Type of the status message - whether it is an error message, a warning or a success message. Depending on the type, a small icon is displayed to the left of the message.
The status message itself - the text displayed within the status message.
A long text for the status - text shown in a dialog when clicking on the status message.
The adapter class has to support properties which provide data that are passed to the status bar. The get methods for the default property names are:
public String getMessageType() ...
public String getMessageShortText() ...
public String getMessageLongText() ...
They are already implemented by the adapter class: normally you do not have to overwrite these methods.
There is a method outputMessage(String type, String
shortText, String longText) that can be used from the adapter
class inside your adapter implementation.
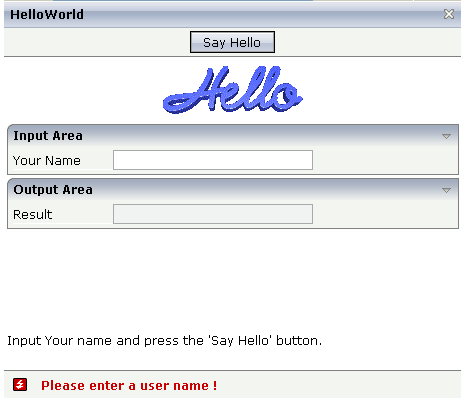
Example: In the "Hello World!" application,
you want to display an error message if the user clicks the button and has not yet entered a name. The
sayHello() method looks as follows:
public void sayHello()
{
    if (m_name == null || m_name.trim().length()== 0)
    {
       this.outputMessage("E","Please enter a user name !"," ... space for a longer text ...");
       return;
    }
    m_result = "Hello World, " + m_name + "!";
}
The method outputMessage(String type, String
shortText) does not need a long message text. In this case, the
sayHello() method looks as follows:
public void sayHello()
{
    if (m_name == null || m_name.trim().length()== 0)
    {
       this.outputMessage("E","Please enter a user name !");
       return;
    }
    m_result = "Hello World, " + m_name + "!";
}
The screen including the error message looks as follows:

Three message types are available:
"E" for errors.
"W" for warnings.
"S" for success and informational messages.
There are corresponding constants in the Adapter
class:
Adapter.MT_ERROR
Adapter.MT_SUCCESS
Adapter.MT_WARNING
The STATUSBARSSW control is an extension to the normal STATUSBAR control. "SSW" in the control name stands for "subsession-wide".
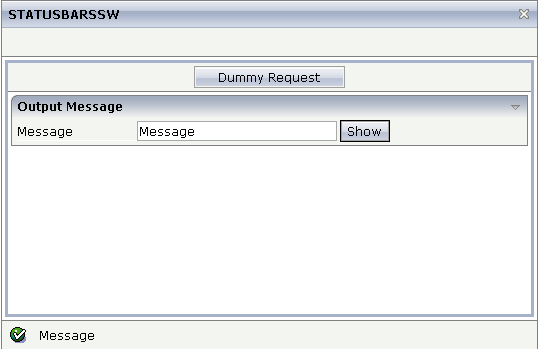
The STATUSBARSSW control allows you to output messages in the statusbar from any subsession, even from a SUBCISPAGE2 control. You place the STATUSBARSSW control once, and you can call from anywhere.
In this example, the SUBCISPAGE2 control sends an
outputMessage() to the STATUSBARSSW control of the
parent page.

The XML layout definition is:
<pagebody takefullheight="true">
  <itr takefullwidth="true" height="100%">
   <subcispage2 subcispageprop="subcisPageInfo" width="100%" height="100%">
   </subcispage2>
  </itr>
</pagebody>
<statusbarssw>
</statusbarssw>
There is no need for any special coding in order to use the STATUSBARSSW control. Both controls use the same server API.
public void onShowMessage()
{
  outputMessage(MT_SUCCESS, m_message);
}
The following coding would be necessary with a normal STATUSBAR control:
public void onShowMessage()  // old version
{
  // find the 'Outer Adapter'
  StatusbarSSWAdapter outer =
            (StatusbarSSWAdapter)findAdapter(StatusbarSSWAdapter.class);
  // output the message
  outer.outputMessage(MT_SUCCESS, m_message);
  // and refresh the parent page.
  refreshParent();
}
This example shows only the code which is required for a page which is nested once. A lot of additional code would be required for further nested pages. When using the STATUSBARSSW control, you need not worry about nesting.
If you have many pages (maybe with several included SUBCISPAGE2 controls) and you want to have a single status bar for all of your messages, you use the STAUSBARSSW control.
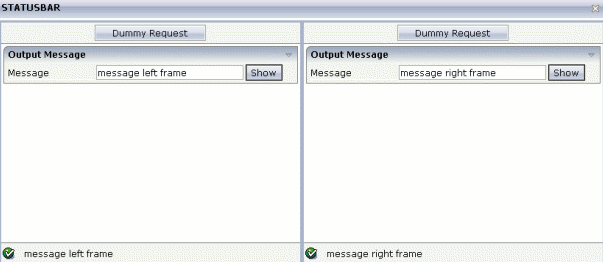
If you have only a few pages (for example, 2 pages in a frameset) and you want to output a different message for each page, you have to use the normal STATUSBAR control. For example:

| Basic | |||
| typeprop |
Name of the adapter property holding the information about the type of the status message. The type defines the image that is rendered at the beginning of the message. Currently there are 3 supported values that can be passed back from the property: E for error, W for warning, S for success. The default property name is messageType provided by the Model-class, from which you derive your adapter class. Please pay attention: changing this property means that you also have to override the "outputMessage(...)" methods inside your adapter accordingly. |
Optional | |
| shorttextprop |
Name of the adapter property providing the message text that is visible inside the status bar. The default property name is messageShortText and is provided by the Model-class. Please pay attention: changing this property means that you also have to override the "outputMessage(...)" methods inside your adapter accordingly. |
Optional | |
| longtextprop |
Name of the adapter property providing the long message text. The long text pops up if clicking onto the short text mesage. The default property name is messageLongText and is provided by the Model-class. Please pay attention: changing this property means that you also have to override the "outputMessage(...)" methods inside your adapter accordingly. |
Optional | |
| straighttext |
If the text of the control contains HTML tags then these are by default interpreted by the browser. Specifiying STRAIGHTTEXT as "true" means that the browser will directly render the characters without HTML interpretation. Example: if you want to output the source of an HTML text then STRAIGHTTEXT should be set to "true". |
Optional |
true false |
| comment |
Comment without any effect on rendering and behaviour. The comment is shown in the layout editor's tree view. |
Optional | |
| Basic | |||
| comment |
Comment without any effect on rendering and behaviour. The comment is shown in the layout editor's tree view. |
Optional | |