The following topics are covered below:
Application Designer's Eclipse plug-in allows you to edit Application Designer layouts directly inside Eclipse. When the plug-in has been installed and configured, you can use the Layout Painter and some other Application Designer tools in Eclipse.
The plug-in is delivered with the Application Designer software. After the installation of Application Designer, a directory with the name EclipsePlugin is available in your <installdir>/tomcat/webapps/cis directory.
The Eclipse plug-in consists of two parts which have to be installed separately: the common part and the GUI part. You must first install the common part.
![]() To install the common part of the Eclipse plug-in
To install the common part of the Eclipse plug-in
It is required that your servlet container has been started.
From the menu of Eclipse, choose .
A dialog appears.
Select the option button Search for new features to install.
Choose the button.
On the resulting page, choose the button.
The following dialog box appears.
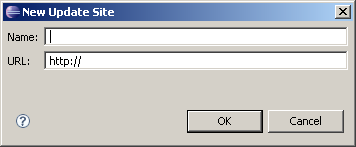
In the Name text box, specify a name of your choice.
In the URL text box, specify the path to the Eclipse plug-in. For example:
http://localhost:51000/cis/EclipsePlugin/com.softwareag.common
Choose the button.
![]() To install the GUI part of the Eclipse plug-in
To install the GUI part of the Eclipse plug-in
Proceed as described above for the common part. In the URL text box, however, specify the following path:
http://localhost:51000/cis/EclipsePlugin/com.softwareag.cis.gui.swt
Software AG products include Software AG Designer 8. This is based on 3.4.2. Plug-ins of Software AG products are installed into this Eclipse installation. Different products or different product versions may include different versions of Eclipse. This section tells you how to migrate plug-ins from one Eclipse version to a newer version of Eclipse. This description applies directly to Microsoft Windows.
The Software AG Eclipse Package is abbreviated to "SEP", and the version is the version of the Eclipse platform in this package.
Let us assume that SEP 3.3 is installed, together with plug-ins for some Software AG products. A newer product installs SEP 3.4 on the computer. SEP 3.1, SEP 3.3 and SEP 3.4 can coexist. However, you want to migrate the installed plug-ins to SEP 3.4 and also you want to migrate the workspace.
SEP 3.1 includes an Eclipse 3.1.2 SDK including Java Development Tooling (JDT) and Plug-in Development Environment (PDE).
SEP 3.3 includes an Eclipse 3.3 SDK, Business Intelligence and Reporting Tools (BIRT), and Web Tools Platform (WTP) with its prerequisites (Eclipse Modeling Framework (EMF), Graphical Editor Framework (GEF), Data Tools Platform (DTP).
SEP 3.4 includes an Eclipse 3.4 SDK, Business Intelligence and Reporting Tools (BIRT), and Web Tools Platform (WTP) with its prerequisites (Eclipse Modeling Framework (EMF), Graphical Editor Framework (GEF), Data Tools Platform (DTP).
This applies to SEP 3.1, SEP 3.3 and SEP 3.4:
<installation_folder> (under Microsoft Windows, typically: C:\Program Files\Software AG)
        <product_folder_1> (e.g. under Microsoft Windows   C:\Program Files\Software AG\ApplinX)
                Eclipse
                        Updates
                                (contains Archived Update Sites)
        <product_folder_2> (e.g. under Microsoft Windows   C:\Program Files\Software AG\EntireX)
                Eclipse
                        Updates
                                (contains Archived Update Sites)
        Eclipse
                plugins3.1
                plugins3.3
                v3.1
                v3.3
<suite installation folder> (under Microsoft Windows, typically: C:\SoftwareAG)
        <product_folder_1> (e.g. under Microsoft Windows   C:\SoftwareAG\ApplinX)
        eclipse
                resources            (contains an icon)
                updates              (contains Archived Update Sites)
                v34
        <product_folder_2> (e.g. under Microsoft Windows   C:\SoftwareAG\EntireX)
<your_workspace>
Each product installs an Archived Update Site inside the product installation (see <installation_folder>/<product_folder>/Eclipse/Updates). Use the Eclipse Update Manager ( > > ) to install the plug-ins from these Archived Update Sites.
Caution:
Some of the plug-ins are only compatible with one version of
Eclipse. See the documentation of the product for further information. For
these products, visit the Software AG Eclipse Update Site to get a newer
version of the plug-ins.
Some prerequisite software components (e.g. BIRT) are not included in the products in the versions for Eclipse 3.1 and 3.3, because the product was delivered prior to the release of Eclipse 3.3. Please visit the Eclipse update site at www.eclipse.org to get the prerequisites that are compatible with Eclipse 3.3.
If you want to use your_workspace with SEP 3.4 only, just select this workspace during Eclipse startup. The workspace is upgraded to Eclipse 3.4 the next time you start Eclipse. After upgrading, it is not possible to downgrade this workspace to Eclipse 3.3 or Eclipse 3.1. See the section Upgrading Workspace from a Previous Release in the Eclipse readme for more details.
If you want to keep the workspace for SEP 3.3 and use the same data in parallel with SEP 3.4, simply copy the workspace and open the copy with Eclipse 3.4. You are responsible for synchronizing the contents of the two workspaces.
Caution:
Be aware of linked content, which is not copied.
An alternative is to use a new workspace with SEP 3.4 and import the projects you want to migrate. See the section Upgrading Workspace from a Previous Release (readme_eclipse.html in the Eclipse installation).
If you use an Eclipse keyring (Eclipse 3.1 and Eclipse 3.3) to store passwords, this keyring is not migrated as long as the default keyring inside the Eclipse installation is used. Eclipse 3.4 uses secure storage instead which is independent of the Eclipse installation. This is configured in the Eclipse preferences.
If not all plug-ins are migrated, Eclipse cannot restore the layout of some perspectives. Some of the views or editors may be unavailable.
You create an Eclipse project in the same way as described in Creating a Java Project in Eclipse.
Each Application Designer project has an project/xml directory in which the layouts are kept. This directory needs to be defined in Eclipse. To do so, you have to modify the properties of each Eclipse project that you create for the Eclipse plug-in.
![]() To configure the Eclipse project
To configure the Eclipse project
Select the Eclipse project.
Invoke the context menu and choose .
Enable the check box Enable Application Designer Access.
In the Layout Folder text box, specify the path to your project's xml folder.
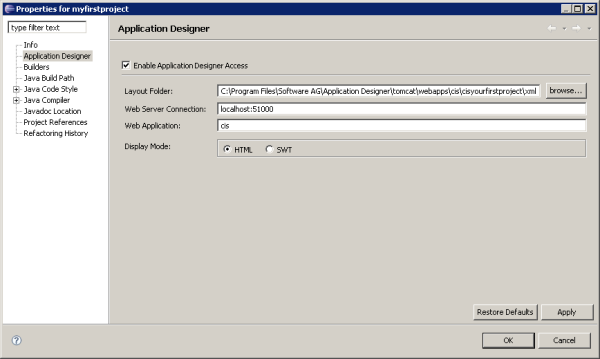
If required, change the properties of the Web Server Connection and the Web Application in this dialog box. See the Tomcat documentation for more details.
Select the display mode for the Layout Painter and Layout Tester:
HTML
This mode makes use of the ActiveX plug-in of Eclipse in which
Internet Explorer is running.
SWT
This mode makes use of SWT controls which are shown in an SWT
client.
Choose the button.
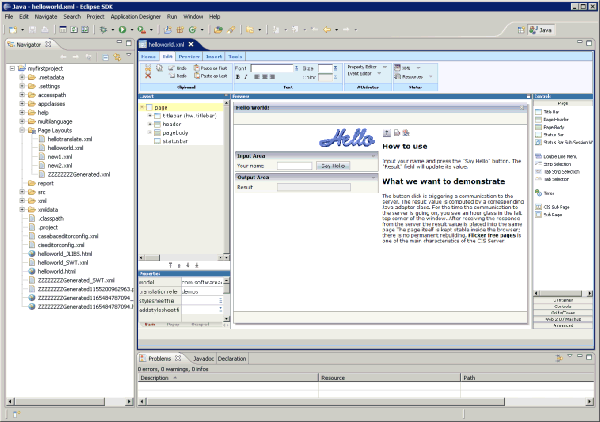
The Page Layouts node is automatically created in the Navigator view. See below.
In order to work with the Eclipse plug-in, your servlet container must have been started. See Starting the Servlet Container in the Development Workplace documentation.
The Eclipse plug-in provides the following tools:
You use these tools in a similar way as those in the development workplace. See the Development Workplace documentation for further information. The descriptions in the Development Workplace documentation also apply to the Eclipse plug-in; the only difference in the Eclipse plug-in is that the tools are invoked in a different way (see below). The screenshots in the Development Workplace documentation also apply - with slight differences - to the Eclipse plug-in.
![]() To invoke the Project Manager
To invoke the Project Manager
From the menu, choose .
In the resulting Show View dialog box, expand the Software AG Application Designer node.
Select the entry Tool - Project Manager and choose the button.
A list of existing application projects is now shown.
![]() To create a new layout
To create a new layout
In the Navigator view, select the Page Layouts node. This node contains all XML layout definitions.
From the menu, choose .
In the resulting dialog box, expand the Software AG node.
Select the entry Application Designer Layout and choose the button.
In the resulting dialog box, enter the name of the file that is to contain your layout definition. The name must end with ".xml".
Select the layout template that you want to use.
Choose the button.
The Layout Painter appears.
![]() To open an existing layout
To open an existing layout
In the Navigator view, select the layout in the Page Layouts node.
Invoke the context menu and choose .
The Layout Painter appears.
![]() To invoke the Style Sheet Editor
To invoke the Style Sheet Editor
From the menu, choose .
In the resulting Show View dialog box, expand the Software AG Application Designer node.
Select the entry Tool - Style Sheet Editor and choose the button.
![]() To invoke the Control Editor
To invoke the Control Editor
From the menu, choose .
In the resulting Show View dialog box, expand the Software AG Application Designer node.
Select the entry Tool - Control Editor and choose the button.
A dialog appears, listing all available editor extensions.
Choose the editor extension that you want to open.
The contents of the editor extension are loaded into the Control Editor. You can now edit your editor extension.
![]() To invoke the monitoring tool
To invoke the monitoring tool
From the menu, choose .
In the resulting Show View dialog box, expand the Software AG Application Designer node.
Select the entry System Monitoring and choose the button.
The Layout Tester can be used to test the currently defined layout according to the display mode which is defined in the properties of the Eclipse project: it is either shown as in the browser or as in the SWT client.
![]() To invoke the Layout Tester
To invoke the Layout Tester
Select the layout in the Navigator view.
Invoke the context menu and choose .