Creating a GraphQL API by Importing an API from a File
Let’s look at a sample scenario, where you are creating a GraphQL API, Star Wars API, by importing an API from the Starwars.graphql file.
Before you begin
Ensure that you have:

Manage APIs or Activate/Deactivate APIs functional privilege. If you are an Administrator, you would have this privilege by default.
A GraphQL SDL (GraphQL Schema Definition Language) file to create an API using the importer. You can download the
Starwars.graphql from the
Github repository.

To create a GraphQL API by importing an API from a file
1. Click APIs in the title navigation bar.
2. Click Create API.
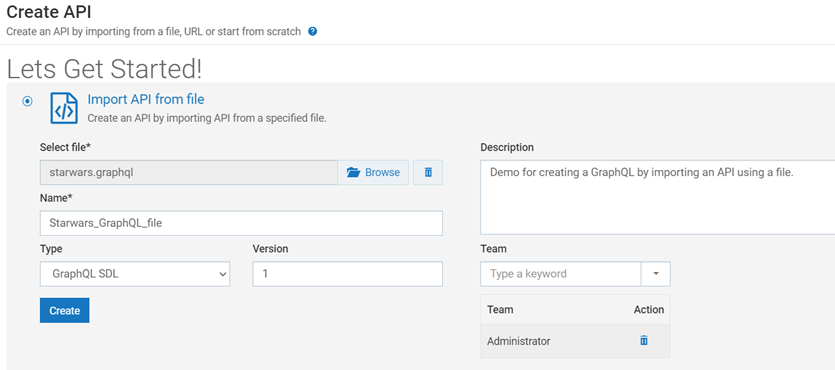
3. Select Import API from file.
4. Click Browse to select a file.
5. Select the required file starwars.graphql and click Open.
6. Type a name for the API name in the Name field. For example, Starwars_GraphQL_file.
7. Provide a description for the API in the Description field.
8. Select GraphQL SDL from the Type dropdown menu
9. Provide the version number as 1.0 in the Version field.
10. Select the team as Administrator for which you want to assign the API in the Team field
This field appears only when the Team feature is enabled. It displays only the teams that you are a part of.
11. Click Create.
A GraphQL API is created with the default Straight Through Routing policy.
12. Click Edit to replace the Endpoint URI of the Straight Through Routing policy.
For the API to work, you must replace the Endpoint URI of the default Straight Through Routing policy with the query string of the native API.
13. Navigate to Policies > Routing > Straight Through Routing and replace the ${sys:query_string} alias in the Endpoint URI with the query string of the native API.
Here, use the native API endpoint of the Star Wars API, that is, https://swapi-graphql.netlify.app/.netlify/functions/index.
14. Click Activate.
15. Click Yes in the confirmation dialog box.
The API is now activated. The API Gateway endpoint is now available, and consumers can use this endpoint to invoke the API.
Next Steps
Now that you have created the REST API, you must
For details about the further actions you can perform on the API, see All about APIs in the API Gateway User's Guide.