How to create an adapter connection implementation?
An adapter connection connects to an adapter resource. This chapter describes how to create an adapter connection implementation.
Pre-requisites:
 webMethods Integration Server
 9.12 or later installed.
Designer 9.12 or later installed.
Integration Server Administrator access.
Java 1.8 or later installed.
Basic understanding of
webMethods Integration Server,
Designer,
Integration Server Administrator, Java.
1. Start the editor to create Java files for adapter connection implementation.
2. Create directories corresponding to your Java package structure in the webMethods package you created using Designer. For example: com\mycompany\adapter\myAdapter\connections. In the example, the folder created is com\wm\MyAdapter\connection.
Note:
You must create your Java package and classes in the adapterPackageName\code\source folder in the webMethods package you created using Designer.
3. Create the following classes and interfaces:
a. Create a class by extending the com.wm.adk.connection.WmManagedConnection base class.
In the example, created SimpleConnection class:
package com.wm.MyAdapter.connections;
import com.wm.adk.connection.WmManagedConnection;
import com.wm.adk.metadata.*;
import com.wm.MyAdapter.MyAdapter;
public class SimpleConnection extends WmManagedConnection {
String hostName;
int port;
public SimpleConnection(String hostNameValue, int portValue)
{
super();
hostName = hostNameValue;
port = portValue;
MyAdapter.getInstance().getLogger().logDebug(9999,
"Simple Connection created with hostName = "
+ hostName + "and port = " + Integer.toString(port));
}
public void destroyConnection()
{
MyAdapter.getInstance().getLogger().logDebug(9999,"Simple Connection Destroyed");
}
// The remaining methods support metadata for related services, etc.
// Implement content as needed.
public void registerResourceDomain(WmAdapterAccess access)
{}
public Boolean adapterCheckValue( String serviceName, String resourceDomainName,
String[][] values, String testValue)
{ return null; }
public ResourceDomainValues[] adapterResourceDomainLookup(String serviceName,
String resourceDomainName, String[][] values)
{ return null; }
}
b. Create a class by extending the com.wm.adk.connection.WmManagedConnectionFactory base class.
In the example, created SimpleConnectionFactory class:
package com.wm.MyAdapter.connections;
import com.wm.adk.connection.WmManagedConnectionFactory;
import com.wm.adk.connection.WmManagedConnection;
import com.wm.adk.info.ResourceAdapterMetadataInfo;
import com.wm.adk.metadata.WmDescriptor;
import com.wm.adk.error.AdapterException;
import java.util.Locale;
import com.wm.MyAdapter.MyAdapter;
import com.wm.MyAdapter.MyAdapterConstants;
public class SimpleConnectionFactory extends WmManagedConnectionFactory implements MyAdapterConstants {
private String hostName;
private int port;
public void setHostName(String hostNameValue){hostName = hostNameValue;}
public void setPort(int portValue){port = portValue;}
public SimpleConnectionFactory(){super();}
public WmManagedConnection createManagedConnectionObject(
javax.security.auth.Subject subject,
javax.resource.spi.ConnectionRequestInfo cxRequestInfo)
{
return new SimpleConnection(hostName, port);
}
public void fillWmDescriptor(WmDescriptor d,Locale l) throws
AdapterException
{
d.createGroup(GROUP_SIMPLE_CONNECTION,
new String[]{SIMPLE_SERVER_HOST_NAME, SIMPLE_SERVER_PORT_NUMBER});
d.setValidValues(SIMPLE_SERVER_PORT_NUMBER, new String[] {"5555","1555","4000"});
d.setDescriptions(
MyAdapter.getInstance().getAdapterResourceBundleManager(),l);
}
public void fillResourceAdapterMetadataInfo(
ResourceAdapterMetadataInfo info, Locale locale)
{}
}
c. Update the interface that contains the constants (you created for the adapter implementation) and add the connection constants:
In the example, update MyAdapterConstants interface:
package com.wm.MyAdapter;
import com.wm.MyAdapter.connections.SimpleConnectionFactory;
public interface MyAdapterConstants {
static final int ADAPTER_MAJOR_CODE = 9009;
static final String ADAPTER_JCA_VERSION = "1.0";
static final String ADAPTER_NAME = "MyAdapter";
static final String ADAPTER_VERSION = "9.12";
// using next statement will create cyclic class loading dependency issue
// therefore, the resource bundle class name is fully spelled out
//static final String ADAPTER_SOURCE_BUNDLE_NAME = MyAdapterResource.class.getName();
static final String ADAPTER_SOURCE_BUNDLE_NAME =
"com.wm.MyAdapter.MyAdapterResource";
// added at Phase 2 to support connector
static final String CONNECTION_TYPE = SimpleConnectionFactory.class.getName();
// for all the properties, make sure the value matches the get/set method
// naming convention. you have to understand how a Java introspection
// build a property name using the names of the get and set methods
// added at Phase 2 to support connector
// connector properties
static final String GROUP_SIMPLE_CONNECTION = "SimpleServerConnection";
static final String SIMPLE_SERVER_HOST_NAME = "hostName";
static final String SIMPLE_SERVER_PORT_NUMBER = "port";
}
d. Update the resource bundle implementation class to add the display name and description of the connection factory class and the fields in the connection factory class.
In the example, update MyAdapterResource class's Object[][] _contents as follows:
package com.wm.MyAdapter;
import java.util.ListResourceBundle;
import com.wm.adk.ADKGLOBAL;
import com.wm.MyAdapter.connections.SimpleConnectionFactory;
public class MyAdapterResource extends ListResourceBundle implements MyAdapterConstants{
static final String IS_PKG_NAME = "/MyAdapter/";
static final Object[][] _contents = {
// adapter type display name.
{ADAPTER_NAME + ADKGLOBAL.RESOURCEBUNDLEKEY_DISPLAYNAME, "MyAdapter"}
// adapter type descriptions.
,{ADAPTER_NAME + ADKGLOBAL.RESOURCEBUNDLEKEY_DESCRIPTION,
"Adapter for MyAdapter Server (a Sample System)"}
// adapter type vendor.
,{ADAPTER_NAME + ADKGLOBAL.RESOURCEBUNDLEKEY_VENDORNAME, "Software AG"}
//Copyright URL Page
,{ADAPTER_NAME + ADKGLOBAL.RESOURCEBUNDLEKEY_THIRDPARTYCOPYRIGHTURL, IS_PKG_NAME + "copyright.html"}
//Copyright Encoding
,{ADAPTER_NAME + ADKGLOBAL.RESOURCEBUNDLEKEY_COPYRIGHTENCODING, "UTF-8"}
//About URL Page
,{ADAPTER_NAME + ADKGLOBAL.RESOURCEBUNDLEKEY_ABOUT, IS_PKG_NAME + "About.html"}
//Release Notes URL Page
,{ADAPTER_NAME + ADKGLOBAL.RESOURCEBUNDLEKEY_RELEASENOTEURL, IS_PKG_NAME + "ReleaseNotes.html"}
//SimpleConnection
,{SimpleConnectionFactory.class.getName() + ADKGLOBAL.RESOURCEBUNDLEKEY_DISPLAYNAME,
"Simple Connection"}
,{SimpleConnectionFactory.class.getName() + ADKGLOBAL.RESOURCEBUNDLEKEY_DESCRIPTION,
"Simple framework for demonstration purposes"}
,{SimpleConnectionFactory.SIMPLE_SERVER_HOST_NAME + ADKGLOBAL.RESOURCEBUNDLEKEY_DISPLAYNAME,
"Host Name"}
,{SimpleConnectionFactory.SIMPLE_SERVER_PORT_NUMBER + ADKGLOBAL.RESOURCEBUNDLEKEY_DISPLAYNAME,
"Port"}
};
protected Object[][] getContents() {
// TODO Auto-generated method stub
return _contents;
}
}
e. Register the connection type to the adapter by updating your fillAdapterTypeInfo method in your WmAdapter implementation class.
In the example the SimpleConnectionFactory connection factory class is registered using the method addConnectionFactory in the adapter implementation class's MyAdapter.fillAdapterTypeInfo method:
package com.wm.MyAdapter;
..
..
..
import com.wm.MyAdapter.connections.SimpleConnectionFactory;
..
..
..
public class MyAdapter extends WmAdapter implements MyAdapterConstants {
..
..
..
public void fillAdapterTypeInfo(AdapterTypeInfo info, Locale locale) {
info.addConnectionFactory(SimpleConnectionFactory.class.getName());
}
}
4. Execute the ANT script created in adapter definition to compile, and deploy the adapter in Integration Server.
Use the files build.xml and build.properties.
ant deploy
5. Restart Integration Server.
6. Start Integration Server Administrator.
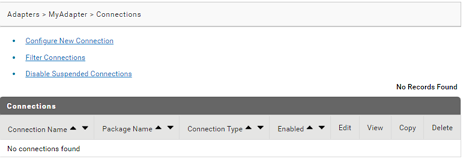
7. In Integration Server Administrator, select Adapters > MyAdapter.
The adapters' connection configured are listed.
8. In the Adapters > MyAdapter > Connections screen, select Configure New Connections.
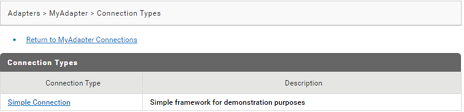
The adapters' connection types are listed.
9. In the Adapters > My Adapter > Connection Types screen, select the Connection Type Simple Connection.
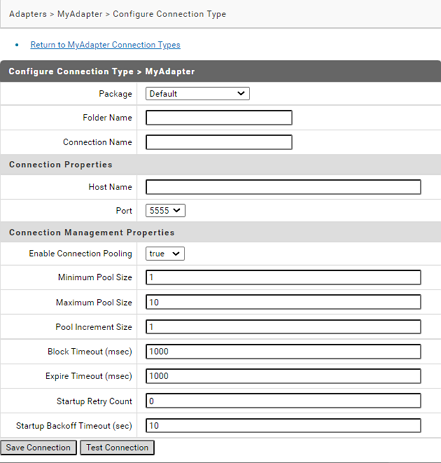
The adapters' connection properties to configure are listed:
10. In the Adapters > My Adapter > Configure Connection Type screen, add the details and Save Connection.
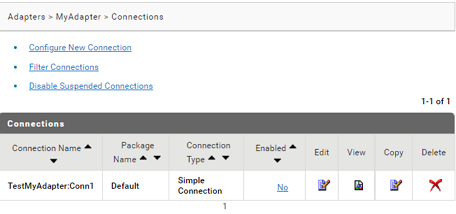
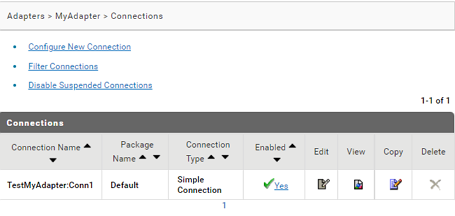
The Adapters > My Adapter > Connections screen lists the connection you added.
11. In the Adapters > My Adapter > Connections screen, click No in the Enabled column.
The Enabled column now shows Yes.