Configuring Single Sign-On for ActiveTransfer Web Client
ActiveTransfer supports Single Sign-On (SSO) through Security Assertion Markup Language (SAML) 2.0, an XML-based framework for the exchange of security information. You can use SAML to access ActiveTransfer web client through SSO. SSO is supported only for HTTPS protocol.
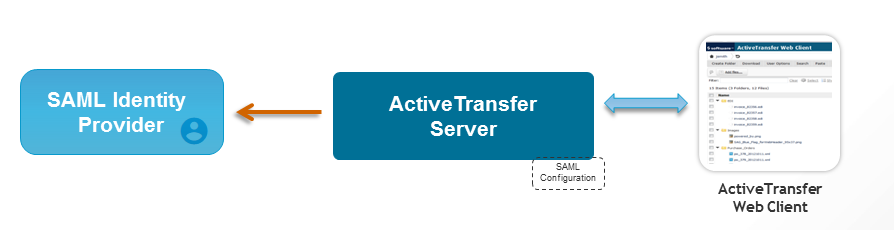
ActiveTransfer serves as the service provider (SP) and communicates between a third-party identity provider (IDP) such as, ADFS, Okta, and so on, to access the target application, ActiveTransfer web client. You can configure ActiveTransfer for exchanging authentication data between the third-party identity provider and ActiveTransfer service provider. The third-party identity provider is the SAML authority and ActiveTransfer is the SAML consumer.
Who are involved?
 ActiveTransfer
 administrator, who performs SSO configurations in
ActiveTransfer.
Identity provider administrator, who creates an identity provider account and manages the SSO configurations for
ActiveTransfer.
ActiveTransfer web client users, who use the
ActiveTransfer web client to perform file transfers.
Visual Model
Preconditions
Keys for generating signed and encrypted SAML requests
IP Metadata XML
User with SSO credentials
User associated with
ActiveTransfer web client through VFS
Redirection URI, which is the URL generated or shared by the identity provider to access the
ActiveTransfer web client
Third party SAML provider such as ADFS, Keycloak, OKTA and so on
Basic Flow

To enable SSO for
ActiveTransfer Web Client
1. Enable the system property mft.server.https.auth.saml to true in the Integration Server_directory \instances\ instance_name \packages\WmMFT\config\properties.cnf file.
2. Enable the Single Sign-On checkbox in the Server Management page for the port.
3. Create a WebSSO configuration file in the Integration Server\instances\default\packages\WmMFT\config\sso.
Note:
You can also provide the configuration filename that represents the port number. For example, websso_2343.properties.
The WebSSO configuration file requires the below key value pairs:
Key | Key value |
SSO_KEYSTORE | C:/softwares/keycloak/keys/keycloak.jks |
SSO_SP_MAPPED_PORT | 2343 |
SSO_SP_ENDPOINT_URL | https://localhost:2343 |
SSO_IDP_METADATA_URL | https://localhost:8443/auth/realms/TestSAML/protocol/saml/descriptor/ |
SSO_KEYSTORE_PASSWORD | password in plain text |
SSO_KEYSTORE_TYPE | JKS |
SSO_SIGN_ALIAS | keycloakssl |
SSO_SIGN_ALIAS_PASSWORD | password in plain text |
SSO_ENCRYPT_ALIAS | keycloakssl |
SSO_ENCRYPT_ALIAS_PASSWORD | password in plain text |
SSO_DEFAULT_ALIAS | keycloakssl |
Important:
If you want to configure Single Sign-On for IDP initiated login, then add the property,
SSO_IDP_INITIATED_REDIRECT_URI for the file (
websso_2343.properties.) with the IDP initiated URL. For example,
SSO_IDP_INITIATED_REDIRECT_URI= https://idp.machine/adfs/ls/idpinitiatedsignon.aspx.
When you configure WebSSO property file, the system generates the
SPMetadata.xml file and downloads the
IPMetadata.xml file in the
sso and
gen directories. However, if you cannot download the IPMetadata.xml file from the IDP server or file path, then copy the content of the hosted IPMetadata XML to the generated IPMetadata.xml file.
You can trigger
wm.mft.sso:initializeSSO from
Designer or Package Management from
Integration Server Administrator console to regenerate the property file.
The SP metadata file needs to be used by the IDP Provider to add the Service Provider.
You can map multiple values of SSO in your system by creating multiple
sso configuration files.
How Does SSO Work When The User Accesses ActiveTransfer Web Client?
1. For the first-time login, the user types the ActiveTransfer web client URL (for example, https://localhost:234) in a web browser.
The first-time logins are preauthenticated by the browser and redirected to the identity provider for login. The SAML identity window appears.
2. The user types the user name and password.
3. An SSO token is sent through the HTTPS port to the identity provider and results in one of the following:
The SAML configuration is authenticated successfully.
ActiveTransfer web client is displayed. The user can switch between the applications without having to log in again.
The SAML configuration is not authenticated successfully and the user authentication fails. In the next login, the user can do one of the following:
Bypass SSO login to the HTTPS port by appending
nosso at the end of the URL. For example,
https://servername:port/nosso.
Login using the user name and password.