Add an HTML Widget to a Workspace
To add fragments of well-formed HTML as a widget in a workspace.
1. Click the Palette menu and expand Utilities.
2. Drag  HTML into the workspace and drop it where you want it in the workspace.
 The widget opens with a canvas area where you can enter text and use basic formatting tools, paste HTML code, or edit the HTML source code.
The HTML editor opens in preview mode where you can enter text and apply formats without seeing the HTML code. The toolbar buttons provide familiar editing capabilities. Fonts are limited to:

Arial

Courier

Tahoma (default)

Times New Roman

Verdana
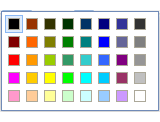
And colors to:
Use the

toolbar to switch the view and edit the source HTML.
3. If available, set Layout options for the gadget:
 Height
 = the height in pixels for this gadget.
 Chrome Options
: set one of the options to control the title bar and border for this gadget:
 Chrome
 = set this option to display both the title bar and the border around this gadget. The title bar also contains the toolbar which allows users to edit inputs or other properties or to minimize/maximize the gadget.
 No Header
 = set this option to hide the title bar, but display a border around this gadget. The title bar also contains the toolbar which allows users to edit inputs or other properties or to minimize/maximize the gadget.
 No Chrome
 = set this option to hide both the title bar and the border around this gadget. The title bar also contains the toolbar which allows users to edit inputs or other properties or to minimize/maximize the gadget.
 Closeable
 = clear this option to hide the Close button in the toolbar.
 Draggable
 = clear this option to keep this gadget always in its current position in the workspace.
 Row Span
 = if this layout has multiple rows, set the number of rows this gadget should fill.
 Column Span
 = if this layout has multiple columns, set the number of columns this gadget should fill.
4. Click Apply to save any layout changes.
5. Click  Save in the HTML Gadget toolbar to save your content and HTML code.
  HTML into the workspace and drop it where you want it in the workspace.
