Configuration for the CAS SSO Solution
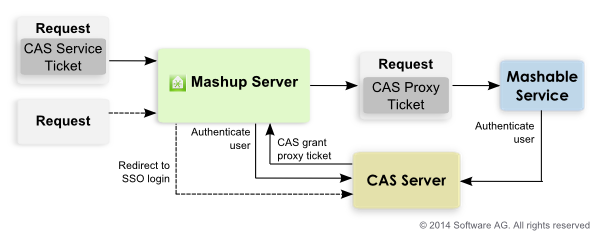
CAS uses tickets in requests that 'secured services' can use to validate the user is authenticated, as shown below:
When users access MashZone NextGen, if they have logged in with CAS, the request includes a service ticket unique to that user. MashZone NextGen validates this ticket to retrieve user ID information needed for authorization.
MashZone NextGen also obtains a proxy granting ticket from CAS to use if the user runs a mashable that is also secured by CAS. This proxy feature allows MashZone NextGen to send the mashable a proxy ticket that the mashable can use to authenticate the user.
If users access MashZone NextGen without first logging in with CAS, MashZone NextGen redirects users to the login page for CAS instead of the default MashZone NextGen login page.
To configure MashZone NextGen authentication using CAS, handle login redirects and enable CAS security profiles for mashables:
1. Enable HTTPS for communication between the MashZone NextGen Server and the CAS Server. You must:
a. Configure the application server hosting the MashZone NextGen Server to listen to separate ports for HTTP and for HTTPS. In addition, you must configure a certificate store for the application server.
See
Configure HTTPS and Certficate Stores in the Application
Server for instructions for Tomcat. If
MashZone NextGen is deployed in another application server, see documentation for your application server for more information.
b. Obtain a certificate for the MashZone NextGen Server and add it to the certificate store.
If the CAS Server uses a self-signed certificate, you must also add this to the certificate store.
2. Open applicationContext-security.xml in any text or XML editor.
This file is located in the web-apps-home/mashzone/WEB-INF/classes folder.
3. Make sure that the import statement for applicationContext-security-authn-cas2.xml is uncommented.
For example:
...
<import resource="applicationContext-security-authn-rememberme.xml"/>
<import resource="applicationContext-scheduler.xml"/>
<!-- import resource="applicationContext-security-authn-x509.xml"/-->
<!-- import resource="applicationContext-security-authn-rsa.xml"/-->
<import resource="applicationContext-security-authn-cas2.xml"/>
...
4. Find the bean with authenticationEntryPointFilter ID and change the value of the defaultAuthenticationModuleName property to cas.
For example:
...
<bean id="authenticationEntryPointFilter"
>
<property name="authentiationModules">
<map>
<entry key="cas" value-ref="casAuthenticationEntryPoint"/>
<entry key="prestohub"
value-ref="prestoDefaultAuthenticationEntryPoint"/>
</map>
</property>
<property name="defaultAuthenticationModuleName" value="cas"/>
</bean>
...
5. Find the bean with preauthAuthProvider ID and:
a. Comment out the preauthenticated user details property based on UserDetailsByNameServiceWrapper.
b. Uncomment the preauthenticated user details property based on casAuthenticatedUserDetailsService.
For example:
<bean id="preauthAuthProvider"
class="org.springframework.security.providers.preauth.PreAuthenticatedAuthenticationProvider">
<property name="preAuthenticatedUserDetailsService"
ref="casAuthenticationUserDetailsService"/>
<!-- property name="preAuthenticatedUserDetailsService">
<bean id="userDetailsServiceWrapper"
class="org.springframework.security.userdetails.UserDetailsByNameServiceWrapper">
<property name="userDetailsService" ref="userRepositoryAccessAdapter"/>
</bean>
</property -->
</bean>
6. Save your changes to applicationContext-security.xml.
7. Open applicationContext-security-filters-default.xml in any text or XML editor.
This file is located in the web-apps-home/mashzone/WEB-INF/classes folder.
8. Make sure that the line beginning with /**/cas/** is not commented out. Save your changes, if any.
9. Set configuration properties to redirect users to the CAS login form if requests attempt to access MashZone NextGen directly without a valid CAS ticket. You must:
a. Open the sso.properties file in any text editor.
This file is located in the web-apps-home/mashzone/WEB-INF/classes folder.
b. Set the following properties for the MashZone NextGen Server:
 prestoServerInfo.host
 = the host name or IP address for this
MashZone NextGen Server.
prestoServerInfo.httpPort = the HTTP port for this
MashZone NextGen Server. This is 8080 if you installed
MashZone NextGen with default ports.
prestoServerInfo.httpsPort = the HTTPS port for this
MashZone NextGen Server. For Tomcat, 8443 is the default HTTPS port.
c. Set the following properties for the CAS Server:
ssoServerInfo.host = the host name or IP address for this CAS Server.
If the CAS server is deployed at https://cas.myOrg.com:9443/cas, for example, the host would be cas.myOrg.com.
ssoServerInfo.httpsPort = the HTTPS port for this CAS Server.
If the CAS server is deployed at https://cas.myOrg.com:9443/cas, for example, the HTTPS port would be 9443.
ssoServerInfo.rootPath = the relative path, starting from the host and HTTPS port for this CAS Server.
If the CAS server is deployed at https://cas.myOrg.com:9443/cas, for example, the root path would be cas.
ssoServerInfo.loginPath = the relative path, starting from the root path where this CAS server is deployed, to the login page where users should be redirected if they do not have a valid CAS ticket.
If the URL for your CAS login page is https://cas.myOrg.com:9443/cas/login, this property should be login as the rest of the URL is set in other properties.
d. Save your changes.