Deploy API Control Plane using Helm
This use case outlines the procedure to deploy API Control Plane using Helm.
Pre-requisites

Open Rancher Desktop, expand
File >
Preferences >
Kubernetes. Select the
Enable Kubernetes check box and unselect the
Enable Traefik check box.

To deploy
API Control Plane using Helm
1. Create a Kubernetes namespace for API Control Plane using the following command in the command prompt:
kubectl create namespace control-plane
Here, the namespace is created in the name control-plane.
The output must be as follows:
namespace/control-plane created
2. Create a Kubernetes secret for pulling Docker images with the below command by replacing [Your git username] and [Your PAT] with your actual credentials in the control-plane namespace.
kubectl create secret docker-registry regcred -n control-plane --docker-server=sagcr.azurecr.io --docker-username=[Your git username] --docker-password=[Your PAT]
The output must be as follows:
kubectl create secret docker-registry regcred -n control-plane --docker-server=sagcr.azurecr.io --docker-username=sowkarthika-KR-softwareag-com --docker-password=ghp_pGkBgk8KxsLMfHwn8BtI4atGwrNh8z8CLkJ0
secret/regcred created created
3. Set up the configurations to deploy API Control Plane.
API Control Plane deployment configurations are available in the values.yaml file located at webmethods-api-control-plane\deployment\helm in your local cloned repo. You can use the configurations as is or update based on your requirements.
Important properties to configure in the values.yaml file:
Property | Description |
imageName | Specify the docker image for the corresponding microservices (assetcatalog, engine, ingress, and UI). By default, the latest docker image of the microservices to be pulled from the container registry are specified. |
imageTag | Specify the image version number for the corresponding microservices (assetcatalog, engine, ingress, and UI). By default, the latest docker image version of the microservices to be pulled from the container registry are specified. |
domainName | Provide a value that matches the hostname of the Kubernetes namespace where you are deploying API Control plane. Default value: my-control-plane |
4. Run the helm deployment scripts.
To deploy API Control Plane with the default configurations specified in GIT Hub:
a. Go to webmethods-api-control-plane\deployment\helm using the following command:
cd webmethods-api-control-plane\deployment\helm
b. Run the following command:
helm upgrade --install --create-namespace --namespace control-plane --wait --timeout 5m0s control-plane .
The output must be as follows:
Release "control-plane" does not exist. Installing it now.
NAME: control-plane
LAST DEPLOYED: Fri Dec 7 11:37:53 2023
NAMESPACE: control-plane
STATUS: deployed
REVISION: 1
TEST SUITE: None
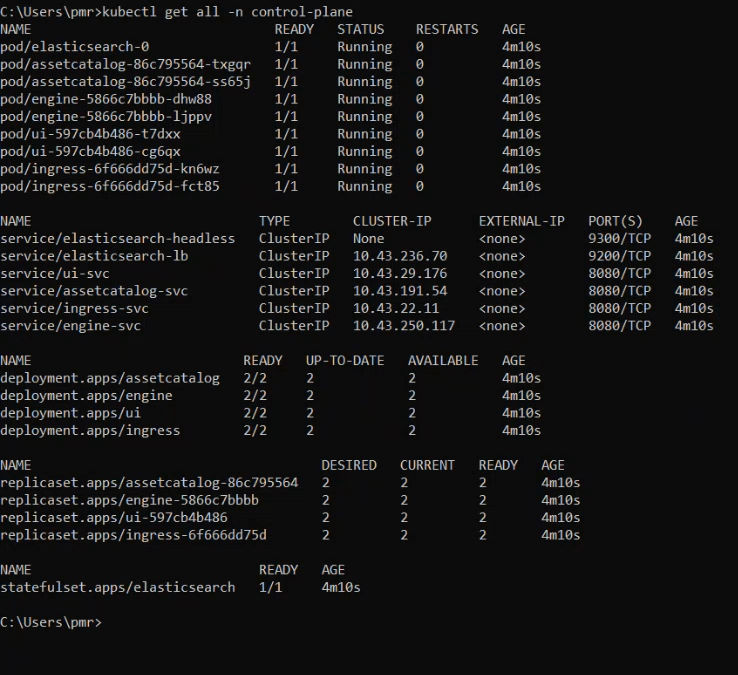
5. Run the following command to verify the pods running status:
kubectl get all -n control-plane
The output must be as follows:
Wait until the status of all pods turn Running.
6. Run the following command to get the IP address of the Kubernetes namespace that you have created.
kubectl get nodes -o wide
The output must be as follows:

Note:
Ensure that the IP address of the Kubernetes namespace displayed in the INTERNAL-IP and the domainName specified in the values.yaml are added to the to the hosts file located in the C:\Windows\System32\drivers\etc\hosts if you are deploying API Control Plane on Windows . For example, 172.18.145.29 my-control-plane.
Ensure to perform this step each time you restart your machine, as the IP address undergoes changes.
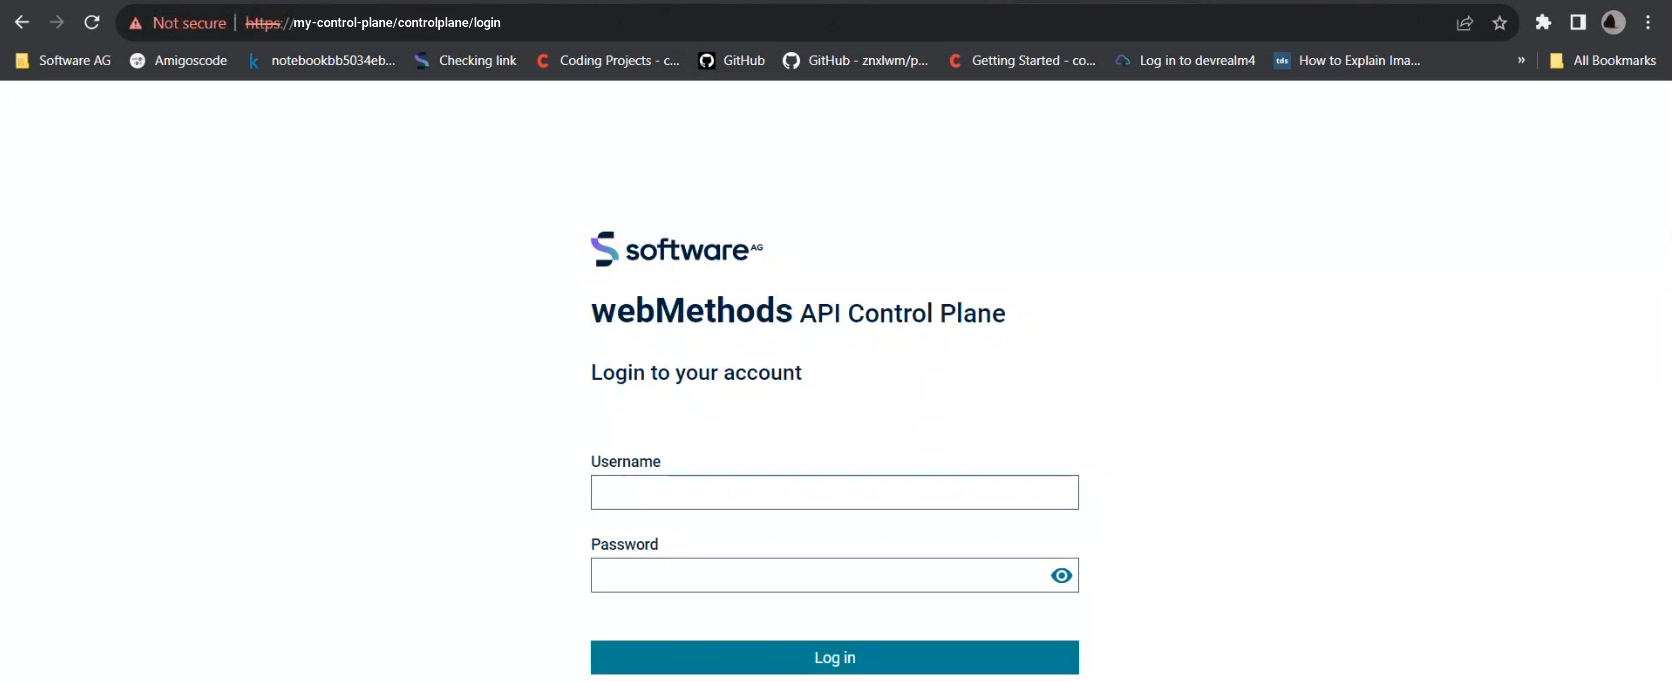
7. Access API Control Plane.
a. Access API Control Plane using https://my-control-plane.
my-control-plane is the domainName specified in the webmethods-api-control-plane\deployment\helm file.
b. Login with the following credentials: Username - Administrator, Password - <default_password>.
API Control Plane login page appears as follows:
8. To stop API Control Plane:
a. Go to webmethods-api-control-plane\deployment\helm using the following command:
cd webmethods-api-control-plane\deployment\helm
b. Run the following command:
helm uninstall control-plane -n control-plane
The output should be as follows:
release "control-plane" uninstalled
9. Optional. To deploy API Control Plane enabling Open Telemetry using Jaeger UI with Helm:
Open telemetry allows you to monitor the performance of API Control Plane through tracing. It enables you to discover, analyse, and debug issues before it adversely impacts the application. It provides insights into the lifecycle of each request reaching API Control Plane.
Note:
Ensure to stop previously deployed API Control Plane before you follow this step to deploy API Control Plane with Open telemetry.
a. Go to webmethods-api-control-plane\deployment\helm using the following command:
cd webmethods-api-control-plane\deployment\helm
The configurations for API Control Plane deployment with open telemetry support are available under jaegertracing: section in the values.yaml file.
b. Enable the jaeger tracing by updating the line 110 in the values.yaml file as true as shown in the following snippet:
jaegertracing:
enabled: true
name: jaeger-tracing
#--- Jaeger Tracer image name
imageName: jaegertracing/all-in-one
#--- Jaeger Tracer image tag
imageTag: latest
#--- Jaeger Tracer image replicas number
replicas: 1
#--- Port to run Jaeger.
port : 4317
uiPort: 16686
extPort: 30007
storage: 2Gi
resources:
# This is just an example. This should be a conscious choice to the user.
limits:
# -- Maximum CPU resource units(1 CPU unit is equivalent to 1 physical CPU core, or 1 virtual core)
cpu: 100m
# -- Maximum Memory resource units
memory: 128Mi
requests:
# -- Minimum CPU resource units(1 CPU unit is equivalent to 1 physical CPU core, or 1 virtual core)
cpu: 100m
# -- Minimum Memory resource units
memory: 128Mi
# - Enable to use volume mapping for Jaeger
volume:
enabled: false
className: ""
size: 3Gi
gainsight:
enabled : false
tenant:
name: "ACME Inc"
cloudProvider: "Azure"
region: "US West Oregon"
plan: "Free"
stage: "Staging"
key: "AP-BCBBKBNAYWW6-2-2"
c. Access Jaeger UI through the extPort value configured in the values.yaml file.
Example: https://localhost:3007.
Troubleshooting Tips:
1. If the status of the microservices do not turn healthy, run the following command to check if the pods are created and running:
kubectl get pods -n control-plane