
If any reports are set to save history data to the Adabas Review repository, data will accumulate that needs to be managed. This document covers the following topics:
The List History Reports (LH) function lists reports that have written history data to the Adabas Review repository, and provides commands to view history data, download it to a personal computer, submit it for hard copy printing, and purge it. In addition, you may edit the report definition and its corresponding display program.
 To access the List History Reports function:
Enter the code LH on the command line.
The Adabas History Reports screen is displayed:
12:57:33                  A D A B A S  -  R E V I E W                2020-02-10
REVIEW-DB (10,252)             History Reports                Hub Target: 296


  Sel     Report Name                     Recs   Rpts   Start Date   End Date
+-----------------------------------------------------------------------------+
! __  APPLICATION FILE FIELD USAGE          25      2   2015-11-18 2015-11-18 !
! __  COMMAND LOGGING                        6      1   2013-06-18 2013-06-18 !
!                                                                             !
!                                                                             !
!                                                                             !
!                                                                             !
!                                                                             !
!                                                                             !
!                                                                             !
!                                                                             !
!                                                                             !
!                                                                             !
+-----------------------------------------------------------------------------+


Command: ______________________________________________________________________
Enter-PF1---PF2---PF3---PF4---PF5---PF6---PF7---PF8---PF9---PF10--PF11--PF12---
Help Exit + Menu |
An explanation of the Adabas History Reports screen is provided in the following table:
| Heading | Explanation |
|---|---|
| Sel | Selection line. Commands are entered on the selection line preceding the report name. For a list of available commands, enter a "?" on the selection line. |
| Report Name | Name of the report. |
| Recs | Records. Indicates the number of records written to the Adabas Review repository by this report. |
| Reports | Indicates the number of intervals that history data was written for the report. |
| Date Range | Starting and ending dates in which the report was run. If the "Reports" column indicates more than one interval, the dates are inclusive from all intervals. |
PF8 has been provided as a scroll key. If more than one screen of report names exists, PF8 or (+) scrolls the list forward.
To issue a command from the Adabas History Reports
screen:
Enter the command on the selection line preceding the report name.
You may use the following commands:
If the list of history reports (LH function) shows a report name as having more than one report, it means that the report has collected data on more than one occasion. Data has been stored on the history file each time the report was active.
To view information about each time a report has collected
data:
Enter the command EX on the selection line preceding the report name.
The Expanded History List screen that appears is similar to the one shown below:
12:58:16                  A D A B A S  -  R E V I E W                2020-02-10
REVIEW-DB (10,252)             History Intervals              Hub Target: 296

Report: APPLICATION FILE FIELD USAGE                                     (1/11)
  Sel Interval-Start       Interval-Stop             Recs              Nucid
+-----------------------------------------------------------------------------+
| __  2019-11-20 07:42:29  2019-11-20 07:43:18        651  compressed  00000  |
| __  2019-11-20 16:59:55  2019-11-20 16:59:56         93              00000  |
| __  2019-11-20 17:01:31  2019-11-20 17:02:11         66              00000  |
| __  2019-11-20 17:03:23  2019-11-20 17:03:23         93              00000  |
| __  2019-11-20 17:03:40  2019-11-20 17:03:40         93  (1)         00000  |
| __  2019-11-20 17:03:40  2019-11-20 17:03:40         93  (2)         00000  |
| __  2019-11-20 17:03:40  2019-11-20 17:03:40         93  (3)         00000  |
| __  2019-11-20 17:03:40  2019-11-20 17:03:49         93              00000  |
| __  2019-11-20 17:03:49  2019-11-20 17:04:28         93              00000  |
| __  2019-11-20 17:04:28  2019-11-20 17:05:17         58              00000  |
| __  2019-11-20 17:05:43  2019-11-20 17:06:24         59              00000  |
|                                                                             |
+-----------------------------------------------------------------------------+

Command: ______________________________________________________________________

Enter-PF1---PF2---PF3---PF4---PF5---PF6---PF7---PF8---PF9---PF10--PF11--PF12---
Help Exit Desc Menu |
Notes:
(1), (2) etc. in the Expanded
History List.
PF7 (-) and PF8 (+)
are enabled. Also the line commands TOP, BOT,
+, +nnnn, -, -nnnn are
available.
(1/11) is displayed.
The compress history (CH) command causes all report occurrences within a date range to be summarized into a single report occurrence. The original report occurrences will then be purged.
This section covers the following topics:
Using the CH command significantly reduces the number of records used to represent the report. However, since the individual report occurrences are deleted, you will lose the ability to view this data by different date ranges. All original report occurrences become one summarized report occurrence.
If the CH command terminates
abnormally for any reason, you can use the RESET HISTORY command to reset the file
to a consistent state.
Once a date range has been compressed, it can be "recompressed" along with new report occurrences. For example, all occurrences of a report that happen during a month can be compressed into a monthly summary. At the end of the year, these monthly summaries can be compressed into an annual summary report.
Unlike viewing history reports by date range, compressed reports can display percentage and rate fields, if they are viewed from the Expanded History List.
All report occurrences that have been compressed will show the text "compressed" in the Expanded History List.
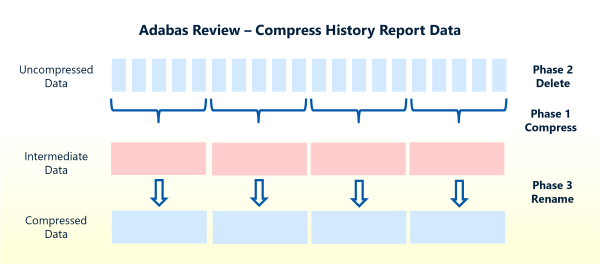
The compression is done in three phases:
In phase 1, all report occurrences within the selected date range are summarized into accumulated intermediate report occurrences.
In phase 2, the uncompressed original data is deleted.
In phase 3, the intermediate data is renamed to the original name so that it can be treated like normal history data.
To compress accumulated history data:
From the History Reports screen, enter the CH command to compress history data for a specific report and press ENTER .
You are prompted to enter an interval date range for the records to be compressed.
Notes:
Enter the date range and press ENTER.
A message is displayed, informing that original individual date ranges can no longer be viewed.
Enter "Y" and press ENTER to continue
Or:
Enter "N" and press ENTER to cancel the
compress command and to return to the History Reports
screen.
When you enter "Y", you are prompted to enter an ET (End Transaction) factor.
Enter an ET factor and press ENTER.
The ET factor describes the number of Adabas calls that will be performed
before an ET (end transaction) is issued. The default value is 25.
If you enter a value that is less than 5, 5 will be
assumed. The value must be small enough to avoid an Adabas hold queue overflow
(response code 9).
Messages report the progress of the history data compression. The final message, "History report compression complete", indicates that the compression has completed.
If the CH (compress history) command terminates abnormally
for any reason, the history file will be in an inconsistent state. The file is then
locked against further compression attempts for any report by any user. To remove this
lock and to reset the file to a consistent state, you can use the RESET
HISTORY command.
Depending on the phase in which the CH command terminates,
RESET HISTORY performs the following tasks:
If the compression fails in phase 1, RESET HISTORY
deletes all intermediate records. This resets the history file to the state it was
before the compression. The compression can be repeated.
If the compression fails in phase 2, RESET HISTORY
reads the intermediate records. For each intermediate record, the command deletes
the corresponding original records.
If the compression fails in phase 2 or 3, RESET
HISTORY renames the intermediate records. This finalizes the
compression procedure. The compression does not have to be repeated.
You are not required to backup and restore the history file when you run
RESET HISTORY as no information is lost in the
process.
Caution
Do not reset the history file while a CH command is running.
To reset the history file:
Enter RESET HISTORY in the SYSREVDB command line and
press ENTER.
The RESET HISTORY Command screen indicates the task which the
RESET HISTORY command will perform, depending on
the phase in which the compression failed.
                        RESET HISTORY Command

  Resetting the history file to the state before the compression.

  The history file is currently locked by
    User ..... UID
    Program .. CH-00078
    Report ... MY-HIST-02
    Date ..... 2024-02-27 14:07:33
    Phase .... 1

Press ENTER to continue, PF2 for preview, PF3 to exit |
Press ENTER to reset the history file.
Or:
PF2 for preview.
When you start the preview, the program counts how many records would be
affected and shows the expected results in the preview page. On the preview
page, you can press ENTER to reset the history file, or
PF3 to cancel the RESET HISTORY
command.
Or:
PF3 to cancel the RESET HISTORY command.
At the end of the reset, the history file is unlocked. The final RESET
HISTORY Command screen shows how many intermediate records have been
deleted (if failed in phase 1), how many uncompressed records have been deleted
(if failed in phase 2), or how many compressed records have been repaired (if
failed in phase 2 or 3).
The data accumulated by a history report is purged using the PH command. You can use the PH command on the History Reports screen or on the History Reports (Expanded List) screen.
To purge accumulated history data from the History
Reports screen:
On the History Reports screen, enter the PH command next to the particular report from which you want history data purged.
The Purge History Reports By Date Range screen appears.
12:59:29                *****   R E V I E W   *****                  2020-02-10
                     Purge History Reports By Date Range


        +------------------------------------------------------------+
        |  Report Name ........... COMMANDS BY HOUR________________  |
        |  Start Date ............ __________   (YYYY-MM-DD)         |
        |  End Date .............. __________   (YYYY-MM-DD)         |
        |  Records Before ET ..... __25                              |
        +------------------------------------------------------------+


Command:________________ ______________________________________________________
Enter-PF1---PF2---PF3---PF4---PF5---PF6---PF7---PF8---PF9---PF10--PF11--PF12---
Help Exit Menu |
In the Start Date field, enter the start date (in YYYY-MM-DD format) from which you want history data purged. If you want to purge history data from the beginning of all data collected for this report type, type an asterisk (*) as a wild card in the field.
In the End Date field, enter the last date (in YYYY-MM-DD format) to which you want history data purged. If you want to purge history data to the end of all data collected for this report type, type an asterisk (*) as a wild card in the field.
Notes:
Once you have supplied dates for the purge operation, press PF6 to run the purge.
Confirm the purge request, if required.
To purge accumulated history data from the History
Reports (Expanded List) screen:
From the History Reports screen, enter the EX command to expand the list so that all occurrences for the particular report are displayed.
From the expanded list, select the occurrence you want to delete, type the PH command on the selection line preceding the report name, and press ENTER.
Depending on the setting in your profile, you may be prompted to confirm the purge request.
Confirm the purge request, if required.
