Publisher App for Loosely-Coupled Interactions
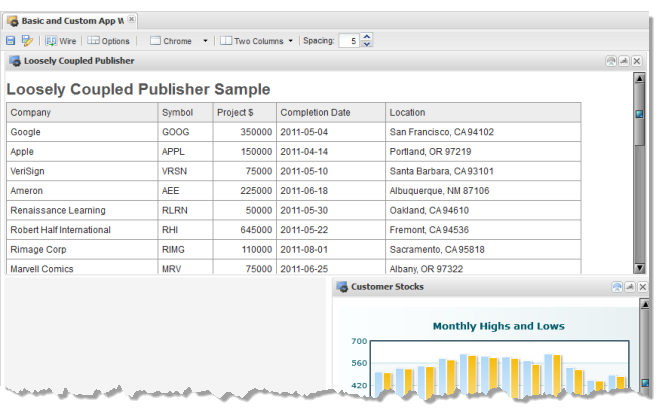
This section builds a sample custom app named Loosely Coupled Publisher. This custom app runs a mashup to combine customer and project information and produce a summary list of current customer projects.
Loosely Coupled Publisher publishes two topics when users select a customer project from the list by clicking any cell with customer data. The steps to create this sample app include:
HTML and CSS for the Loosely-Coupled Publisher Sample
The HTML for Loosely Coupled Publisher has a simple heading and the rough outline for the table that will be populated with customer project information:
<div
>
<h2>Loosely Coupled Publisher Sample</h2>
<table
>
<thead>
<tr>
<th>Company</th>
<th>Symbol</th>
<th>Project $</th>
<th>Completion Date</th>
<th>Location</th>
</tr>
</thead>
<tbody
></tbody>
</table>
</div>
The CSS is also very simple. It is important, however, that all of the styles are class-based to ensure that they do not affect any other apps that may be used in workspaces with this custom app.
div.loose-wiring-sample { font-family: Arial, Helvetica, sans-serif; }
div.loose-wiring-sample h2, div.loose-wiring-sample h3 { font-weight: bold;
color: #555; padding-top: 10px; }
div.loose-wiring-sample div { font-size: 9pt; margin: 5px; }
table.projectTable { border: 1px solid #999999; border-collapse: collapse;
width: 90%; }
table.projectTable thead { background-color: #ededed; font-size: 9pt; }
table.projectTable th, table.projectTable td { padding:5px;
border: 1px solid #999999; }
Declaring Publish Topics in the App Specification
In addition to the basic requirements for an App Specification for a custom app, custom apps that support loosely-coupled interactions must declare the topics that the app publishes and the payload for messages published to that topic in their App Specification.
To declare topics, add a <topics> section, with a <topic> child for each topic that an app publishes or subscribes to:
<?xml version="1.0" encoding="UTF-8"?>
<app name="Loosely Coupled Publisher" id="Loosely_Coupled_Publisher"
jsclass="Sample.LooselyCoupledPublisher"
minimizable="false" draggable="false" height="auto" width="600">
<title>Loosely Coupled Publisher Sample</title>
<description>Sample demonstrates an App that publishes two separate events for use in loosely-coupled interactions. </description>
<dependson>
<resource name="CustomerProjectSummary" operation="runMashup"
type="service"/>
</dependson>
<properties/>
<presto-meta name="presto.desktopCompatible" type="text">true</presto-meta>
<presto-meta name="presto.phoneCompatible" type="text">false</presto-meta>
<presto-meta name="presto.tabletCompatible" type="text">false</presto-meta>
<topics>
<topic name="Sample.location" datatype="object" publish="true">
<description>Selected client location information</description>
<properties>
<property name="city" datatype="string"/>
<property name="state" datatype="string" />
<property name="zip" datatype="number"/>
</properties>
</topic>
<topic name="Sample.stock" datatype="object" publish="true">
<description>Selected client stock and project information</description>
<properties>
<property name="company" datatype="string" />
<property name="symbol" datatype="string"/>
</properties>
</topic>
</topics>
<requires>
<require name="jquery-tmpl" type="library" version="1.0"/>
<require src="js/app.js" type="script"/>
<require src="css/app.css" type="css"/>
<require src="html/app.html" type="html"/>
</requires>
</app>
Each topic has a name and a datatype which can be either a simple type or
object, for complex message payloads, or
any. You define the payload of the messages that the app publishes in <properties> within <topic>. For more details on declaring topics and message payloads, see
Declare App Topics and Payloads.
This App Specification also includes the basic changes to the default specification, such as id, name, and jsclass, and has added the jQuery Templating library in <requires>. It also uses the <dependson> section to declare the dependency to the mashup that produces combined customer and project data and has the appropriate <presto-meta> device compatibility flags set.
The Initial Constructor for the Loosely-Coupled Publisher Sample
The constructor for this sample custom app handles the basic tasks:

Declaring a namespace

Getting the root node for the app

Getting references to nodes of interest within the app

Defining the jQuery template that will be used to generate table rows

Connecting to
MashZone NextGen and invoking the mashup to retrieve project information

And finally rendering the data.
Presto.namespace("Sample");
Sample.LooselyCoupledPublisher = function( app ) {
var root = jQuery( app.getRootElement() ),
projectTable = root.find(".projectTable"),
projectBody = projectTable.find(".tblBody"),
rowMarkup = "<tr class='project'>"+
"<td class='company'>${customer_company}</td>"+
"<td class='symbol'>${customer_symbol}</td>"+
"<td class='projectValue' align='right'>${project_value}</td>"+
"<td class='projectEta'>${project_eta}</td>"+
"<td>"+
"<span class='city'>${customer_city}</span>, "+
"<span class='state'>${customer_state}</span> "+
"<span class='zip'>${customer_zip}</span>"+
"</td>"+
"</tr>";
rowTemplate = jQuery.template("rowTemplate", rowMarkup);
//invoke mashup
prestoUrl = "/presto/edge/api/rest/CustomerProjectSummary/runMashup?x-presto-resultFormat=json";
this.onLoad = function(app) {
app.getConnection().request({
url: prestoUrl,
type: "get",
contentType: "application/x-www-form-urlencoded",
data: ""
}, {
onSuccess: function(response) {
if (response.result && response.result.customer_project) {
var projects = response.result.customer_project;
projectBody.empty();
jQuery.tmpl(rowTemplate, projects).appendTo(projectBody);
} else {
projectTable.hide();
}
},
onFailure: function(e) {
app.handleException({
message: 'Failed to retrieve project info: ' + e.message
});
}
});
};
};
Adding the Row Click Handler to Publish Messages
In addition to rendering mashup data, this custom app must publish messages to two topics when a user selects a project by clicking on a row in the table. To do this the app needs an event handler to build and publish the messages:
...
rowTemplate = jQuery.template("rowTemplate", rowMarkup);
//inner function to publish topics for row click
onRowClick = function(event) {
var row = jQuery(this),
customer = row.find("td.company").text(),
symbol = row.find("td.symbol").text(),
city = row.find("td span.city").text(),
state = row.find("td span.state").text(),
zip = row.find("td span.zip").text();
app.publish("Sample.stock", {
"company": customer,
"symbol": symbol
});
app.publish("Sample.location", {
"city": city,
"state": state,
"zip": zip
});
},
The event handler receives an event object for the user action, in this case the click event, and uses this to find the data needed to build each message and publish them using the publish method from the App API.
This handler must also be bound to each row of data after the rows have been generated in the onSuccess callback:
..
app.getConnection().request({
...
}, {
onSuccess: function(response) {
if (response.result && response.result.customer_project) {
var projects = response.result.customer_project;
projectBody.empty();
jQuery.tmpl(rowTemplate, projects).appendTo(projectBody);
//bind handler to row click event
projectBody.find("tr.project").click(onRowClick);
} else {
projectTable.hide();
}
},
onFailure: function(e) {
app.handleException({
message: 'Failed to retrieve project info: ' + e.message
});
}
});
...
Wiring a Published Topic in Mashboard
You can test the Loosely Coupled Publisher app using the index.html file that comes in the standard custom app template. This will invoke the mashup and render a table of project data. However, with loosely-coupled interactions, you cannot test the interaction until you have wired the app to another app in a workspace in Mashboard.
First, upload
Loosely Coupled Publisher or your custom app using the
App Editor (for more information, see
Create Custom Apps from the Base App Package). To test the interaction:
1. Select Visualize > Mashboard in the MashZone NextGen Hub main menu to open Mashboard.
2. Start a new workspace. For this sample, use a Table layout with one cell in the top row and two cell in the second row.
3. Drag Loosely Coupled Publisher or your custom app into the workspace. For this example, put Loosely Coupled Publisher in the top row of the workspace.
4. Drag another app that is appropriate for the interaction and that has at least one subscription topic.
Note: | Basic apps that have input parameters automatically have one subscription topic, named propertychange. |
For this sample, we will use a basic app named Customer Stocks and drag in into a cell in the second row of the workspace.
Customer Stocks uses a mashup with an input parameter for one stock symbol to retrieve monthly data for the high and low values for that stock which is shown in a column chart view.
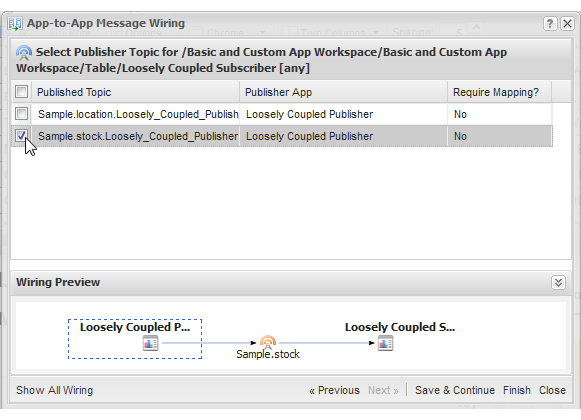
5. Click
 Wire
Wire and choose the subscription topic that should receive a published message from
Loosely Coupled Publisher or your custom app.
6. Click Next and choose the publish topic to wire to this subscription. In this sample, choose the Sample.stock topic from Loosely Coupled Publisher.
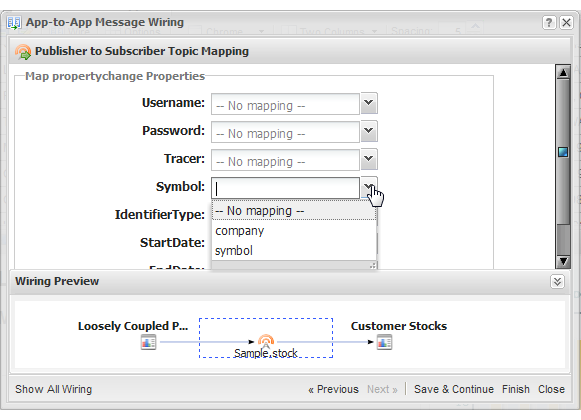
7. If the published message payload does not match the subscription message payload, click Next to map the appropriate message properties. In this sample, you must match symbol from the published message to Symbol in the subscription message:
8. Click Finish.
9. To test the interaction, perform the action in the publisher app that should publish a message. In this sample, simply click on one of the project rows in Loosely Coupled Publisher. The chart in Customer Stocks updates for each selection to show 12 months of stock for the selected customer.
10. Save this workspace as Basic and Custom Apps Workspace.
To test the other publish topic in Loosely Coupled Publisher, we first need to build a custom app that supports loosely-coupled interactions.


